

CMS: Using Reference Fields to Display Content from Multiple Collections
7 min
In this article
- Step 1 | (Optional) Change the primary field in the collection you want to reference
- Step 2 | Add a reference field to your main collection
- Step 3 | Connect elements to your referenced collection fields
- FAQs
Reference fields allow you to associate an item in one collection with an item in another collection. This lets you connect elements such as repeaters, galleries, and tables to fields from multiple collections, within the same dataset.
When you add a reference field to your collection, you choose which collection to reference. Then, for each item in your collection, you choose a related item to associate from the referenced collection. As a result, you can display details about your items from fields that are stored in multiple collections within the same repeater, gallery, or table. When connecting the elements, you can choose from any of the referenced collection's supported fields in the dataset's connection options.
Advantages of using reference fields:
- Reference fields let you easily create pages that use info from all your referenced collections. This is especially useful in galleries and tables that can only connect to one dataset, and in repeaters that you want to show details from multiple collections.
- Reference fields help you avoid duplicating your data. They allow you to store information one time and then reference it wherever you need it.
- Reference fields help you maintain data integrity across your collections. Since the collections are intrinsically connected with each other, any change in the field values is automatically reflected in the referenced data.
Do you need to associate items with multiple items from another collection?
If so, use multi-reference fields instead of reference fields. Multi-reference fields create a two-way connection between the collections and allow the items to reference and be associated with more than one item from each collection.
Step 1 | (Optional) Change the primary field in the collection you want to reference
The primary field of the collection you want to reference plays an important role. Later, when you select the items that you want to reference in your reference field, you'll see the values from the primary field. If needed, you can make a different field the primary field to help you see which items you're choosing to reference.
Important:
By default, the primary field is used in your collection's dynamic item page URL. Changing the primary field will also change your dynamic page URLs if the primary field is used in the URL slug structure of your dynamic pages. This can cause links to your dynamic pages to break. Keep this in mind before changing your primary field. Learn more about URL slug structures.
To change the primary field of the collection you want to reference:
- Go to CMS in your site's dashboard. Alternatively, you can click CMS
 in your editor, then click Your Collections.
 - Click the collection that includes the field you want to reference. We'll call this your 'referenced' collection.
- (If the field you want to reference is not the primary field) Click the title of the field you want to reference and select Make primary.

Step 2 | Add a reference field to your main collection
Add a reference field type to the 'main' collection in which you want to reference another collection. Later, when selecting fields to connect in your dataset, the referenced collection's fields appear indented under the reference field name, followed by the collection name in parentheses: {Reference field name} {Collection name}
To add a reference field to your main collection:
- Go to CMS in your site's dashboard. Alternatively, you can click CMS in your editor, then click Your Collections.
- Select the main collection where you wish to reference the primary field from your referenced collection.
- Add a reference field to your collection:
- Click Manage Fields.
- Click + Add Field.
- Select the Reference field type and click Choose Field Type.
- Enter the Field name.
- (Velo only) Edit the Field ID used in your site's code, which cannot be changed later.
- Click the Reference Collection drop-down and select your referenced collection.
- (Optional) Enter Help text that will appear in a tooltip at the top of your collection.
- Click Save.

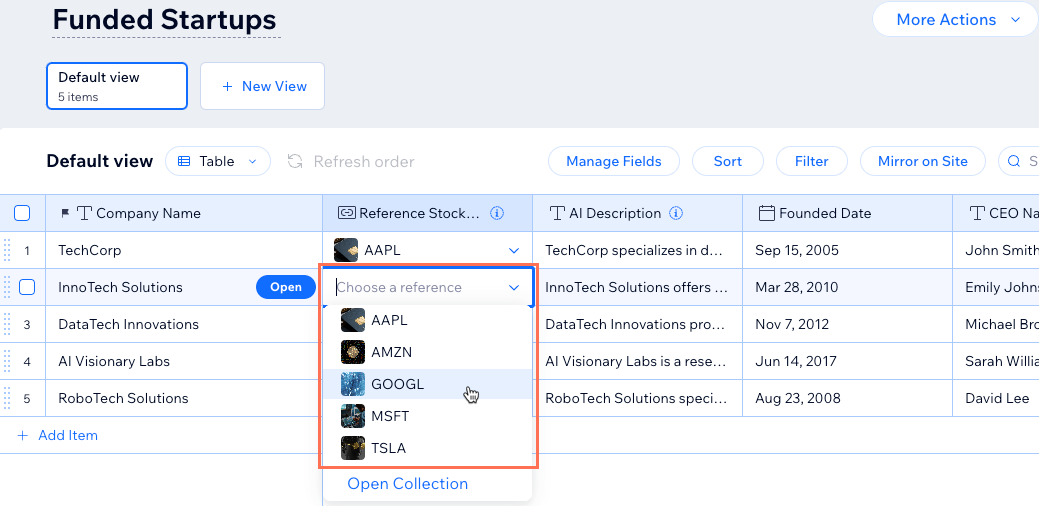
- Select a reference for each item in your collection:
- Click the reference field for the first item in your collection.
- Select the primary field from your referenced collection that corresponds to the item.
Tip: Use your keyboard to search for the fields you want to select. You can also click Open Collection to view the referenced collection. - Repeat these steps for each item in your collection.
Step 3 | Connect elements to your referenced collection fields
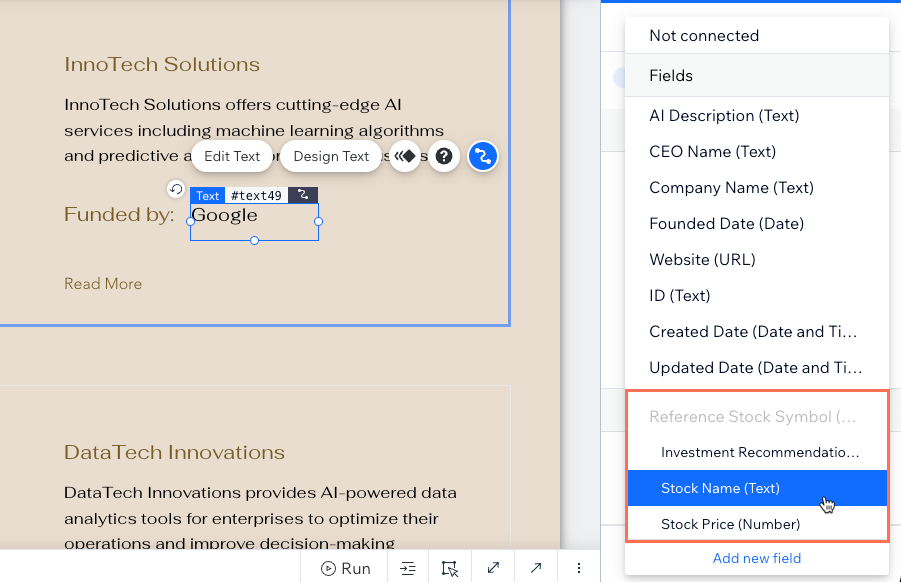
Connect elements such as repeaters, galleries, and tables to the relevant collection fields to display the field values on your site. When choosing which collection fields to connect in the dataset, you'll see fields from the referenced collection indented under your reference field name.
To connect elements to your referenced collection fields:
Wix Editor
Studio Editor
- Go to your editor.
- Click the element you want to connect to the CMS (e.g. repeater, gallery, table).
- Click the Connect to CMS icon
 .
. - (Certain input elements only) Choose how you want to use the element:
- Filter content: Let site visitors filter page content.
- Collect content: Collect content submitted by site visitors.
- Click the Choose a dataset drop-down and select a dataset that connects to your main collection. Alternatively, click Add a Dataset, then choose your main collection, give the dataset a name and click Create.
- Click the relevant drop-down under Connections and select the field you want to display in the element. Fields from your referenced collection appear indented in the list under your reference field.
- Repeat these steps for each element you want to connect to the referenced collection fields.
- Click Preview at the top right to test your connections.
- Click Publish if you are ready to make the changes go live.
FAQs
Click below for answers to common questions about reference fields.
Can I reference fields from the same collection?
What happens if I delete an item from a referenced collection?
What happens if I change the primary field in my referenced collection?
What is the URL slug structure?
