

Wix Editor: Adding a Custom Element to Your Site
5 min
In this article
- What are custom elements?
- Adding the custom element
- Setting the custom element's attributes
- Guidelines and limitations
- Custom element example
Use the custom element to add visible content to your site, and to design elements with additional CSS capabilities.
Important:
We cannot provide support for external codes that were not created or tested by Wix. If you are experiencing an issue with your code snippet, please contact the provider directly.
What are custom elements?
Custom elements allow you to create custom HTML tags that you can use on your Wix site. The custom elements work across all Wix-supported browsers, and can be used with any JavaScript ES6 library or framework that works with HTML 5.
You might want to use a custom element to:
- Design your own elements that are not yet available in the Wix Editor's Add panel or via apps.
- Design elements with additional CSS capabilities, such as CSS animation, countdown animation, breadcrumbs, tooltips, tags, charts, quotes, cursor changes and scroll interactions.
- Change the height of your element on your published site, such as to avoid layout collisions on the page.
- Improve performance (compared to iframe-based components). This largely depends on the implementation of the custom element.
Note:
You can use custom elements from third-party sources, just make sure to update the Tag Name in Properties when adding the custom element to your page.
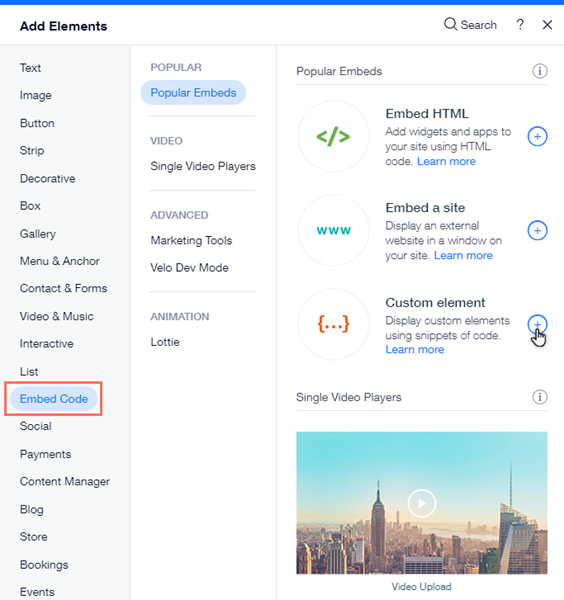
Adding the custom element
- Click Add Elements
 on the left side of the Editor.
 - Click Embed Code.
- Click the Custom Element to add it to your page.
- Click Choose Source.
- Select Server URL and enter the URL, including the file name.
Note: If you are using Velo, you can click Velo File. - Enter the Tag Name.
Note:
All elements must be defined in the custom elements registry for the page. The tag name is the name used when registering the element. You can find the tag name in the customElements.define() line in the JavaScript file.
Setting the custom element's attributes
Important:
Attributes are not open to all users yet.
Define the HTML attributes on the custom element's DOM node. Make sure to add code to acknowledge and handle these defined attributes in the code of the custom element.
- Click Set Attributes on the custom element.
- Click New Attribute.
- Name the attribute, for example, "rotation" or "width".
- Assign the value for the attribute, for example, 45.
Note:
You can also edit and remove a custom element's HTML attributes.
Guidelines and limitations
- For security reasons, to use the custom element, you must upgrade your site with a Premium Plan, connect a domain and have no ads on it.
- Make sure that your code contains HTTPS, not HTTP, or it will not be displayed on your live site.
- JavaScript code contains the core elements of the page, but the design settings and other complex functionalities might be stored separately. Therefore, some elements may not function or look the same if the relevant elements aren’t included within the main JS code, for example the CSS and other JS files.
- Always make sure the code is up to date and HTML5 compatible. Most browsers don't display pages and scripts properly if they were written using older versions of JS or HTML.
- SEO can be defined separately using Velo API.
- The performance depends on the implementation of the custom element itself.
- The custom element code must be hosted by you if you are not using Velo.
Important:
For security reasons, the custom element is rendered inside an iFrame inside the Editor and in preview mode. This might affect the layout of the component. Go to your published site to see how it actually looks on your live site. You can also use test sites as a live site preview.
Custom element example
Below is an example of adding a basic custom element to your site. The instructions explain how to add "Hello World" text to your site.
First you need to create and code the element and its behavior in a JavaScript file.
Note:
Upgrade your site with a Premium Plan, connect a domain and make sure the Wix ads are removed.
To create and add your custom element:
- Set up, or get access to, a server for your custom element. If you host externally on your own server, you will need to connect the custom element to the server URL when adding the custom element in the Wix Editor.
- If you are hosting locally, you can use HTTP.
- If you are hosting on an external server, you must use HTTPS. Learn how to get started hosting an external server
Note: If you are using Velo and want to host with Wix click here.
- Use any IDE to create a custom element in a Javascript file using the standard ECMAScript 2015 class syntax. For full instructions and examples, see the MDN documentation.
- Define the custom element class:
- The
HelloWorldclass is the class of the custom element, which we'll use when registering the custom element. connectedCallback()is a lifecycle callback function that is triggered automatically when the element is attached to DOM.
- The
1class HelloWorld extends HTMLElement {
2  connectedCallback() {
3    this.innerHTML = '<br/><br/><br/>Hello World!';
4  }
5}
6customElements.define('hello-world', HelloWorld);-
Register the custom element class with the
customElements.define(name, class)method. In the Editor, enter the registered name as the tag name when adding the custom element to the site. Once registered, the custom element can be used on your site.- The first parameter,
hello-world, maps to the tag name, which will be defined in the Editor (step 8). - The second parameter,
HelloWorld, is the class name of the custom element.
- The first parameter,
1CustomElementRegistry.define('hello-world', HelloWorld);- Add the custom element in your Editor (see above).
- Click Settings.
- Choose Server URL and enter the server URL for your custom element script file.
- Enter the tag name. The tag name corresponds to the element name we registered using the
define()function in the previous step. The tag name in this example ishello-world. - Save and publish your site.
Looking for more advanced information?
Tips:
- Show your custom element on all pages.
- Display your custom element even on scroll with Pin to Screen. Or, alternatively, use the CSS fixed positioned element in the custom element code.
