

Velo: About Custom Elements
- How to Create Custom Elements
- Prerequisites
- Code the Custom Element
- Host the Custom Element with Wix Using Velo
- Add the Custom Element in the Wix Editor
- Set the Location of the JavaScript File
- Configure the Tag as Registered
- Code the Behaviors with Velo
- Examples
With Velo, you can enhance the behaviors of custom elements even more than what is possible from the Editor. You can also host your custom elements with Wix using Velo.
First you create and code the element and its behavior in a JavaScript file. Then you implement how your site should handle events on the custom element.
How to Create Custom Elements
- Check prerequisites.
- Code the custom element.
- Host the JavaScript file.
- Add a custom element to your site.
- For really cool custom elements, use Velo to code additional behaviors, such as code event handling and more functionality.
Prerequisites
Code the Custom Element
This article provides basic instructions only. For full instructions and examples about using web components, which are the basis of custom elements, see the MDN documentation.
- Variables and styles.
- Functions for animations and other behaviors.
- Events. Creating events is the custom element's way of "communicating" with the Wix site using Velo. Events let Velo know that something has to be handled, and parameters can be sent with the event.
Here is a sample code snippet:
1class MyCustomElement extends HTMLElement {
2  constructor() {
3    super();
4    console.log(...);
5  }
6
7  connectedCallback() {
8    ...
9    ...
10    ...
11  }
12}
13customElements.define('my-custom-element', MyCustomElement);
Important!
Keep track of the name you used when registering the element with customElements.define(). You will need it when defining the tag name while adding the element in the Editor. In our example, the name is my-custom-element.
Host the Custom Element with Wix Using Velo
To host with Wix, you must turn on Velo Dev Mode.
When you host with Wix, the default location for your custom element Javascript files will be: Public/custom-elements/
You create custom element JavaScript files:
- By creating the file in an IDE and then manually uploading the file to
Public/custom-elements/in the Site Structure sidebar. - When adding the custom element in the Wix Editor by choosing New File.
- By modifying the sample template file
wix-default-custom-element.jsprovided by Velo.
Add the Custom Element in the Wix Editor
When using Wix to host, or Velo to enhance the custom element, do the following:
Set the Location of the JavaScript File
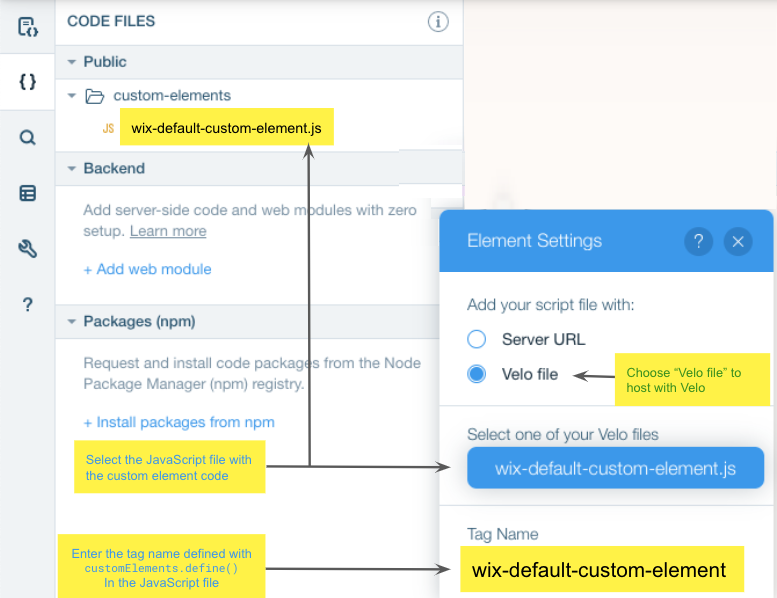
When you create a new file, it is by default called wix-default-custom-element.js. The file automatically contains a template of a custom element that you can change.
Configure the Tag as Registered
Enter the tag name. The tag name corresponds to the element name registered using the define() function in the custom element code.
Code the Behaviors with Velo
You can customize how the custom element behaves for a single page on the site or for all pages on the site.
Make sure to set up event handlers using the on() function for the events defined in the custom event's Javascript file.
Create and set attributes on the custom element using setAttribute(). This is Velo's way of "communicating" with the custom element. We can pass the custom element attributes and their values so that the custom element's implementation can behave accordingly.
Examples
