Wix Restaurants: Setting up Dine-In Orders
5 min
In this article
- Step 1 | Add the dine-in option to your site
- Step 2 | (Optional) View and customize the Online Orders page
- FAQs
Let your customers scan a QR code at your restaurant and place their order from their own device. You manage dine-in orders together with your regular online orders, while keeping them clearly marked as dine-in. This helps you speed up service on busy shifts and reduce back-and-forth with staff.
Before you begin:
Make sure you've added the Wix Restaurants Orders app to your site.
Step 1 | Add the dine-in option to your site
Start by turning on dine-in in your restaurant orders settings. This is where you control when dine-in is available, what customers see when they order, and where you download the QR code to place on your tables.
To set up dine-in for your restaurant:
- Go to Restaurant Orders Settings in your site's dashboard.
- Click Pickup, Delivery and Dine-in next to Scheduling and Availability.
- Enable the toggle next to Allow dine-in orders.
- Click the Edit icon
 to set up your dine-in options.
 - Choose what to do next:
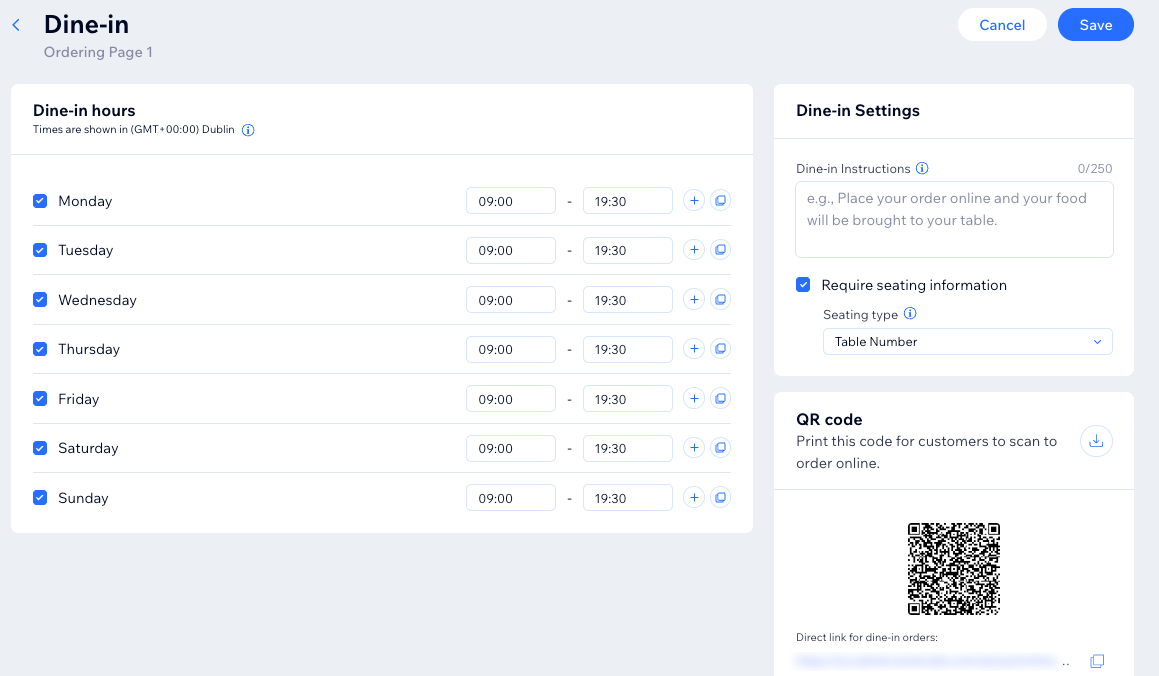
- Dine-in hours: Decide when dine-in should be available – your regular schedule or custom days and hours.
- Select the checkboxes next to the relevant days and edit the existing times.
Tip: When ASAP ordering is active, an Available for ASAP orders column appears next to your dine-in hours, showing the actual times customers can place ASAP orders based on your order prep time. - Add more time slots by clicking the Add icon
 .
. - Quickly apply the same hours to other days by clicking the Copy icon
 .
.
- Select the checkboxes next to the relevant days and edit the existing times.
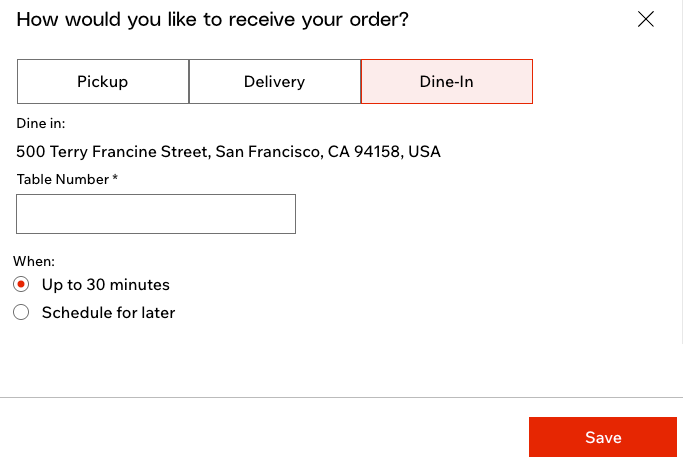
- Dine-in settings: Enter instructions for your customers to see when they place a dine-in order. For example, share how customers can get their order once it's ready. You can also require the customer's seating information (their table number, room number or your own requirement).
- QR code: Click the Download QR code icon to save an image of the QR code. You can print your QR code and place it on the tables of your restaurant so that customers scan it, view your menu and place an order online.
- Dine-in hours: Decide when dine-in should be available – your regular schedule or custom days and hours.
- Click Save at the top right.
Tip:
You can also use the direct link to the dine-in site page, which appears right below the QR code.
Step 2 | (Optional) View and customize the Online Orders page
After you enable dine-in, it is added as an option on your Online Orders page, and the QR code sends customers straight there with dine-in already selected.
You can open the page in your editor to adjust the layout, text, and design so it matches your brand and explains how dine-in works at your restaurant.
Tip:
You can always access this page from your editor. Open the Pages panel and click the Online Orders page to get started.
To view and customize the Online Orders page:
- Go to Restaurant Orders Settings in your site's dashboard.
- Click More Actions at the top right.
- Select Design in editor.
- Customize the look of your Online Orders page.
Tip: By default, this page is connected to your site's fonts and colors to keep the design consistent. However, you can always select individual elements and choose your own fonts and colors.

FAQs
Click a question below to learn more.
How do customers use the QR code to place an order?

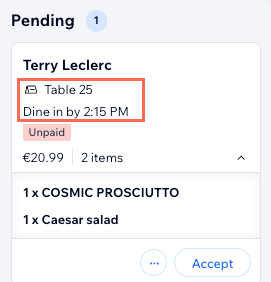
Where can I see and manage my dine-in orders?
Can I have a separate page just for dine-in orders?
Why can't I see the QR code in my site's dashboard?
Can customers order dine-in from their computer?