

Wix Restaurants: Setting Up Delivery Areas for Orders
3 min
Important:
- This article is about the original Restaurants Orders app.
- We've released a new online ordering app. Learn how to add and set up the new Wix Restaurants Orders (New) app.
Choose which areas you deliver to and set different costs and delivery times for each area. For example, if a location is further away from your restaurant you can charge extra to deliver there and increase the delivery time. You can also temporarily switch delivery areas on and off based on your availability.
Before you begin:
Make sure you've set a business location before you start defining delivery areas.
To set up delivery areas:
- Go to Order Settings in your site's dashboard.
- Click the Delivery tab.
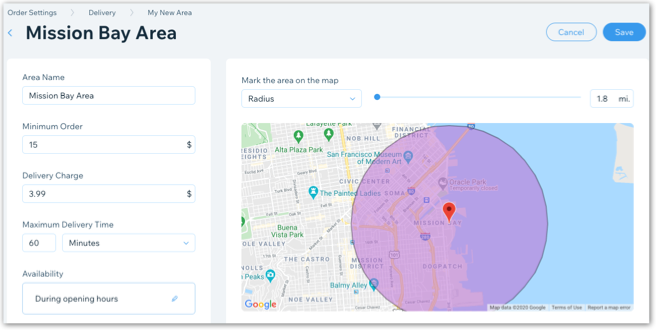
Note: If you haven't set a business location you'll be asked to add one before you can continue. - Click + New Area to set up a delivery area:
- Enter the name of the area (customers do not see this name).
- Enter the minimum order amount for that area. Customers must purchase items totaling at least this amount to get a delivery option to this area.
- Enter the delivery charge for that area. This is how much you charge customers to deliver to this area.
- Define the maximum delivery time. This is how long it takes your delivery person to reach the new delivery area from the restaurant's location. For example, selecting 45 minutes means customers must wait a maximum of 45 minutes after selecting their desired delivery time to receive their food.
- Click the Edit
 icon under Availability to edit your delivery hours. Then click Apply.
Note: You can also temporarily make this delivery unavailable by disabling the Availability toggle. - Click the Mark the area on the map drop-down to choose how you want to define your delivery area:

- Radius: Drag the slider to change the radius of the delivery area. You can also do so by entering a number in the text field.
- Postal code: Enter the postal code of the delivery area.
Note: The postal code option is only available for sites in the USA, Canada, Australia, and the UK. - Draw your own: Click and drag the corners of the shape to customize the delivery area.
- Click Save.
- (Optional) Click the box with the + icon to add more delivery areas.
- Select or deselect the Pinpointing Addresses toggle.
- Enabled: If a customer's address can't be located on the map, they are asked to enter a different address. Learn More
- Disabled: Customers can enter an approximate address even if it's not located on the map. Learn More
- Select or deselect the Pinpointing Addresses toggle.
Tip:
To allow customers to order from your restaurant hours or days in advance before it can be delivered (e.g. a wedding cake), enable the Scheduled orders toggle in the Order scheduling tab.
Do you have a catering business?
Learn about delivery time settings for caterers.
