

Wix Pro Gallery: Working with Sliding Galleries
5 min
In this article
- How your gallery slides
- Navigating through gallery items
- Scroll animations
- FAQs
The Wix Pro Gallery lets you choose from a variety of layouts for your gallery, and some of these layouts allow your gallery to slide.
Sliding galleries offer a unique set of customization options, interactive elements and animation effects to really grab your visitors' attention. Some of these options include adjusting how your gallery slides (automatically or manually) and adding fun scroll animations that appear as visitors navigate your content.
Which gallery layouts slide?

How your gallery slides
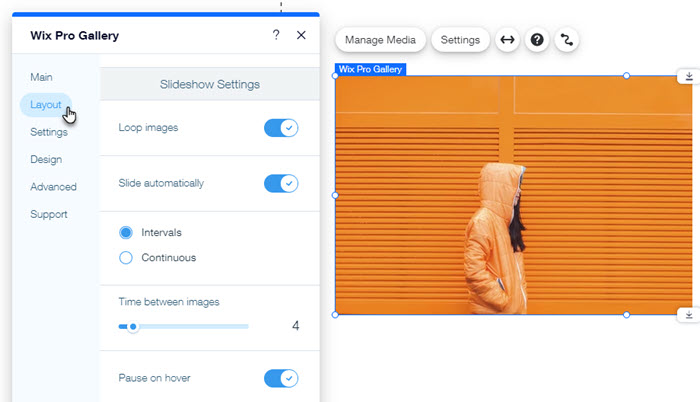
Customize how your gallery slides when visitors open your site. You can set your images to loop, have the gallery slide automatically with a set time (chosen by you) between items, or leave that up to your site visitor to decide.
To customize how your gallery slides:
- Go to your editor.
- Click the pro gallery element on your page.
- Click Settings.
- Click the Layout tab.
- Click Customize Layout and adjust the following:
- Loop images: Choose to allow visitors to scroll through your gallery items in a continuous loop.
Note: The Loop images toggle only appears on desktop and is available for the Slider, Slideshow, Thumbnails, and Column layouts. When you enable it on desktop, it also applies to the mobile version of your gallery. - Slide automatically: Choose to display your items in a continuous slideshow:
- Intervals: Your gallery slides to the next item after your chosen amount of time. Drag the Time Between Images slider to change the number of seconds between the items.
- Continuous: Your gallery slides automatically. Drag the Slideshow speed slider to adjust how fast your gallery slides.
- Pause on hover: Enable the toggle to have the slideshow pause when a visitor hovers over a gallery item.
- Loop images: Choose to allow visitors to scroll through your gallery items in a continuous loop.
Navigating through gallery items
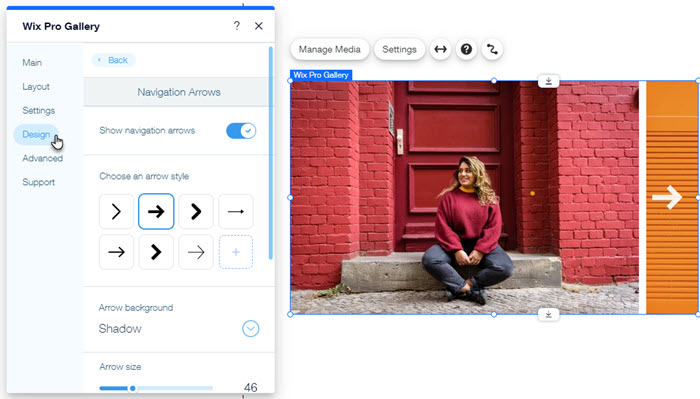
Display navigation arrows on your Pro Gallery to encourage visitors to view more of what your gallery has to offer, at their own pace. Then customize these arrows to complement your site's style. Available customization options depend on the gallery layout you choose.
To customize your gallery's navigation arrows:
- Go to your editor.
- Click the pro gallery element on your page.
- Click Settings.
- Click the Design tab.
- Click Navigation Arrows.
- Enable the Show navigation arrows toggle.
- Customize the arrows using the following options:
- Arrow style: Select an arrow design, or click the Add icon
 to upload your own.
 - Arrow background: Click the drop-down and select an option:
- Shadow: Add a slight shadow around the arrow.
- Box: Add a box around the arrow. Click the color box to change the color, and drag the relevant sliders to adjust its transparency and round its corners.
- None: No background is added to the arrow.
- Arrow size: Drag the slider to increase or decrease the size of the navigation arrows.
- Arrow color: Click the color box to select the navigation arrow color. Select a color from your site colors or choose your own.
- Arrow position: Select the relevant checkbox to display navigation arrows on or outside the gallery.
Note: Displaying navigation arrows on your gallery may cover part of your gallery items. - Center arrows to: Choose the part of the gallery the arrows will be centered to: Gallery, Image, or Text.
- Horizontal Padding: Drag the slider to adjust the amount of space between your arrows and the border of your gallery.
- Arrow style: Select an arrow design, or click the Add icon
Scroll animations
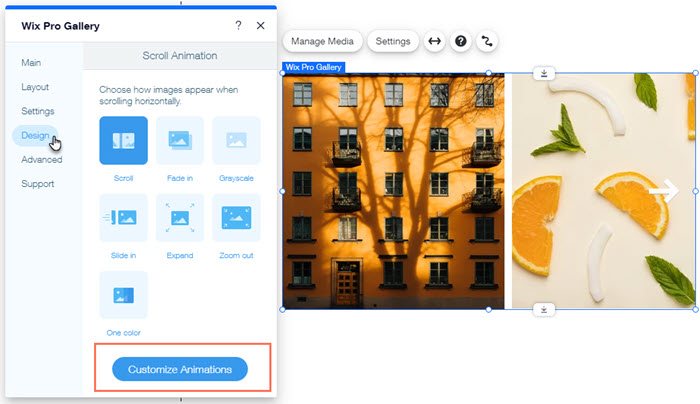
Add a cool visual effect to your gallery items when they slide. This creates a smooth flow from one gallery item to the next. For example, you can make images fade in, zoom out or slide up into view.
To set up scroll animations:
- Go to your editor.
- Click the pro gallery element on your page.
- Click Settings.
- Click the Design tab.
- Click Scroll Animations.
- Choose what happens when visitors scroll through your gallery:
- No effect: No effect is applied to the scroll.
- Fade in: Images gradually appear during the scroll.
- Grayscale: The image becomes black and white when scrolling.
- Slide up: The image slides up when scrolling.
- Expand: The image gets larger when scrolling.
- Shrink: The image gets smaller when scrolling.
- Zoom out: The image zooms out when scrolling.
- One color: A single color is applied to the images when scrolling.
- Click Customize Animations.
Note: Customization of animation settings is only available in layouts with a horizontal scroll. - Edit your animation settings:
- Transition Style: Click the drop-down to apply a motion effect to your gallery items. This effect is applied upon scrolling, as visitors move from one item to the next.
- Duration: Drag the slider to adjust how long your animation lasts.
FAQs
Click a question below to learn more about sliding galleries:
What animations are available in the Slideshow and Thumbnails layouts?
There's a gap under my gallery when using the Slideshow layout. How can I fix this?

