Wix Pro Gallery: Adding Navigation Arrows to Your Gallery
5 min
In this article
- Adding and customizing navigation arrows
- Customizing navigation arrows in expand mode
Display navigation arrows on your pro gallery to encourage your visitors to view more of what your gallery has to offer, at their own pace. With certain pro gallery layouts, you can choose to display navigation arrows on or outside of your gallery, and further customize them.
You can change the color of these arrows to complement the rest of your site's design.

Note:
If you enabled the expand mode for your gallery, navigation arrows are automatically displayed.
Adding and customizing navigation arrows
You can enable navigation arrows in the Thumbnails, Slider, Slideshow, and Column layouts as well as the Collage and Grid layouts with a horizontal scroll. Customize the navigation arrows' position, color and size from the Design tab in the Settings panel.
Wix Editor
Studio Editor
- Go to your editor.
- Click the pro gallery element on your page.
- Click Settings.
- Click the Design tab on the left.
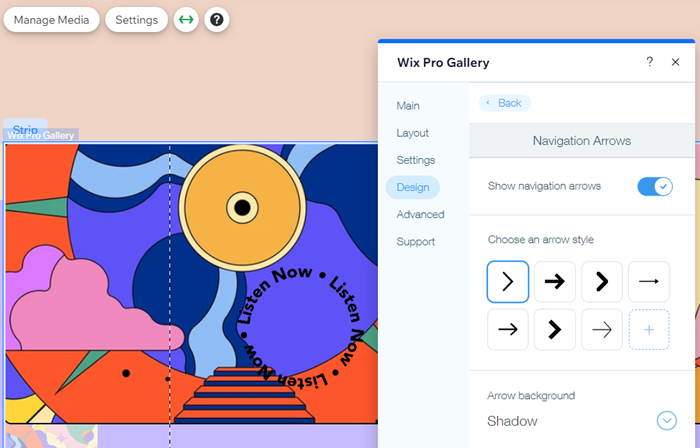
- Click Navigation Arrows.
- Enable the Show navigation arrows toggle.
- Customize the arrows using the options:
- Arrow style: Click to select an arrow design, or click the Add icon
 to upload your own.
 - Arrow background: Click the drop-down to select a Shadow, Box or no background.
- Shadow: Adds a slight shadow around the arrow.
- Box: Adds a box around the arrow. Click the color box to change the box color, and drag the relevant sliders to adjust its transparency and round its corners.
- None: No background is added to the arrow.
- Arrows size: Drag the slider to increase or decrease the size of the navigation arrows.
- Arrows color: Click the color box to select the navigation arrow color. Select a color from your site colors or choose your own.
- Arrows position: Select the relevant checkbox to display navigation arrows on or outside the gallery. Note: Displaying navigation arrows on your gallery may cover part of your gallery items.
- Center arrows to: Choose to center your arrows on either side of the gallery itself, its images or text.
Note: To see this option, make sure you have chosen to display text underneath or above your gallery items. This option is currently unavailable in the Thumbnails and Slider layouts. - Horizontal Padding: Drag the slider to adjust the amount of space between your arrows and the border of your gallery.
- Arrow style: Click to select an arrow design, or click the Add icon

Tip:
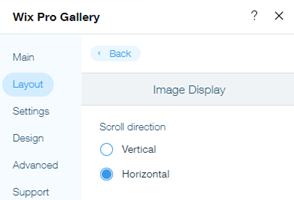
You can also enable navigation arrows in the Grid and Collage layouts, by setting the scroll direction to horizontal in the Layout tab.

Customizing navigation arrows in expand mode
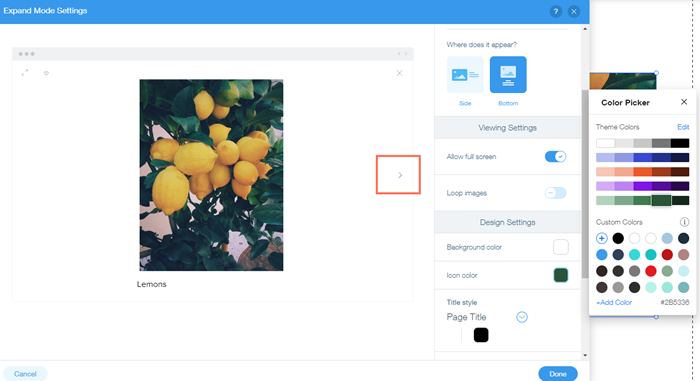
When enabling the expand mode for your gallery, navigation arrows are automatically displayed. Customize the color of these arrows from the Design Settings tab inside the expand mode.
To customize navigation arrows in expand mode:
Wix Editor
Studio Editor
- Go to your editor.
- Click the pro gallery element on your page.
- Click Settings.
- Click the Design tab on the left.
- Click Expand Mode.
- Click Customize Expand Mode.
- Scroll down to Design Settings on the right of expand mode popup.
- Click the color box beside Icon color and select a color from your site colors or choose your own.
- Click Done.

Note:
Navigation arrows in the expand mode are only visible on desktop - not on mobile. Site visitors must swipe left or right to navigate through the gallery on mobile.


