Wix Multilingual: Optimizing SEO Settings for Multilingual Sites
8 min
In this article
- Step 1 | Choose keywords in your secondary language
- Step 2 | Localize your page's SEO settings
- Step 3 | Localize your images' alt text
- Step 4 | Link elements per language
Wix Multilingual lets you optimize your SEO settings for each language individually. This way, you can tailor your strategy for different locales and boost your online presence.
By default, Wix adds hreflang and x-default tags to the code of your site's multilingual pages. These are HTML attributes that can help tell search engines like Google the language and geographical targeting of a page. For example, when someone searches for your page, the hreflang tag helps the search engine find all the language versions of the page. It also helps search engines display the most appropriate version of your page based on the person's language and location.
In this article, you can learn how to optimize the SEO settings for the pages of your site's secondary languages.
Tip:
You can also use the Wix SEO Wiz to get SEO recommendations for your site's main language. Learn more about the SEO Wiz
Step 1 | Choose keywords in your secondary language
Before defining any SEO settings, choose the three keywords that are most likely to reach people in your secondary language. These should clearly describe your business or the services you offer. They could be words, or groups of words, that a user in that locale would enter into search engines.
Keep your localized keywords in mind and use them in SEO settings for your secondary language.
Want to learn more about keywords?
Check out this video on choosing the right keywords in the SEO Learning Hub.
Step 2 | Localize your page's SEO settings
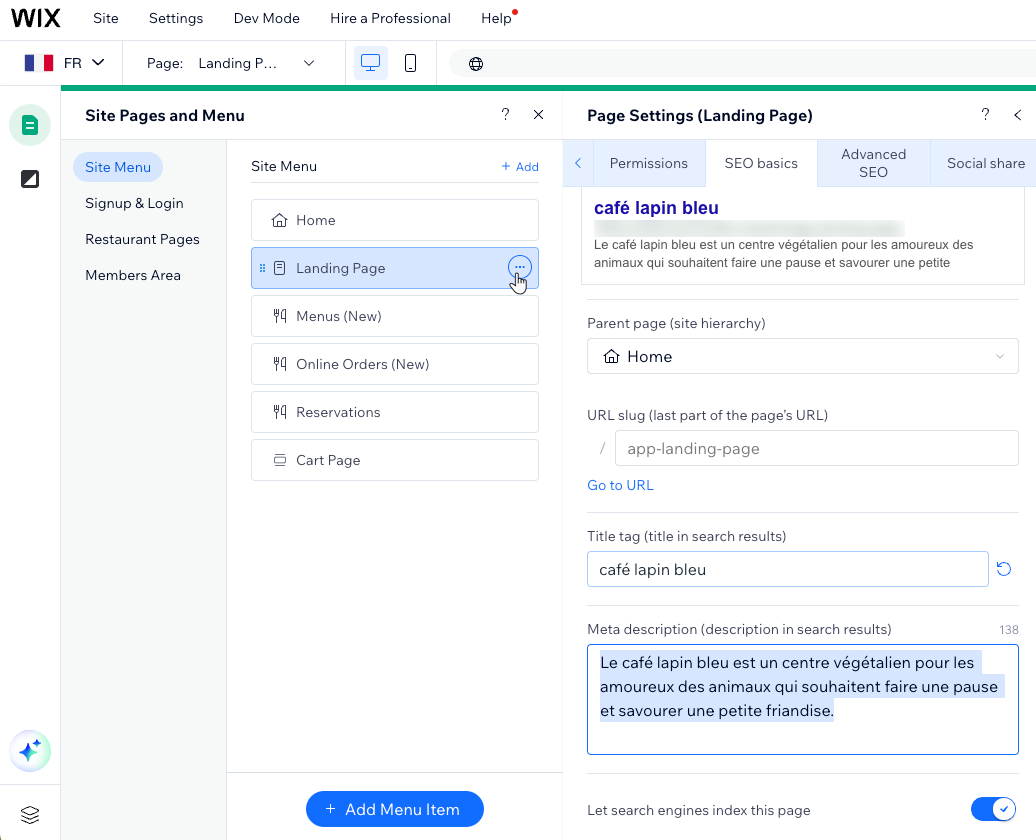
After choosing your keywords, get started by optimizing each page's SEO settings for your secondary language. Enter a page title and description in your secondary language for each and every page. This ensures that your site appears in search results for the relevant locales.
How to choose SEO title tags?
How to choose SEO meta descriptions?
Important:
Currently, it is not possible to customize the page URL for each language version. For example, if your site has a page with the following URL: https://www.example-wix-site.com/shop, you cannot localize the word "shop". If this is a feature you would like to use, vote for it here.
Wix Editor
Studio Editor
- Go to your editor.
- Click the Switch languages drop-down menu at the top of the editor.
- Select the secondary language you want to work on.
- Click Pages & Menu
 on the left side of the editor.
 - Click the More Actions icon
 next to the relevant page.
 - Click SEO basics.
- Enter your page's title tag and meta description in the relevant language.
- Make sure that the toggle next to Let search engines index this page is enabled.
- Click Publish at the top right of the editor.

Tip
You can also update your Social Share settings for each language.
Step 3 | Localize your images' alt text
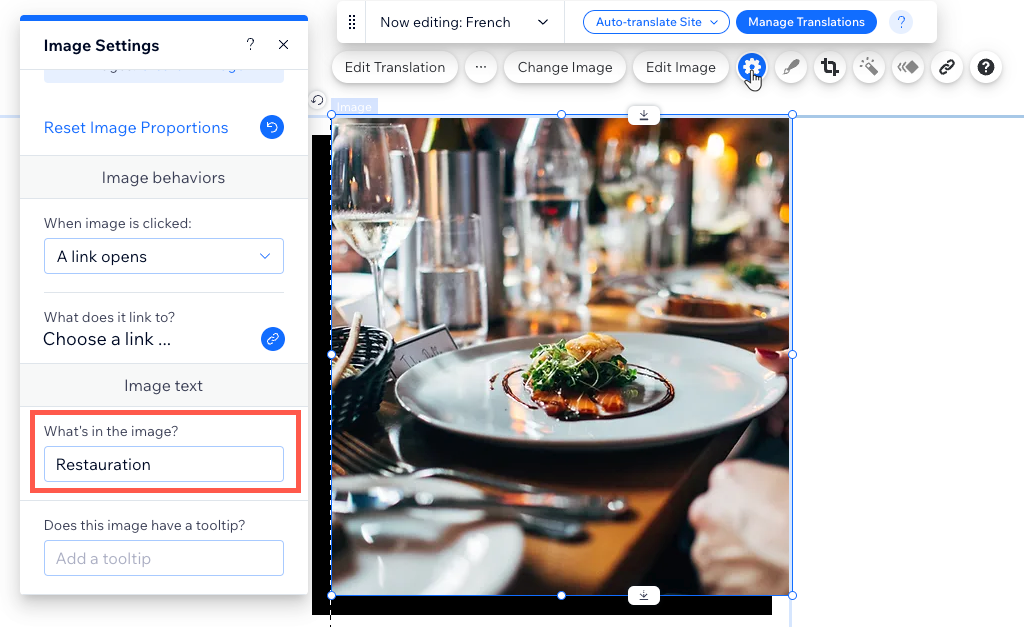
Enhance the visibility of your images on Google and boost website traffic by localizing alt text. Alt text serves as a description for search engines, aligning search queries with the most pertinent results. Optimize your images for SEO by adding alt text in every language your site supports.
While the Translation Manager offers a convenient platform, you can also perform this directly within your editor.
Wix Editor
Studio Editor
Dashboard
- Go to your editor.
- Click the Switch languages drop-down menu at the top of the editor.
- Select the secondary language you want to work on.
- Click Pages & Menu
 on the left side of the editor.
 - Select the relevant page.
- Select the relevant image in that page.
- Click the More Actions icon
 .
. - Click the Settings icon
 .
. - Enter a description for your image in the field under What's in the image?

Step 4 | Link elements per language
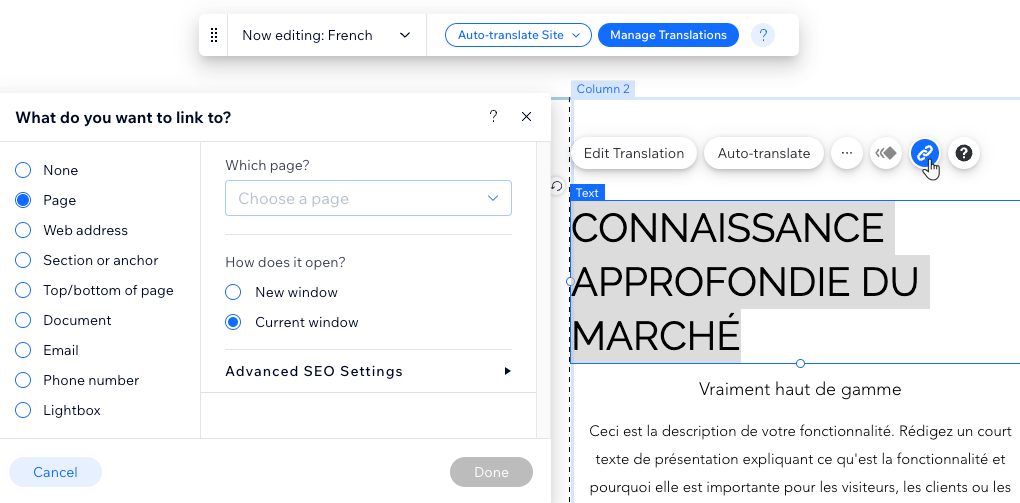
Another great way to improve your site's SEO is to create links, both to other pages on your site and to external pages as well. Wix offers a variety of linkable elements such as text, images, button, etc. You can edit every element on your site to set a unique link for your secondary language.
Wix Editor
Studio Editor
- Go to your editor.
- Click the Switch languages drop-down menu at the top of the editor.
- Select the secondary language you want to work on.
- Click Pages & Menu
 on the left side of the editor.
 - Select the relevant page.
- Select the relevant element in that page.
- Click the More Actions icon
 .
. - Click the Link icon
 .
. - Select where you want to link to and enter the destination link.


