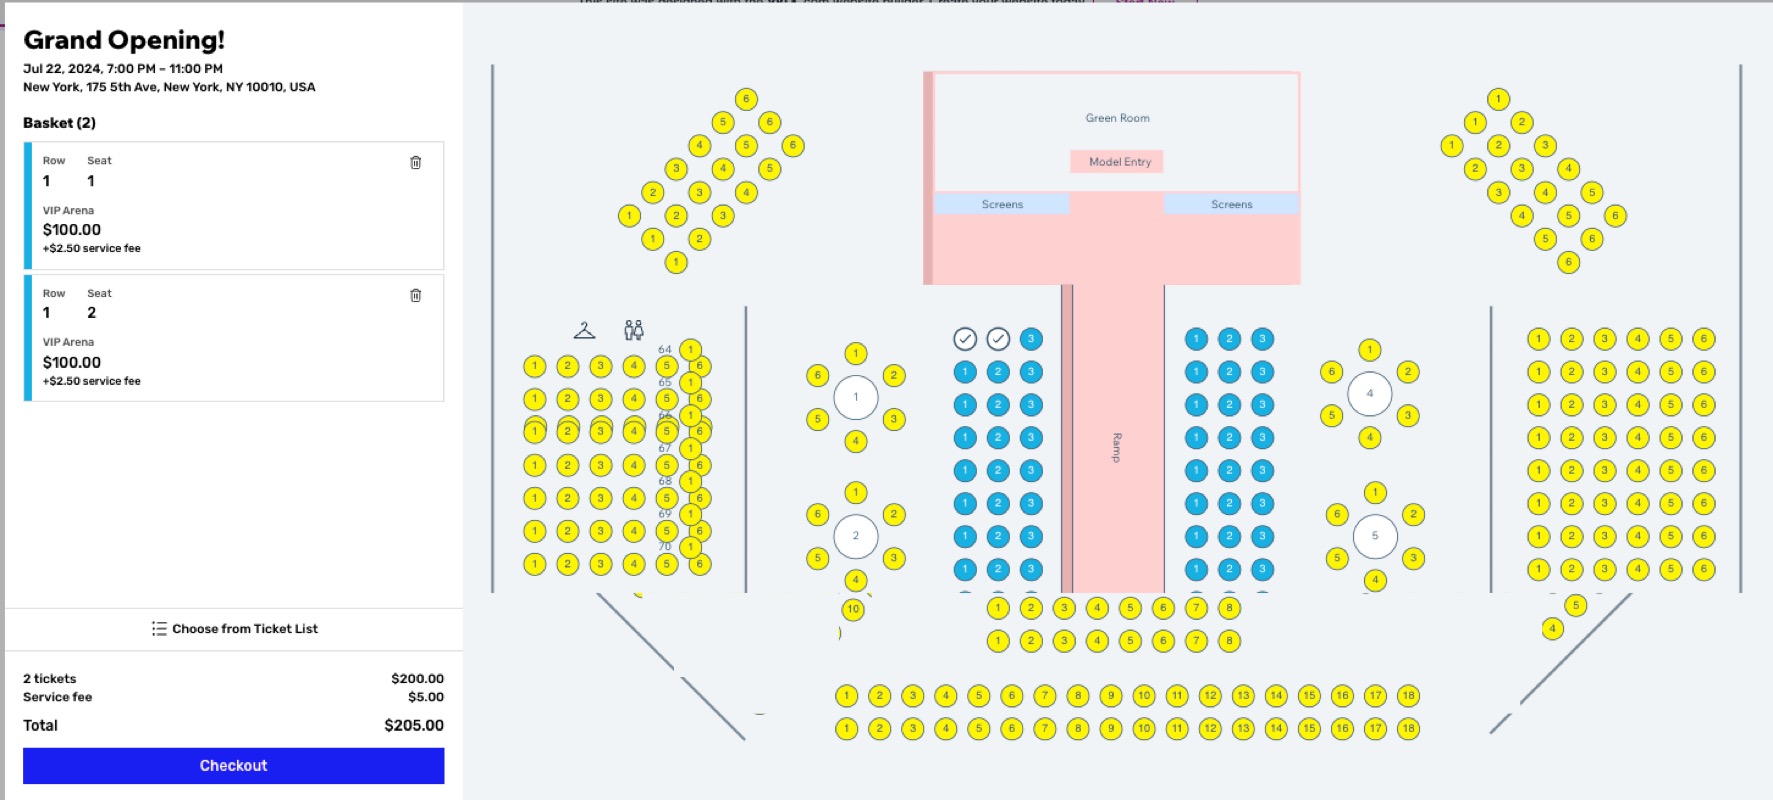
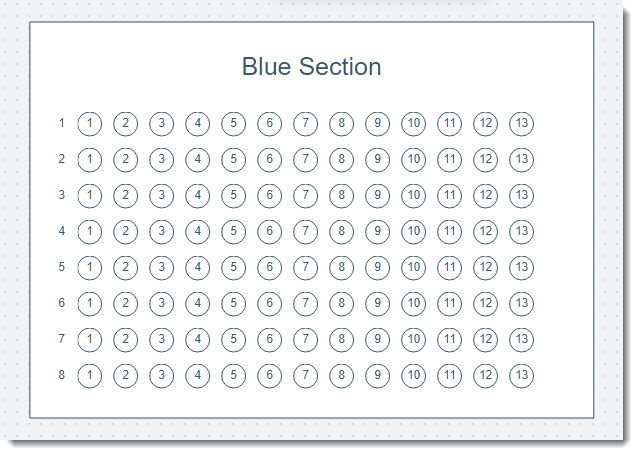
Create a seating map so guests can purchase specific seats for your event. You can create seating around tables, rows of seats, areas with unreserved general seating (e.g. a standing room only area), or a combination of any of the above.
When guests buy tickets, they click to select the seats they want to purchase from the available seating.
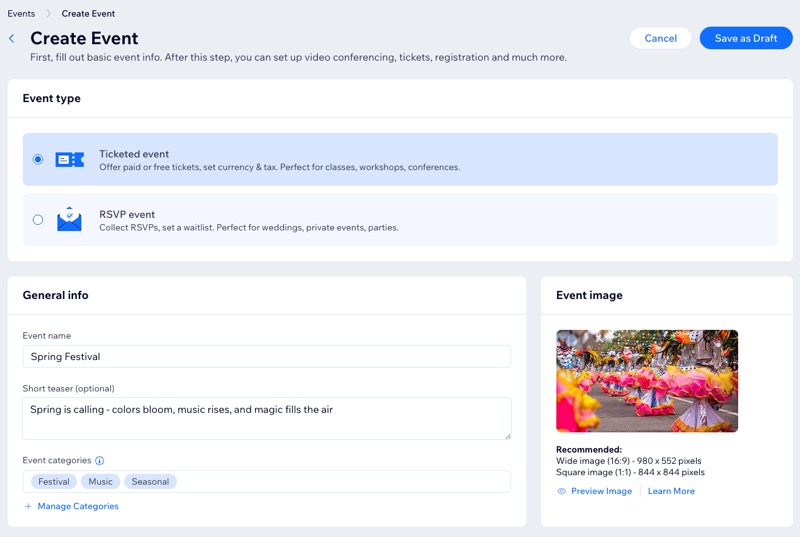
Step 1 | Create an event draft
Start by
creating an event. Make sure it's a ticketed event, as the tickets are directly related to the seating map you're about to create. When ready, click
Save as Draft.
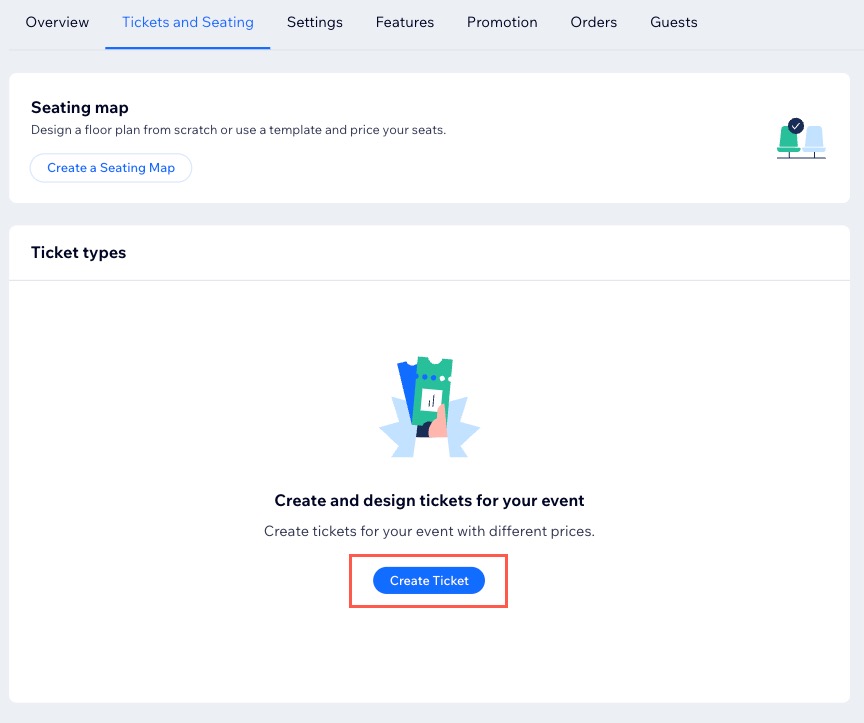
Step 2 | Create event tickets
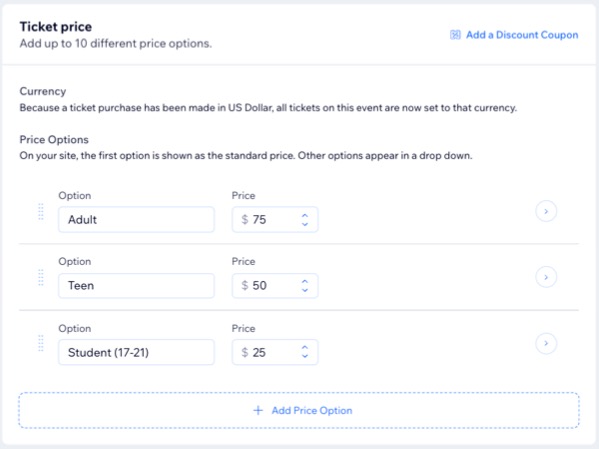
Create up to 50 different ticket types to match your seating map. For instance, if front row seats cost more than back row seats, you can create two ticket types, each for the different pricing areas.
Alternatively, if all tickets are priced the same, you only need one ticket type.
To create event tickets:
- Go to Events in your site's dashboard.
- Click Drafts on the left under Events.
- Click Manage next to the relevant ticketed event.
- Click the Tickets and Seating tab.
- Create the ticket types you need for your event (e.g. 15 table seats, 90 row seats, and 20 standing room only places). Learn more about creating tickets.
Tip: You can edit these tickets later or add additional ones.
Step 3 | Create the seating map
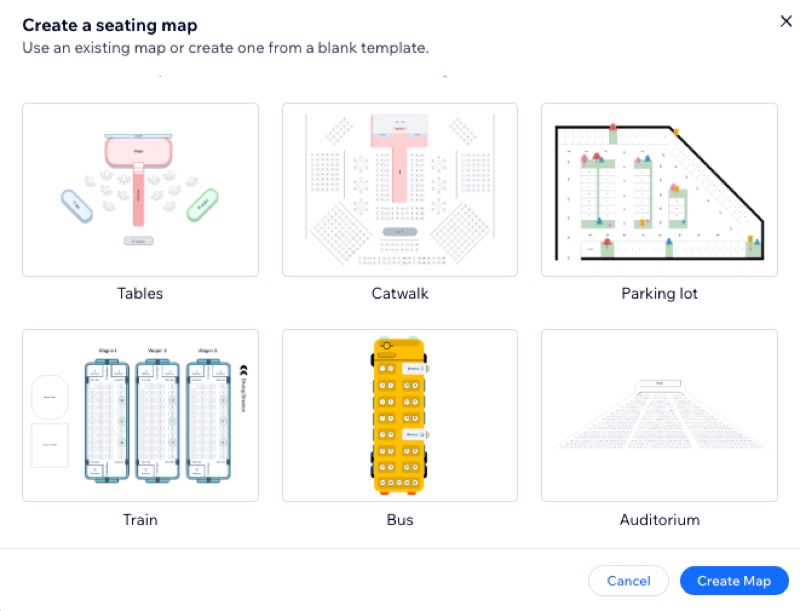
Now it's time to create the seating map for your venue. You can start from a blank canvas or select a map that already has row seating, tables, or both and edit it.
To create your seating map:
- Go to Events in your site's dashboard.
- Click Drafts on the left under Events.
- Click Manage next to the relevant event.
- Click the Tickets and Seating tab.
- Click Create a Seating Map.
- Click the relevant tab to create a seating map:
- Copy from existing event: Use a previously created map.
- Use a template: Create a new map from a blank template.
- Blank template: Start from a blank canvas.
- Mixed seating: Mixed seating with both rows and tables
- Rows: Default stage type seating.
- Tables: Seating around tables.
- Catwalk: A runway-style layout.
- Parking lot: A grid layout resembling a parking lot.
- Train: Seating arranged like a train compartment.
- Bus: Seating arranged like a bus.
- Auditorium: Traditional auditorium seating with a stage.
- Click Create Map.
Step 4 | Customize your seating map
No matter which map you started with, you can now customize it to fit the exact layout of your venue.
To customize your map:
- Go to Events in your site's dashboard.
- Click Drafts on the left under Events.
- Click Manage next to the relevant event.
- Click the Tickets and Seating tab.
- Click Edit Map.
- Customize the relevant Add seating options:
Add and customize rows. You can use the Labels and Layout settings on the right to edit the specific number of seats per row and the number of rows.
- Click Rows.
- Click the map and then drag to add seats and rows.
Tip: You can draw and adjust groups of rows as a single entity for easier resizing, while still being able to select and modify individual rows within the group. - Click the Layout tab and adjust the rows:
- Seats per row: Enter the number of seats.
Note: You can edit individual rows later. - Spacing: Adjust the distance between seats.
- Number of rows: Enter the total number of rows.
- Spacing between rows: Adjust the distance between rows.
- Rotate: Enter a value to rotate the seating arrangement.
- Click the Labels tab and customize the Row and Seat labels:
Note: If disabled, enable the Show row label toggle.
- Label format: Choose the type of label (e.g. numbers, alternate numbers, or letters).
- Label starts from: Specify the starting number or letter for labels.
- Label position: Select where row labels should appear.
- Label direction Choose the direction for numbering labels.
- Click the Section drop-down and enter a new name or select an existing section to divide your venue.
Note: You can create multiple map sub-sections that are all part of the same area (e.g. sections within the balcony area).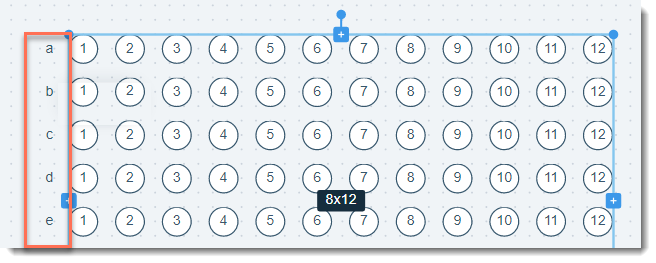
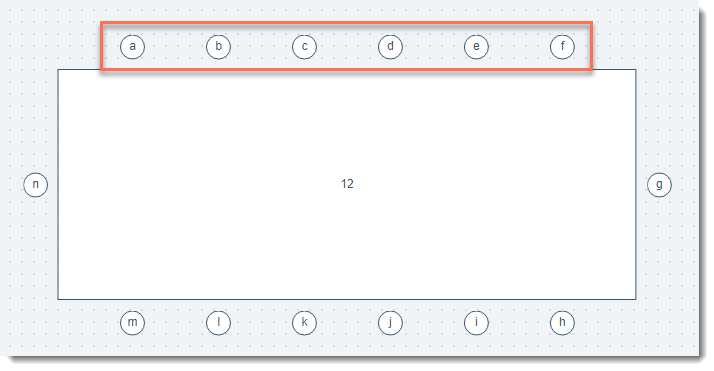
Set up a full or half-circle seating arrangement for events such as concerts, conferences, or panel discussions
- Click Curved rows.
- Click the map and then drag to add seats and rows.
- Select the row, then go to the Layout tab under Venue summary to customize:
- Seats per row: Adjust the number of seats in each row.
- Number of rows: Set how many rows you want.
- Space between rows: Define the distance between each row.
- Rotate: Set the orientation of the seating arrangement.
- Curve: Modify the angle to form a desired curved row.
- Click the Labels tab and customize the Row and Seat labels:
Note: If disabled, enable the Show row label toggle.
- Label format: Choose the type of label (e.g. numbers, alternate numbers, or letters).
- Label starts from: Specify the starting number or letter for labels.
- Label position: Select where row labels should appear.
- Label direction: Choose the direction for numbering labels.
- Click the Section drop-down and enter a new name or select an existing section to divide your venue.
Note: You can create multiple map sub-sections that are all part of the same area (e.g. sections within the balcony area).

Add a 4-sided table and change the shape to give it the right proportions. Then, set how many seats you have on each of the 4 sides.
- Click Rectangular table.
- Click the map and drag to resize the table.
- Click the Layout tab and customize the following:
- Top chairs: Enter the number of chairs on the top side of the table.
- Right chairs: Enter the number of chairs on the right side.
- Bottom chairs: Enter the number of chairs on the bottom side.
- Left chairs: Enter the number of chairs on the left side.
- Guests must reserve the whole table: Select this checkbox so guests can only book the entire table.
- Width / Height: Enter a value to resize the table width & height.
- Rotate: Enter a value to rotate the table.
- Click the Labels tab and edit the Table and Seat labels:
- Label format: Choose the type of label (e.g. numbers, alternate numbers, or letters).
- Label starts from: Specify the starting number or letter for labels.
- Label position: Select where row labels should appear.
- Label direction: Choose the direction for numbering labels.
- Click the Section drop-down and enter a new name or select an existing section to divide your venue.
Note: You can create multiple map sub-sections that are all part of the same area (e.g. sections in the VIP seating area).
Add a round table and then set how many seats you have around the table. You can place seats all the way around, or leave some seats open so guests can all see the stage more clearly.
- Click Round table.
- Click the map and drag to resize the table.
- Click the Layout tab and set the following:
- Number of chairs: Adjust the number of chairs around the table.
- Move chairs: Rearrange the placement of chairs.
- Guests must reserve the whole table: Select the checkbox so guests can only book the entire table.
- Size: Enter a value to resize the table.
- Rotate: Enter a value to rotate the rows.
- Click the Labels tab and edit the Table and Seat labels:
- Table label: Edit the default table label (e.g. change to Table 6).
- Text Size: Adjust the size of the labels.
- Label format: Select a seat label type (numbers, alternate number, or letters).
- Label starts from: Select the first seat number/letter.
- Label direction Select the numbering direction.
- Click the Section drop-down and enter a new name or select an existing section to divide your venue.
Note: You can create multiple map sub-sections that are all part of the same area (e.g. sections within the general seating area).

Use the area element to create an area with general seating. For example, you can create an area with 20 tickets which is standing room only or where there are 20 seats that aren't specified (guests with tickets can sit in any one of them).
- Click Area.
- Click the map and drag to resize the area.
- Under Layout on the right, adjust the area settings:
- Total spots: Enter the number of tickets for this area.
- Width / Height / Rotate: Enter a value for the relevant setting.
- Add labels:
- Text: Edit the default text or click the toggle to hide it.
- Text size: Enter a value to customize the text size.
- Create a section label or select one you already created.
Note: You can create a number of different map sub-sections that are all part of the same section. For example, you can have rows and general seating, both in the "Gallery" section.
6. Customize any elements under Add objects:
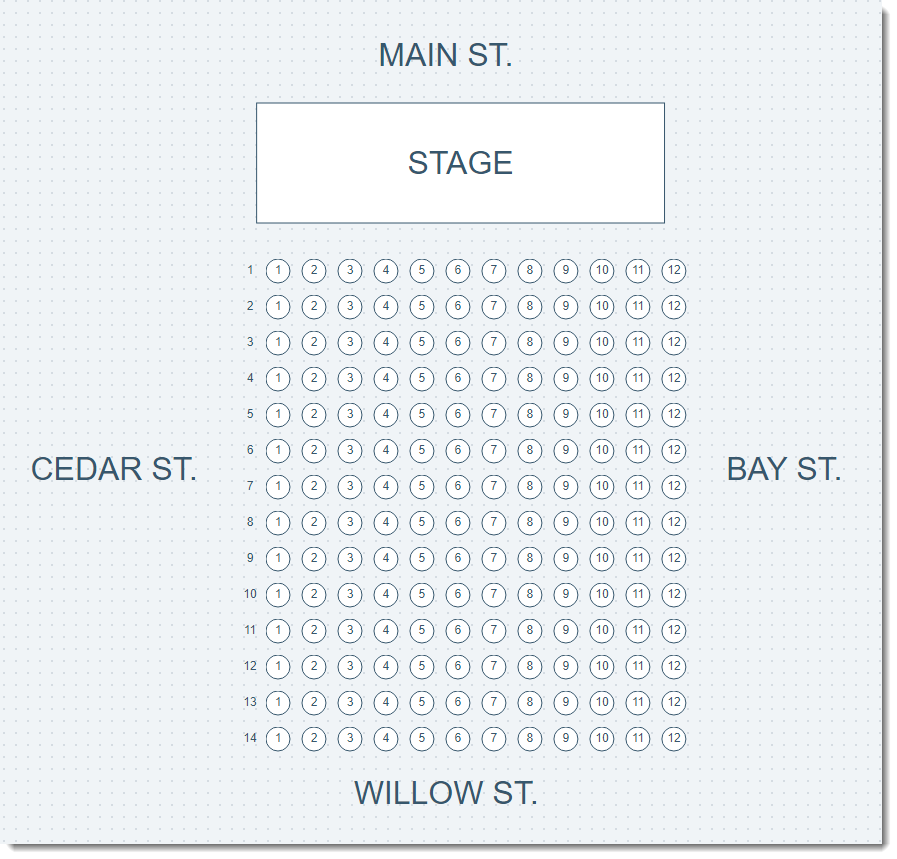
Add text anywhere on your map to add helpful information. For example, you can add street names or add text to a rectangle to show where the stage is.
- Click Text.
- Click the map to place the text.
- Adjust the text settings under Venue Settings on the right:
- Text: Edit the text.
- Text size: Enter a value to customize the text size.
- Text color: Choose a color from the panel.
- Rotate: Enter a value to rotate the text.
You can add a rectangular or circular shape to your map to represent parts of your venue, even if they don't have seating.
For example, you can use a rectangular shape to represent the stage or the bar. You can also add a shape and then add rows or tables on top of it to show different seating areas.
- Click Rectangle or Circle.
- Click the map to place the shape.
- Adjust the relevant size, rotation, shape or border color options under Venue Settings on the right.
Add a divider line anywhere on your map to define separate areas.
- Click Line.
- Click the map to move or resize the line.
- Adjust the relevant length, rotation or color options under Venue Settings on the right.
Add icons to represent different parts of your venue, such as exits and restrooms.
- Click Icons.
- Click the map to add an icon.
- Adjust the relevant Size and rotation options under Venue Settings on the right.
- (Optional) Change the icon and choose a color from the panel.

- Click Background on the left.
- Click Change Color on the right.
- Select a color and click the Checkmark icon
 .
. - (Optional) Drag the slider to change the opacity.
You can upload an image to your seating map. This can be used to upload your company's logo.
To add an image:
- Click Add Image.
- Select an image and click Apply.
- Drag the image to position it.
- Under Layout on the right, adjust the text settings:
- Width / Height / Rotate: Enter a value for the relevant setting.
- Opacity: Drag the slider to change the opacity.
7. (Optional) Assign seat properties (e.g. wheelchair-accessible):
a. Select the relevant seat.
b. Click the Assign a property drop-down under Seat property and select the relevant option.
c. Click Save.
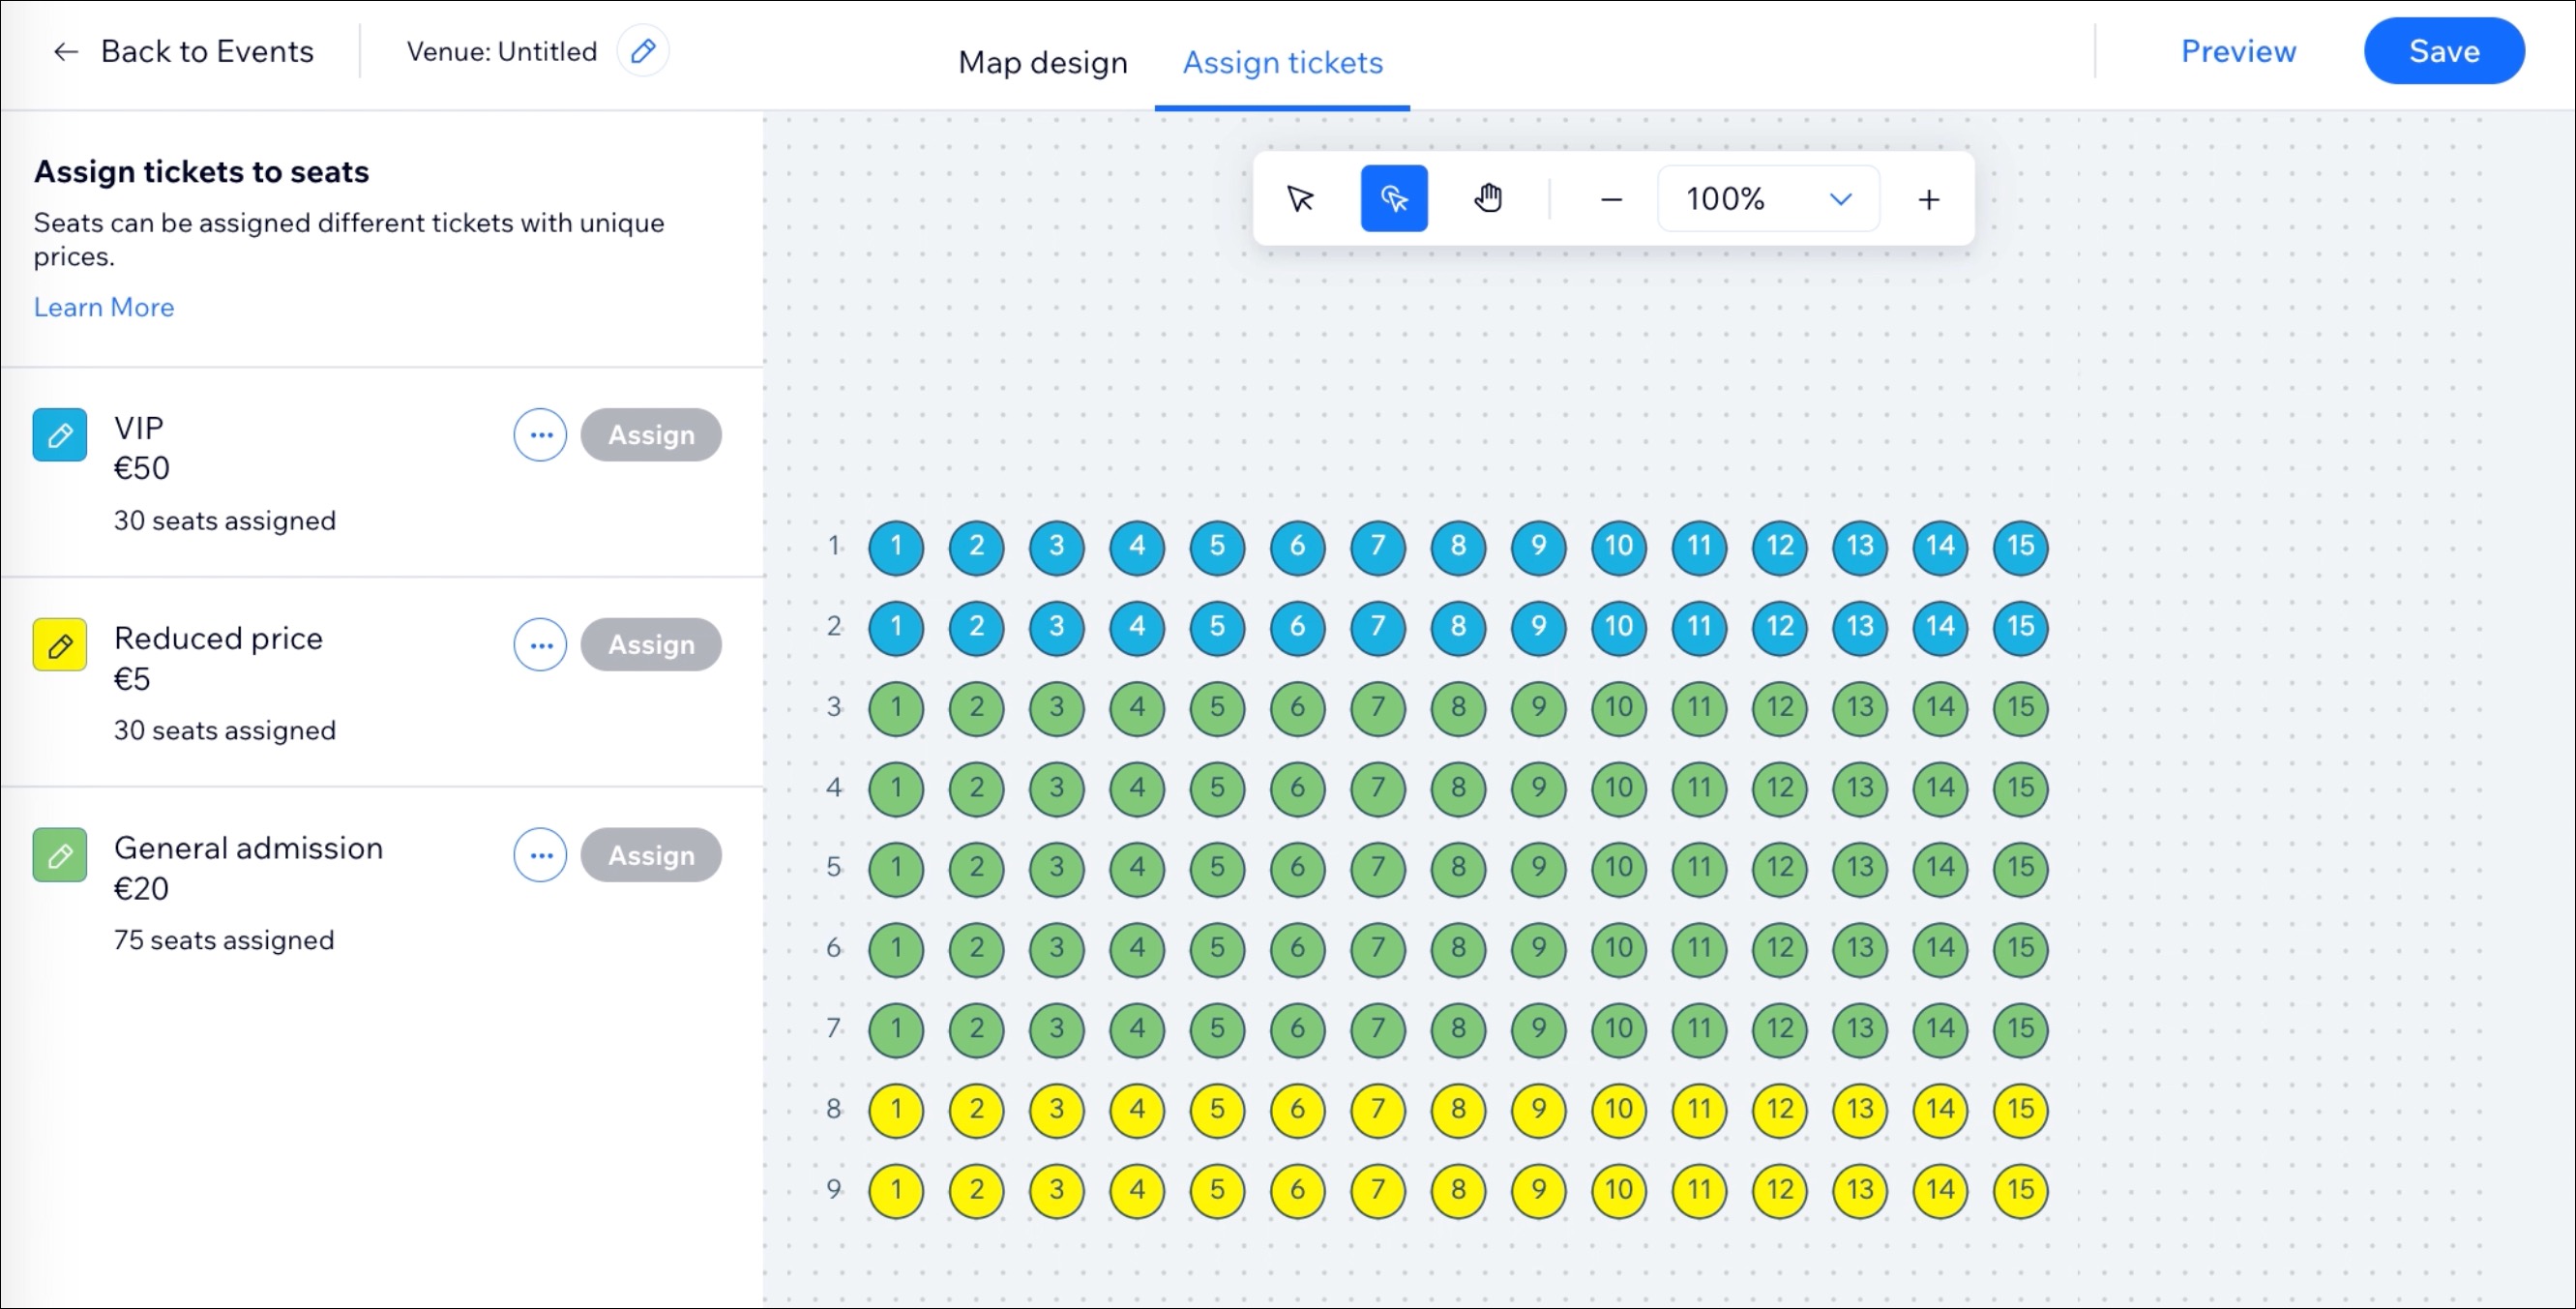
Step 5 | Assign tickets to seats
Once your seating is set up, assign tickets to seats by selecting a table, row, or area. Alternatively, you can choose individual seats within a row.
For example, if your venue has tables, rows, and a general admission area, you can assign tickets to specific tables, rows, or areas. Or, you can assign tickets to individual seats within a row.
To assign tickets to seats:
- Go to Events in your site's dashboard.
- Click Drafts on the left under Events.
- Click Manage next to the relevant event.
- Click the Tickets and Seating tab.
- Select Edit Map.
- Click the Assign tickets tab at the top.
Note: The tickets you created before appear on the left. You can click the More Actions icon  to edit a ticket or + Create Tickets at the bottom to add a new ticket type.
 - Choose how to assign tickets to the relevant seats:
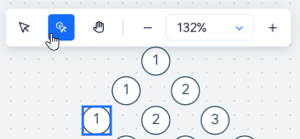
- To a table, row, or area: Click the Selection icon
 and choose the relevant area.
 - A single seat in a row: Click the Seat selection icon
 and choose a specific seat.
- Click Assign next to the relevant ticket type.
- Repeat until you have assigned each table, row, and area a ticket type.
- Click Save.
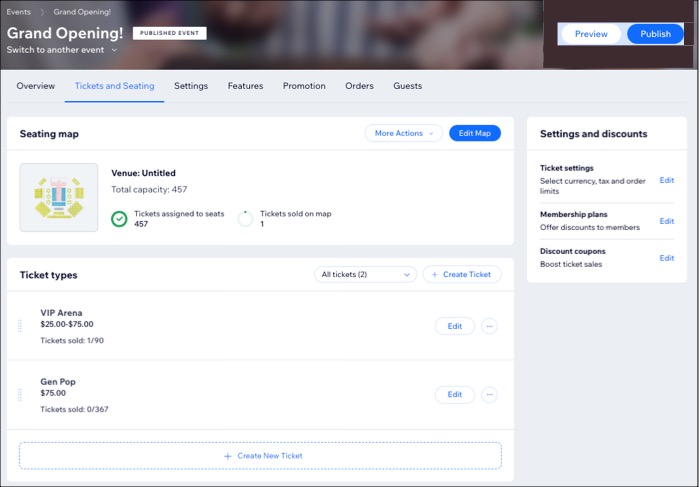
Step 6 | Publish the event on your site
When you are ready, you can publish your event so guests can start purchasing tickets. You can decide where your event is displayed on your site and when registration opens and closes.
FAQs
Click a question below to learn more about creating a seating map.
How do guests know when a seat is sold out?
When guests buy tickets, they select from the available seats on your seating map. Sold-out seats are marked with a grey circle and no seat number.
Can I make changes to specific seats within a group?
Yes. You can use "Seat selection" from the floating menu bar to select individual seats.
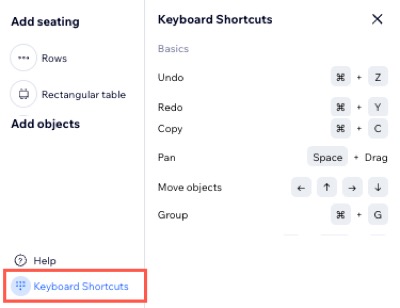
How can I access shortcuts for faster navigation and commands?
Click Keyboard Shortcuts to access a list of key combinations for faster navigation and commands (e.g. Group objects together to make bulk edits).
If I edit a seating map connected to multiple events, will the changes apply to all events?
No. Changes made to a seating map for a specific event only apply to that event. To apply the same changes to other events using the same venue, you’ll need to edit each event’s map individually.
My map has tables and rows. Can I edit multiple elements at the same time?
Yes, you can select different types of elements and make changes to them at the same time. This is especially handy when you want to assign some rows and tables, for example, to a section.
Note: You'll be able to make changes that all the selected elements have in common. For example, if you select table and a text item, you won't be able to edit the labels because text elements don't have labels.
Can I edit the seating map after I started selling tickets?
Yes, you can still make changes after tickets were purchased.
Important: Do not change the table labels (e.g. changing table 1 to table 2) if you already sold tickets.
Can I sell a ticket offline and select a seat?
Yes, you can
manually add a guest to an event. Go to the relevant event and select the
Guests tab. From there, you can click
Add New Guest and you'll be directed to select a seat from the seating map.
My guest wants to switch seats. How can I help them do that?
You can do so by adding a new order and cancelling the old one.
Notes:
- It's only possible to cancel an entire order. This means, if your guest ordered 2 tickets, for example, you can create a new order for 2 tickets and cancel the original 2-ticket order.
- If there's a price difference between the old and new tickets, make sure you arrange to collect or refund the appropriate amount.
To change a guest's seat:
- Manually book a new ticket for the guest(s) with the seat(s) they want.
Note: Select “Paid" as the ticket status. - Cancel the original ticket:
- Go to Events in your site's dashboard.
- Select the event you want to view.
- Click the Orders tab.
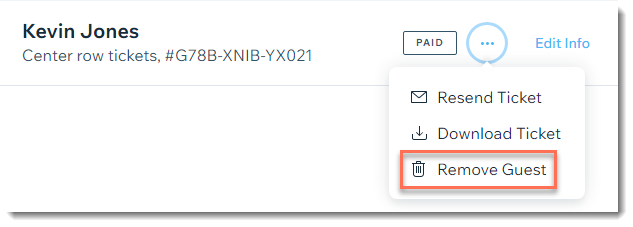
- Click the order you want to cancel.
- Click the More Actions
 icon next to the guest's name.
 - Select Remove Guest.
Tip: If the order has more than one ticket, click Remove Order. - Click Remove Guest/Remove Order to confirm.
- Make sure to inform your guest that they need to bring their new ticket to the event since the old one was canceled.
After the original order your guest booked is canceled, those ticket become available on your site.
Can I build or edit a seating map on a mobile device?
No, it isn’t possible to build or edit a venue seating map on a mobile device. To create or update your seating map, use a desktop computer.
After you publish your event, you can adjust the seating layout for mobile viewing.