

Wix Editor: Adding and Setting Up a PayPal Buy Now Button
3 min
In this article
- Step 1 | Add a Buy Now button
- Step 2 | Set up your button
- Step 3 | Choose your button's layout
PayPal Buy Now buttons allow you to sell products on your site, without needing to add an online store. The button links to your PayPal account and product, so it's quick and easy for visitors to make purchases.
Add the button to your page, and set it up by linking it to your PayPal account. You can also choose its layout, currency, and language.
Important:
- This article is about PayPal buttons in the Wix Editor, which is separate to adding PayPal as a payment method for use with Wix Stores, Wix Bookings, and other business solutions.
- To use the PayPal button, you must have a PayPal Business or Premier account.
Step 1 | Add a Buy Now button
Add a Buy Now button to sell a product through your PayPal account. You can link one item per button, and add as many buttons as you need to sell different products across your site.
To add a Buy Now button to your site:
- Go to your editor.
- Click Add Elements in your editor.
- Click Button.
- Click PayPal Buttons.
- Click and drag the Buy Now button to add it to your site.
 in your editor.
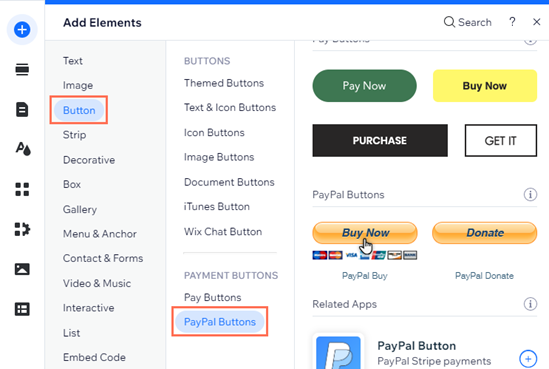
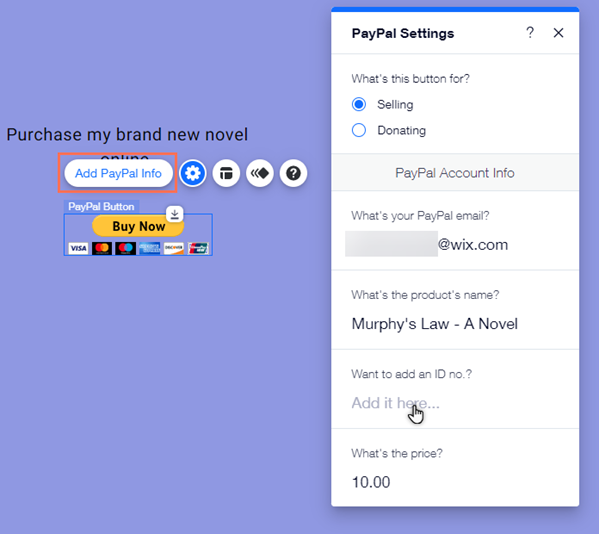
Step 2 | Set up your button
After adding the Buy Now button, link it to your Paypal account and set the product details (e.g. item name, price, etc.). When visitors click the button, they're directed to PayPal to complete the purchase.
To set up your PayPal Buy Now button:
- Go to your editor.
- Click the PayPal button in the editor.
- Click Add PayPal Info.
- Select Selling under What's this button for?.
- Set up the buttons with the below options:
- What's your PayPal email?: Enter the email address you want to link into the field.
- What's the product's name?: Enter the name of the product or item into the field.
- What's the price?: Enter the price of the product into the field.
- What's the currency?: Click the drop-down menu to select the currency for the button.
- Want to add an ID number?: Add the ID number of the product into the field (optional).
- How does PayPal open?: Click the drop-down menu to select whether Paypal opens in the same window, or a new window.
- What language is the button in?: Click the drop-down menu to select the button's language.
Note:
Due to changes in the PayPal API, you must fill the PayPal email field in order to complete your button's set up. We also recommend entering the product's name, and confirming its price. Learn more about changes to PayPal buttons
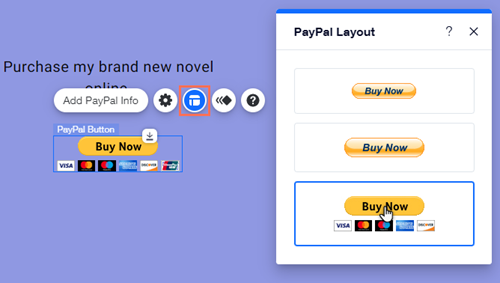
Step 3 | Choose your button's layout
Set how you want the button to look on your site. You can choose between a button that shows accepted cards, or a button without them.
To choose the layout of your PayPal button:
- Go to your editor.
- Click the button in your editor.
- Click the Layout icon .
- Select a layout preset from the options.
 .
.
Note:
You do not get notifications on your Wix account for purchases made through PayPal buttons. This is because the payments are made to the PayPal account, and not your Wix account.
