

Wix Editor: Linking to Sections on Your Site
4 min
In this article
- Adding sections to a menu
- Displaying sections on an in-page menu
- Linking elements to sections
- Creating and sharing unique section URLs
Sections are building blocks you can use to structure your content. After you've added and set up sections, you can link to them to ensure that visitors have access to everything they need.
There are several ways that you can share sections on your site; by adding them to a menu, linking elements to them, and creating unique section URLs.
Adding sections to a menu
Adding sections to your menu is a great way to help your visitors navigate your site, and direct them to the right content.
Making sections a menu item is also particularly useful if you have a one-page site that contains a lot of information, as visitors will be able to find what they're looking for without having to scroll.
To add a section to your menu:
- Go to your editor.
- Click your site menu.
- Click Manage Menu.
- Click Add Menu Item at the bottom of the panel.
- (For advanced menus) Select Section from the list.
- (For site menus) Click Section or anchor.
- Select the page the section is on from the dropdown menu.
- Select the section from the dropdown menu.
- Click Done.
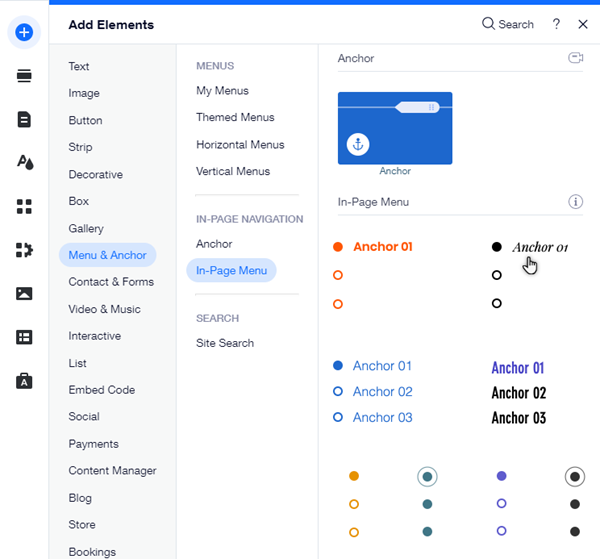
Displaying sections on an in-page menu
You can display all of your sections in a cool floating menu on your site. An in-page menu allows your visitors to access different parts of your site page by clicking the section name, and is always visible to visitors on your page.
To add an in-page menu:
- Go to your editor.
- Click Add Elements
on the left side of the editor.
- Click Menu & Anchor.
- Click In-Page Menu.
- Drag your chosen menu on to your page.
- (Optional) Right click on your anchor and select Pin to Screen to change its location on your page.
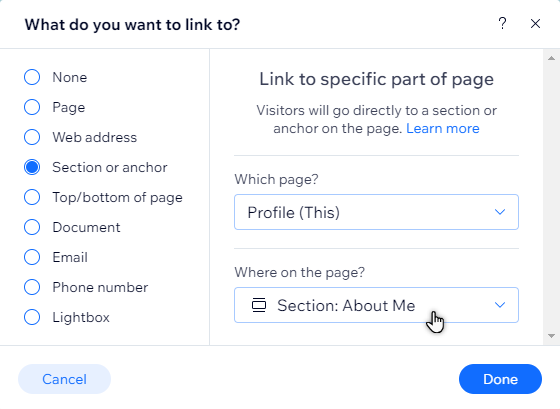
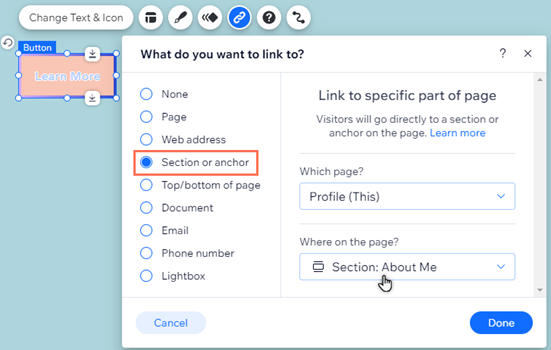
Linking elements to sections
Link elements on your site to page sections. When visitors click the element on your live site, they're brought directly to the relevant content.
To link an element to a section:
- Go to your editor.
- Click the element you want to link from.
- Click the Link icon
.
- Click Section or anchor.
- Select the page the section is on from the dropdown menu.
- Select the section from the dropdown menu.
- Click Done.
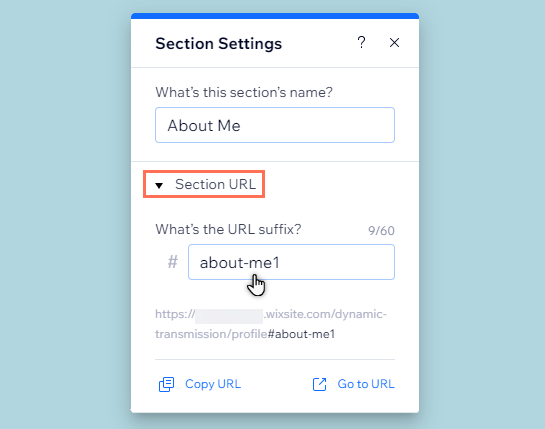
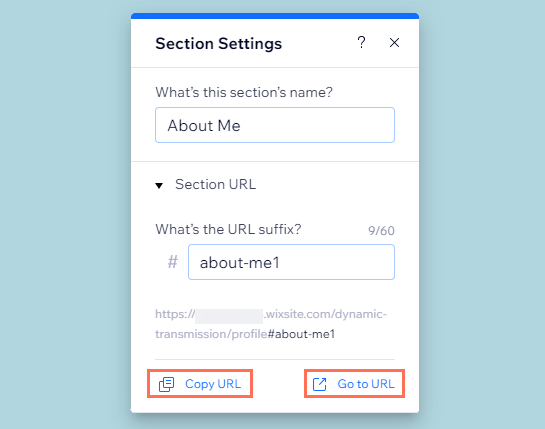
Creating and sharing unique section URLs
Generate a unique URL that you can share across platforms to showcase relevant and important content. When visitors click the link, they're brought directly to the section on your page, so they don't need to scroll to find information.
Choose the suffix to make the link look how you want. Once you've created a unique URL for your section and published the changes, you can preview the link and copy it to share across platforms and accounts.
To create and share a section URL:
- Go to your editor.
- Hover over the relevant section in your editor.
- Click the More Actions icon
.
- Click Section Settings.
- Click Section URL.
- Enter the suffix into the field under What's the URL suffix?.
- Press the Enter key on your keyboard.
- Publish the site changes.
- (Optional) Hover over the relevant section in your editor.
- Click the More Actions icon
- Select Section Settings.
- Click Section URL.
- Choose what you want to do with the URL:
- Copy URL: Copy the link to your device's clipboard in order to paste and share it on external sources.
- Go to URL: Open the URL directly to see how it looks for visitors.
Notes:
- The options to share and open the URL only work if you publish the site after setting up the link.
- Linking sections to elements on your site or adding them to a menu does not generate a URL. These steps only apply if you've created a unique URL from the Settings panel.
