

Wix Bookings: Customizing Your Booking Calendar Page
14 min
In this article
- Choosing the layout for the Booking Calendar page
- Choosing which elements to display on the Booking Calendar page
- Designing the Booking Calendar page
- Editing the text on the Booking Calendar page
When clients go to book a class or appointment session, they choose the day and time on the Calendar page. Customize your Calendar page to suit your brand by adjusting the text, layout and what you choose to display.

Note:
The Booking Calendar page only appears for classes and appointments - not for courses.
Choosing the layout for the Booking Calendar page
Make sure you choose a clear layout for your calendar page to make it as easy as possible for clients to find the information they need. Choose from a daily or weekly calendar layout and adjust the alignment and spacing of each of the elements. The layout you choose applies to all of your services.
Important:
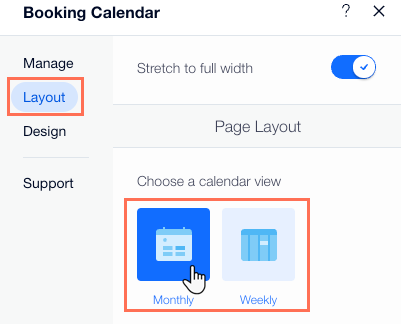
You can also adjust the layout of your mobile site by clicking Switch to Mobile at the top of your editor. You can choose from two layout styles: Monthly or Weekly.
Wix Editor
Studio Editor
Wix Harmony Editor
- Go to your editor.
- Go to your Book Online page:
- Click Pages & Menu
 on the left side of the editor.
 - Click Bookings Pages.
- Click the Booking Calendar page.
- Click Pages & Menu
- Click the Booking Calendar element on your page.

- Click the Booking Calendar element on the page.
- Click Settings.
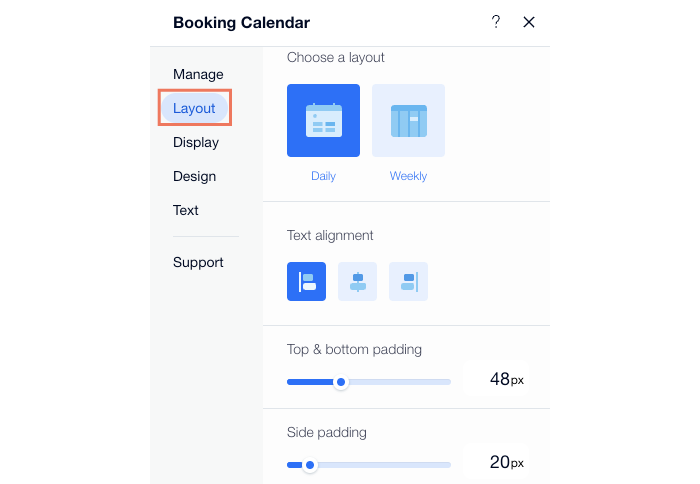
- Click the Layout tab.
- Customize the following options:
- Choose a layout: Choose between a daily or weekly view for your Booking Calendar.
- Text alignment: Click to set the text blocks to the left, center, or right.
- Top & bottom padding: Use the slider to control the space above and below the Booking Calendar.
- Side padding: Use the slider to control the space to the left and right of the Booking Calendar.
- Space between header & body: Use the slider to control the space between the header and the body.
Choosing which elements to display on the Booking Calendar page
The Booking Calendar page contains several elements that show more information about your services, like the service subtitle or its day and time. You can choose to display certain elements and hide others, depending on your needs.
Wix Editor
Studio Editor
Wix Harmony Editor
- Go to your editor.
- Go to your Book Online page:
- Click Pages & Menu on the left side of the editor.
- Click Bookings Pages.
- Click the Booking Calendar page.
- Click Pages & Menu
- Click the Booking Calendar element on your page.
- Click the booking calendar in your editor.
- Click Settings.
- Click the Display tab.
- Choose which elements to display:
- Header:
- Select the appropriate checkboxes to show or hide the header Subtitle or Filters below the service title.
- Choose what text to display under the service title:
- Custom text: This is set in the Headers & Filters section under the Text tab.
- Service subtitle: To set the text for this option, go to Manage Services and click on a service.
- Date & Time:
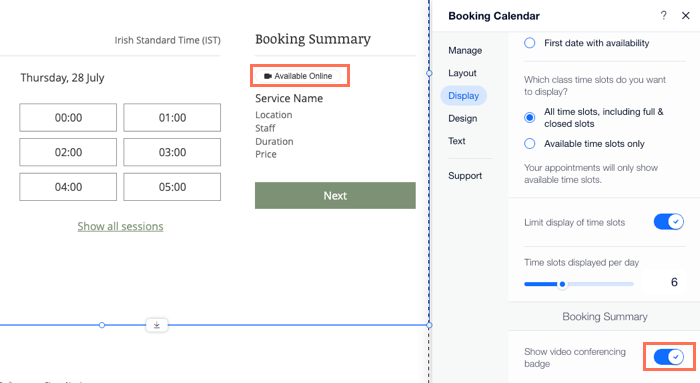
- Select the relevant checkbox to choose between displaying the Current date or the First date with availability.
- Select the relevant checkbox to choose between displaying All time slots, including full & closed slots, or Available time slots only.
- (Optional) Enable the Limit display of time slots toggle to display fewer time slots. Use the slider to set the number of time slots you display per day.
- Booking Summary: Enable the Show video conferencing badge toggle for virtual services.
- Header:
Designing the Booking Calendar page
You can apply your own look and feel to the booking calendar so it fits the overall design of your site. The Booking Calendar page is dynamic, which means you only need to design it once, and it is applied to all services.
Wix Editor
Studio Editor
Wix Harmony Editor
- Go to your editor.
- Go to your Book Online page:
- Click Pages & Menu on the left side of the editor.
- Click Bookings Pages.
- Click the Booking Calendar page.
- Click Pages & Menu
- Click the Booking Calendar element on your page.
- Click the Booking Calendar element.
- Click Settings.
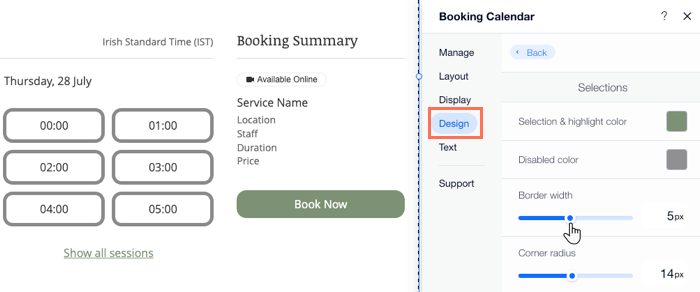
- Click the Design tab.
- Choose what design you want to customize:
- Styles: Change the background color of the widget, its header, borders and dividers.
- Text: Choose the font and color of different text elements across the page.
- Selections: Design buttons and other elements your clients can click on the page (for example, dates on the calendar).
Editing the text on the Booking Calendar page
You can edit all text elements on the calendar to suit your business and your clients. Make sure to describe everything in terms your staff and clients understand.
Wix Editor
Studio Editor
Wix Harmony Editor
- Go to your editor.
- Go to your Book Online page:
- Click Pages & Menu on the left side of the editor.
- Click Bookings Pages.
- Click the Booking Calendar page.
- Click Pages & Menu
- Click the Booking Calendar element on your page.
- Click the Booking Calendar element.
- Click Settings.
- Click the Text tab.
- Choose what text element you want to customize:
- Header and Filters: Change the text for elements such as the location, staff and duration labels.
- Date and Time: Customize the text you want to appear explaining your waitlists to clients.
Tell me more about waitlist text

- Booking Summary: Edit the text that appears for clients before they proceed to checkout.
- Book Button: Edit the different buttons that appear on your calendar, including: Book online, Request booking, Waitlist and Reschedule.

Tips:
- The business location you selected in your regional setting determines the day that is used as the first day of the week. You can change your regional settings at any time.
- You can add your cancellation policy to your calendar.
