Wix Audio Player: Adding and Setting Up the Wix Audio Player
7 min
In this article
- Step 1 | Add the player to your site
- Step 2 | Set up your Audio Player
- Step 3 | Customize the player's layout and design
- Troubleshooting Wix Audio Player issues
- FAQs
The Wix Audio Player is a stylish and simple music element that allows you to add a single track to a page on your website. Select your preferred player style, add a track and cover image, and customize its design.

Step 1 | Add the player to your site
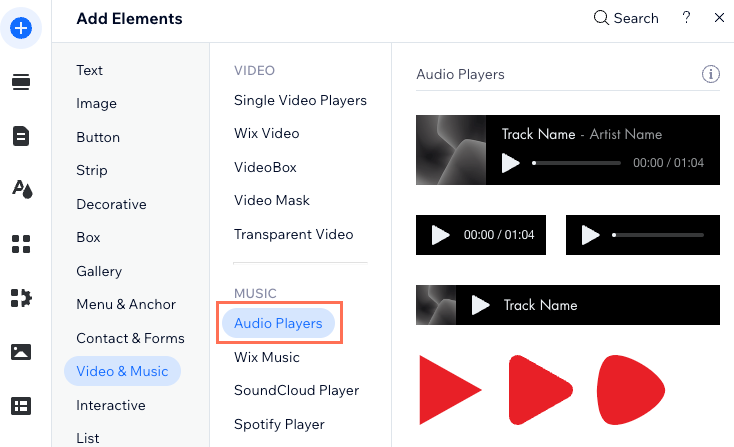
First, add a player. Choose between a classic audio player or a player that only displays a play icon.
Wix Editor
Studio Editor
- Go to your editor.
- Click Add
 .
. - Click Video & Music.
- Click Audio Players.
- Select a player and drag it to the relevant location on your page.

Step 2 | Set up your Audio Player
Next, set up your player. Upload a track, add an image and track details, and define the player's playback settings.
Wix Editor
Studio Editor
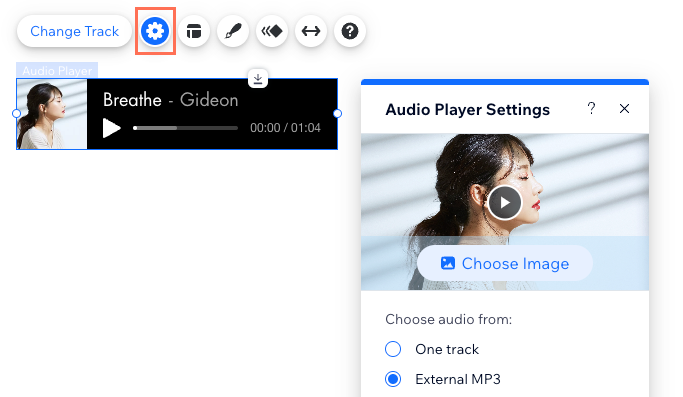
- Click the player in your editor.
- Click the Settings icon
 .
. - Set up your player using the options:
- Choose Image: Select the image you want your player to display and click Add to Page.
- Choose audio from:
- One track: Click Upload Track to access your Media Manager. Select your chosen track and click Add Track.
- External MP3: Enter the URL of the track you want to play.
- Track Details: Enter the artist and track name.
- Playback Options: Select an option:
- Play once: The track plays once.
- Play in loop: The track plays continuously in a loop.

Step 3 | Customize the player's layout and design
Lastly, customize the player's layout and design so that it complements your site's style.
Wix Editor
Studio Editor
- Click the player in your editor.
- Click the Layout icon
 and select a layout: Classic or Icon.
Note: If you choose the Classic layout, you can choose what info to display, e.g. a progress bar or time stamp. - Click the Design icon and customize the following:
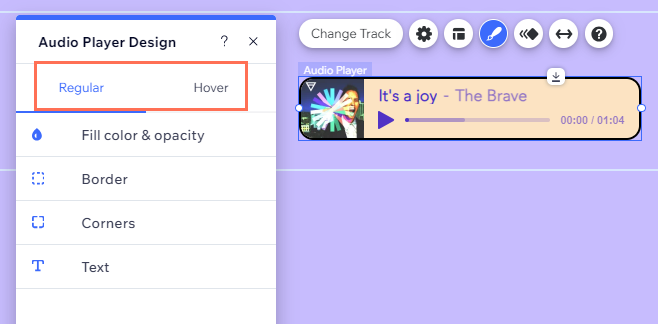
- Classic layout: Customize the regular and hover view of your player.
- Regular:
- Fill color & opacity: Choose a color for your player's background and adjust its opacity.
- Borders: Adjust the color and thickness of the player's border.
- Corners: Change the shape of the player by adjusting the corner radius.
- Text: Choose the font and color of the player's text and controls and adjust their size.
- Hover: Choose a color for the text and controls when a visitor hovers over the player.
- Regular:
- Icon layout: Select your preferred icon and click Customize Design.
- Regular: Choose an icon color and adjust its opacity.
- Hover: Choose a color for controls when a visitor hovers over the player.
- Classic layout: Customize the regular and hover view of your player.

Troubleshooting Wix Audio Player issues
Click an issue below to learn how to solve it.
Music files aren't uploading
External MP3 music is not working
FAQs
Click a question below to learn more.
What file types does the Wix Audio Player support?
Can I change the track displayed on my player?
Can I connect a radio station to my player?
Can I customize the Wix Audio Player on mobile?
Can I add more than one player to my site?
What information should I include if I need to reach out for assistance?


