Studio Editor: Adding and Customizing Breadcrumbs
5 min
In this article
- Adding and setting up breadcrumbs
- Updating parent pages
- Adjusting the breadcrumbs layout
- Designing the breadcrumbs
Enhance navigation on your client's site by adding a breadcrumbs element. By offering a clear path back to parent pages and the homepage, breadcrumbs encourage visitors to stay longer and explore.

Adding and setting up breadcrumbs
Add a breadcrumbs trail to provide visitors with a clear display of the site hierarchy. If you add the breadcrumbs element to your global header, it appears on all site pages.
You can also add breadcrumbs to a specific site page by placing the element on the page body.
Using dynamic pages?
Currently, it is not possible to add breadcrumbs to a dynamic page.
To add and set up the breadcrumbs element:
- Go to your editor.
- Click Add Elements
 on the left side of the editor.
 - Click Menu & Search.
- Click Breadcrumbs.
- Drag the design you like onto your page.
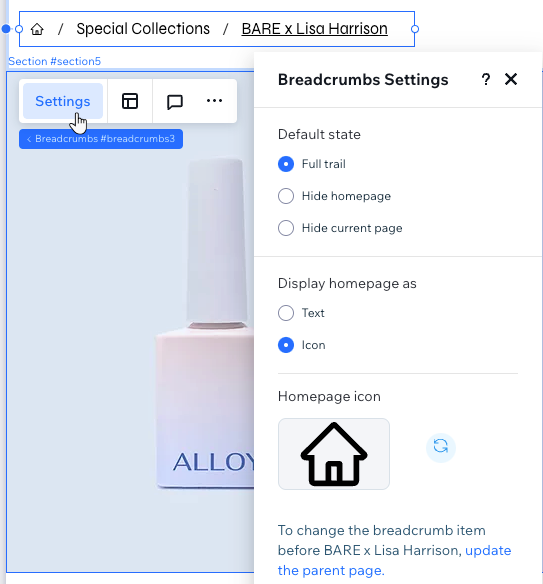
- Click Settings.
- Decide what you want to show on the breadcrumbs trail:
- Default state: Choose which items appear on the breadcrumbs trail:
- Full trail: Show both the homepage and the current page. If a visitor goes to a subpage, the main page is also displayed.
- Hide homepage: Hide the homepage from the trail.
- Hide current page: Hide the page the visitor is currently on from the trail.
- Display homepage as: Choose how you want the homepage to appear in the trail:
- Text: The homepage name appears in the breadcrumbs.
- Icon: An icon representing the homepage appears in the breadcrumbs. Click the icon below Homepage Icon to choose an icon from Wix or upload your own vector art.
- Default state: Choose which items appear on the breadcrumbs trail:
Working with breakpoints:
Your selections in the Breadcrumbs Settings panel apply to all breakpoints.
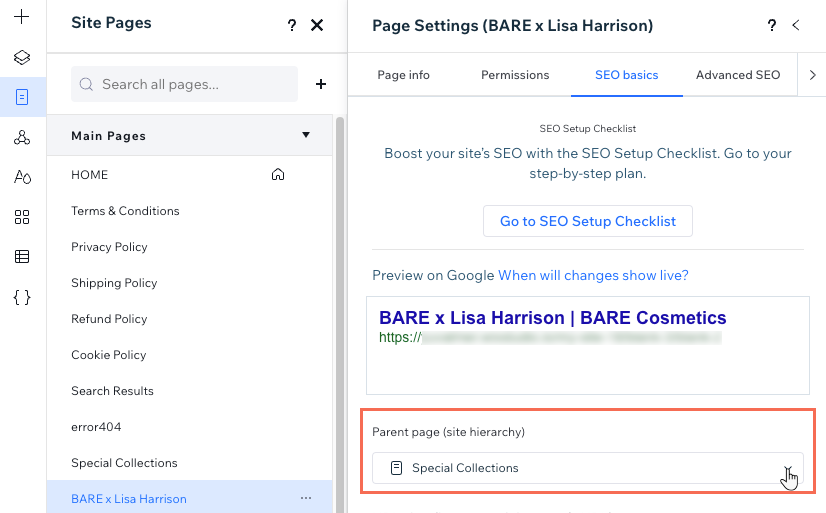
Updating parent pages
The breadcrumbs element shows the current page's position in the site hierarchy. To organize the site better, and for SEO purposes, you can create a hierarchy of parent pages (i.e. top-level pages) with child pages nested under it.

To select a new parent for the page you're working on (reparenting), head over to the Page Settings panel.
Note:
It is not possible to reparent the homepage, as well as pages related to Wix apps (e.g. Wix Stores pages).
To reparent a page:
- Go to your editor.
- Click Pages
 on the left side of the editor.
 - Click the More Actions icon
 on the page you want to reparent.
 - Click SEO Basics.
- Select the new parent for this page under Parent page (site hierarchy).
Adjusting the breadcrumbs layout
From controlling overflow items to adjusting vertical and horizontal spacing, you have the flexibility to tailor the breadcrumbs layout to your client's site. Additionally, you can choose the alignment and direction of the items for a polished appearance.
To adjust the breadcrumbs layout:
- Go to your editor.
- Select the breadcrumbs element.
- Click the Layout icon
 .
. - Adjust the layout using the available options:
- Overflow items: Select how to display items that don't fit on the trail on smaller screens:
- Wrap: If items don't fit, another line is created on the trail.
- Collapse: Items are displayed on one line only. If they don't fit, an ellipsis displays.
- Show separators: Enable the toggle to show separators between trail items, then choose the icon you want to use: Arrow or Forward slash.
- Vertical spacing: Drag the slider to change the spacing above and below the items.
- Horizontal spacing: Drag the slider to change the spacing between the items.
- Item alignment: Align the items to the left, center or right.
- Item direction: Choose the direction in which the items appear: Left to right or Right to left.
- Overflow items: Select how to display items that don't fit on the trail on smaller screens:
Working with breakpoints:
Your selections in the Breadcrumbs Layout panel apply to all breakpoints.
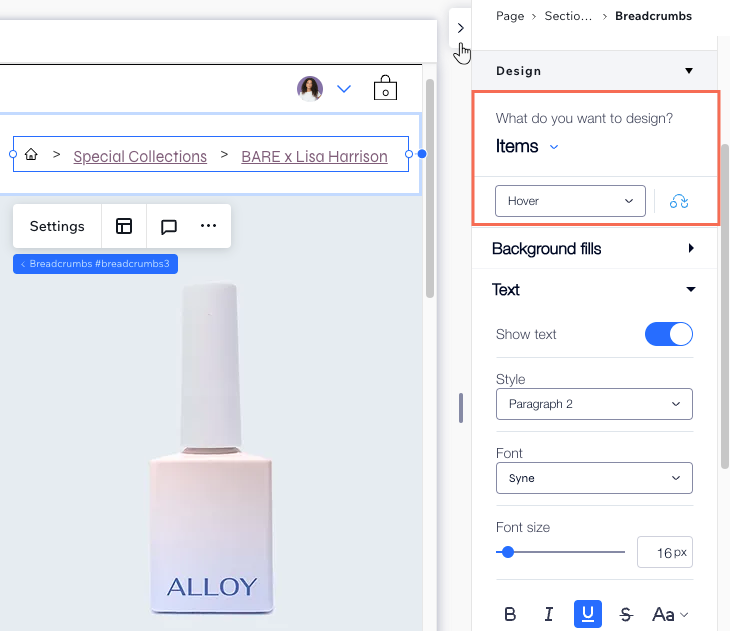
Designing the breadcrumbs
Fine-tune the appearance of the breadcrumbs element from the Inspector panel. Whether you're adjusting the background, the separators or the actual items, you have full control over the design. Easily toggle between different states such as regular, hover, or current page.
To design the breadcrumbs:
- Go to your editor.
- Select the breadcrumbs element.
- Click the Open Inspector icon
 at the top right of the editor.
 - Choose the part you want to design: Background, Separators or Items.
- Select the relevant state from the drop-down: Regular, Hover or Current page.
- Use the available options to design the breadcrumbs.
Working with breakpoints:
You can design the breadcrumbs per breakpoint so the element looks ideal on every screen.