Suggested social posts in your Social Media Marketing dashboard help you keep a steady stream of content going without having to start from scratch every time. The planner analyzes your site and connected social accounts to suggest posts, then lets you customize the text, timing, channels, and images so every post still feels like your brand.
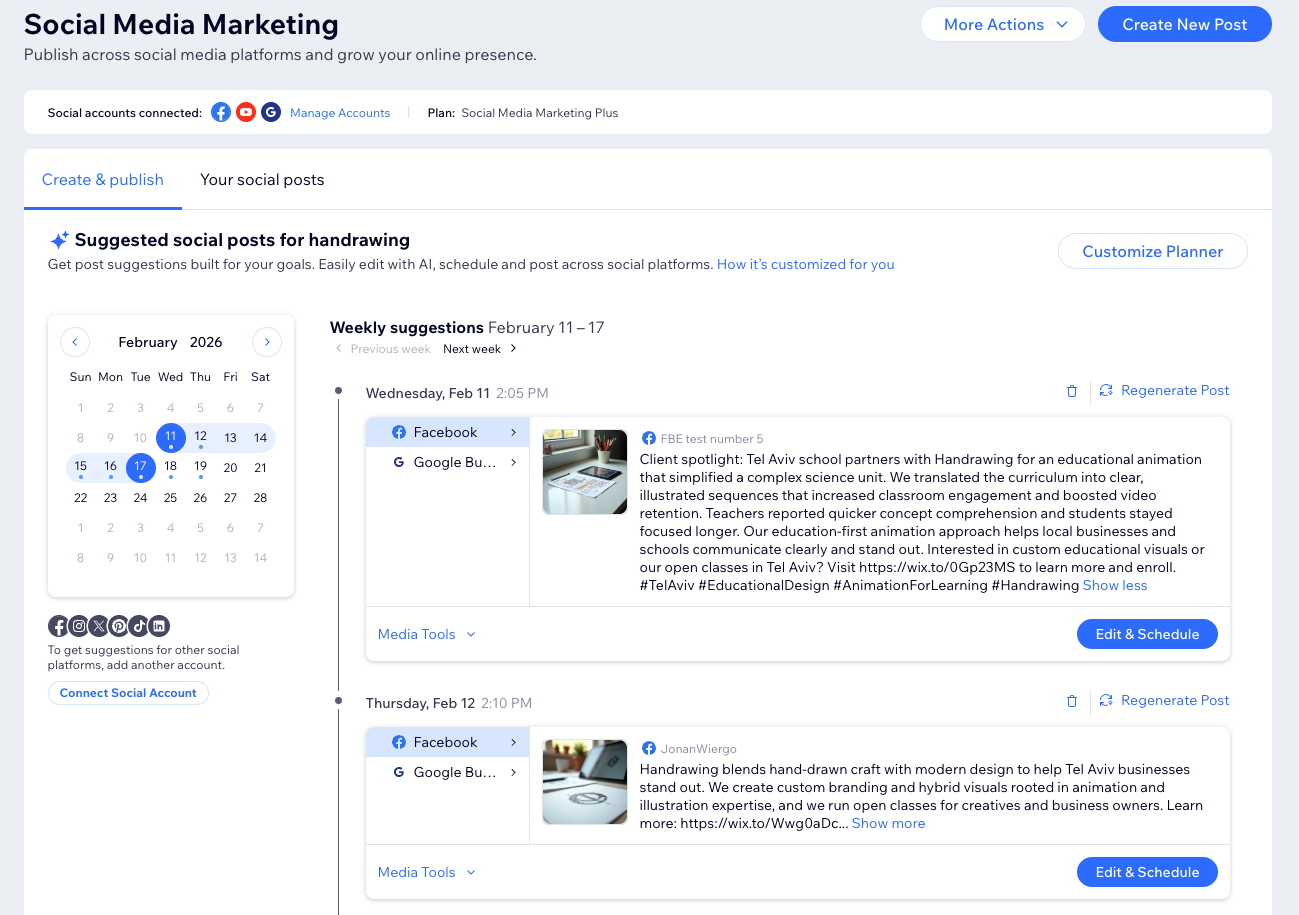
Reviewing your suggested social posts
Your Suggested social posts section shows a calendar and a weekly list of recommended posts for each connected social channel. From here, you can quickly scan your upcoming content, open individual suggestions, and decide what to keep, edit, or schedule.
To review your suggested social posts:
- Go to Social Media Marketing in your site's dashboard.
- Make sure the Create & publish tab is selected.
- Scroll to the relevant day in the timeline.
- Click the relevant social platform(s) to review the suggested content.
- Click Edit & Schedule to publish your post(s).
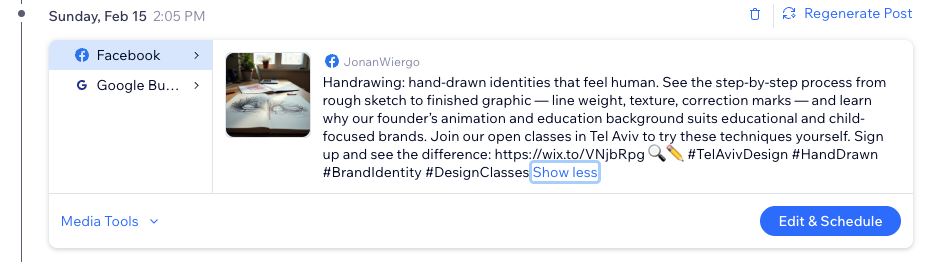
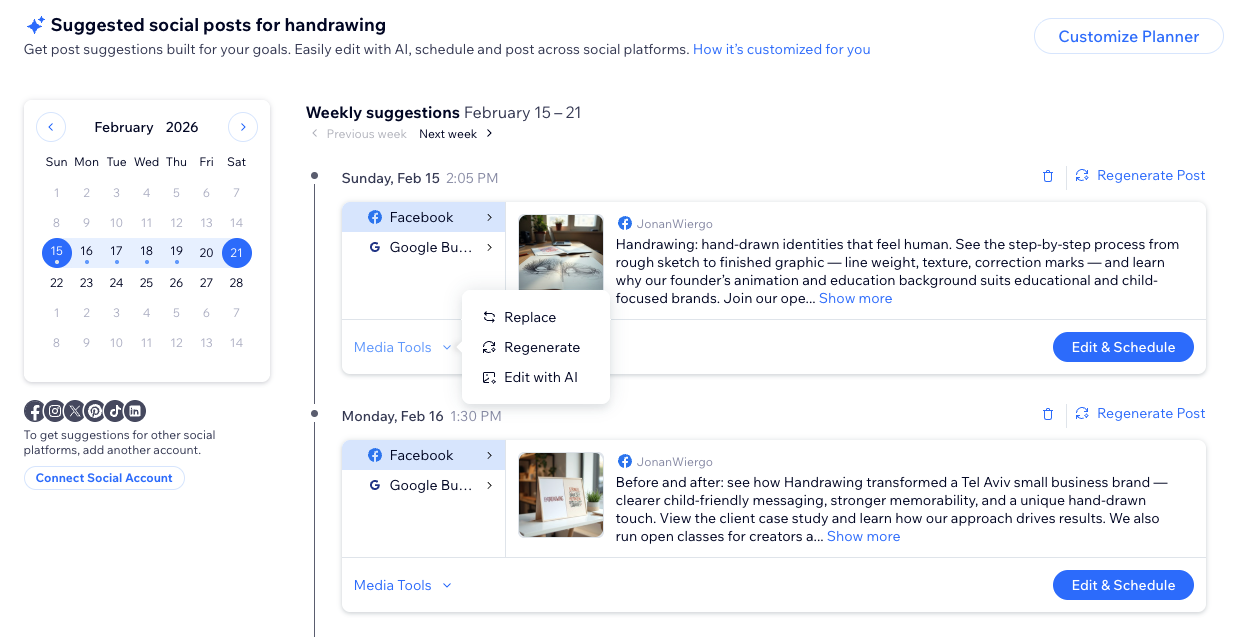
Managing your suggested social posts
Once you have found a suggestion you want to work with, you can manage the content in more detail. You can adjust the text, update the image, regenerate the whole suggestion, or fine-tune the image with AI before scheduling.
To manage your suggested social posts:
- Go to Social Media Marketing in your site's dashboard.
- Make sure the Create & publish tab is selected.
- Scroll to the relevant day in the timeline.
- Click the Media Tools drop-down and select the relevant option:
- Replace: Choose a different image for the post from your media or upload a new one.
- Regenerate: Generate a new version of the suggested post, including updated text and image.
- Edit with AI: Open the AI image editor to describe the changes you want to see.
Customizing your suggested posts planner
You can customize your suggested posts planner so the ideas you get match your goals, audience, and brand. Use the planner settings to control what AI focuses on, how it sounds, and how often you receive new suggestions.
To customize your planner:
- Go to Social Media Marketing in your site's dashboard.
- Make sure the Create & publish tab is selected.
- Click Customize Planner.
- Choose the relevant AI marketing settings:
Tell AI what your business is about, who you are speaking to, and what you want to achieve. This helps your suggested social posts stay relevant.
- Click General.
- Customize the settings using the options:
- Business goal: Enter a short description of what your business wants to achieve overall. For example, growing repeat customers or expanding into a new market.
- Unique selling point: Describe what makes your business different from competitors so suggestions highlight your strengths.
- Target audience: Describe who you are trying to reach. For example, local families with young children or small creative agencies.
- Main marketing goal: Select the main goal you want your marketing content to focus on. Select from the available options Drive traffic, Increase brand awareness, Increase sales, Collect leads, or click Custom to write your own.
- Language & location: Check the Site language, Regional format, and (if available) your Target location to make sure content and dates are generated in the right language and format for your audience.
- Click Save.
Choose which calendars, events, and topics your planner should use when suggesting posts.
- Click Content focus.
- Customize the settings using the options:
- Calendars & special days: Click the drop-down to choose the calendars that are relevant to your audience. These calendars include various Religions and Countries that can be used in suggested posts.
- Custom events: Click Add event to add important business dates, such as product launches, sales, or anniversaries. Enter the event details so AI can suggest posts around those dates.
- Content topics: In the Content topics field, enter or edit the main themes you want to talk about in your marketing. You can also click Generate topics to let AI suggest topics based on your business.
- Excluded topics: Enter any topics you do not want your planner to focus on. This helps AI avoid suggestions that are off brand or not relevant.
- Click Save.
Set how your suggested posts should sound and look so they match your brand identity.
- Click Brand voice.
- Customize the settings using the options:
- Tone of voice guidelines: Enter a short description of how you want your brand to sound in marketing content, such as friendly and encouraging or professional and informative. You can also click Generate from text sample to paste in an example of your writing and let AI create guidelines for you.
- Writing point of view: Click the drop-down to choose the point of view for your content.
- Image style: In the Imagery guidelines field, describe the visual style you want for generated images, such as colors, mood, or level of realism. You can also click Generate from image example to base the guidelines on an existing image.
- Click Save.
Control how often you receive suggestions and which social platforms they use.
- Click Plan preferences.
- Adjust how often you want suggestions in the Suggestion frequency section:
- Social media: Click the drop-down to choose how many suggested social posts you want per week.
- Blog: Click the drop-down to choose how many blog post ideas you want per week.
- Email marketing: Click the drop-down to choose how many email ideas you want per month.
- In the Social platforms section, connect the accounts you want to receive suggested social posts for.
Note: If there is a loading issue, click Refresh and try again. - Click Save.