

Wix POS Go: Setting Up the Wix POS Go Card Reader
4 min
In this article
- Step 1 | Connect to Wix Payments
- Step 2 | Activate Wix POS as a payment method
- Step 3 | Purchase your Wix POS Go
- Step 4 | Start your reader and connect to WiFi
- Step 5 | Generate and enter your code
- Step 6 | Log in to your Wix account
- Troubleshooting
With your Wix POS Go card reader you can collect payment from your customers by using it on its own, or together with one of our POS solutions: Desktop POS, or POS Register.
In order to use a card reader to process payments in your preferred way, you first need to connect to Wix Payments, activate Wix POS, purchase the card reader itself, and then set it up in on your dashboard.
Important:
- The Wix POS Go card reader is currently only available in the US, Canada and UK.
- You can use the Wix POS Go on its own only with Wix Stores.
- When using the Wix POS Go with the Desktop POS or the POS Register solutions, you can collect payments for Wix Stores, Wix Bookings and Wix Restaurants (New).

Step 1 | Connect to Wix Payments
To be able to use your Wix POS Go card reader, you need to first connect to the Wix Payments payment provider.
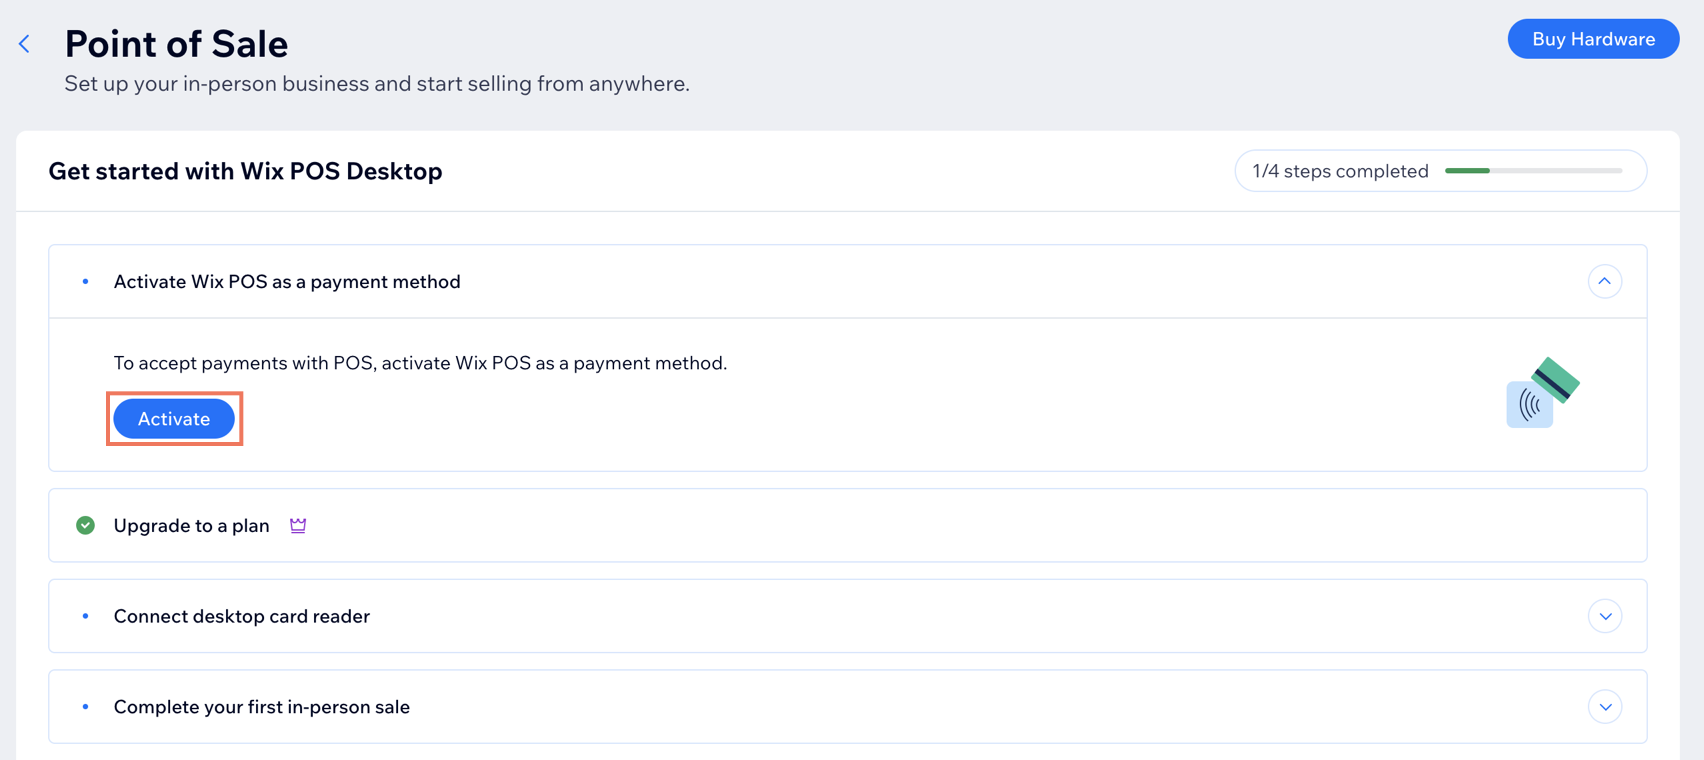
Step 2 | Activate Wix POS as a payment method
After you have connected your account to Wix Payments, activate Wix POS as a payment method.
To activate Wix POS as a payment method:
- Go to POS Home in your site's dashboard.
- Click Activate.
Step 3 | Purchase your Wix POS Go
Once you have activated Wix POS as a payment method, you can order your Wix POS Go from the Wix POS shop.
Step 4 | Start your reader and connect to WiFi
When you have your card reader, you can connect it to a WiFi network to start pairing it with your Wix account.
Note:
When using your reader with the Desktop POS or POS Register solutions, make sure to connect it to the same WiFi network as your computer or tablet.
To start setting up your reader:
- Unbox your card reader and insert the battery.
- (If necessary) Charge your reader.
- Go to POS Home in your site's dashboard.
- Click Pair Reader.
Note: If this is not your first reader, go to your Point of Sale Settings to pair it instead. - Turn on your reader and select your language and country.
- (On your POS Home pop-up) Click Next.
- Select an option:
- Your device automatically opens WiFi settings: Select your WiFi network.
- Your device does not open WiFi settings: Manually access WiFi settings.
- Swipe right from the edge of the screen and tap the Settings button.
- Enter the admin PIN 07139, then select Network.
- Select your WiFi network.
- Click Continue on your device.
- (On your POS Home pop-up) Click Next.

Step 5 | Generate and enter your code
To finish pairing your device with your account, enter the code displayed on the device screen in your POS Home pop-up. After your reader is paired, you'll see it listed in your Point of Sale Settings.
To generate and enter your code:
- Check if a code is displayed on your card reader screen.
- Select an option:
- Code is displayed: Enter the three-word code in the POS Home pop-up, including the hyphens.
- Code not displayed: Generate a code and enter it on the pop-up:
- Swipe right on your card reader screen.
- Tap the Settings button.
- Select Generate pairing code.
- Enter the three word code in the POS Home pop-up, including the hyphens.
- (Optional) Give your card reader a name.
Tip: If you plan on using more than one reader, this will help you manage them. - Click Pair Reader.

Step 6 | Log in to your Wix account
Log in to your Wix account so that the POS Go card reader can connect to your site and load your products.
Tip:
After logging in for the first time, you'll stay logged in so that your card reader remains connected to your store.
To log in:
- Tap the POS Go screen.
- Choose how you want to log in:
- QR code:
- Tap the QR code.
- Scan it with your mobile device and tap the URL that appears.
- Enter the code displayed on the POS Go screen on your mobile device.
- Tap Connect.
- Log in with Google:
- Tap the Google icon
 .
. - Select the Gmail account associated with your Wix account.
- Tap the Google icon
- Log in with email:
- Enter the email address associated with your Wix account.
- Tap Continue with Email.
- QR code:
- If you have multiple sites, select the site you want to use.
What's next?
Now that you have paired your reader, you can start using your Wix POS Go card reader.
Troubleshooting
If you are experiencing any issues setting up your card reader, click below.
Why can't I pair the card reader to my computer?
