

Improving Conversion Tracking with Google Tag Manager
3 min
In this article
- Step 1 | Find your Conversion ID and Label in Google Ads
- Step 2 | Set up a Conversion Tag in Google Tag Manager
Improve your conversion tracking and remarketing capabilities by passing additional information like purchase value, currency, and transaction IDs through Google Tag Manager.
Important:
By using this service, you are engaging directly with a third-party service provider. We recommend reviewing the service provider's Privacy Policy and Terms of Use prior to your use of such third-party service. You acknowledge that we are not liable for any loss or damage resulting from your use of such third-party service, including any liability arising from any personal data exchanged between you and such third-party.
Note:
- To use this feature you must have a Premium site with a connected domain.
- If you don't use Google Tag Manager, you can also improve your conversion tracking using Google Ads Conversions.
Step 1 | Find your Conversion ID and Label in Google Ads
First, you need to find your Conversion ID and Conversion Label in your Google Ads account.
To find your Conversion ID and Label:
- Go to your Google Ads account,
- Click Tools & settings in the top right corner.
- Select Conversions under Measurement in the drop-down menu.
- Click Add conversion
 .
. - Create the conversion type that you want to use (for example, website).
- Select the type of conversion action to track from the Category drop-down menu.
- Enter a name for the conversion action in the Conversion name field.
- Choose a value for the conversion action.
- Click Create and continue.
- Click Use Google Tag Manager to view your Conversion ID and Conversion label.

Step 2 | Set up a Conversion Tag in Google Tag Manager
Next, you need to set up your Conversion Tag in your Google Tag Manager account.
To set up your tag:
- Go to your Google Tag Manager account.
- Click New Tag.
- Enter a name for your tag.
- Click Tag Configuration.
- Choose Google Ads Conversion Tracking.
- Click Create.
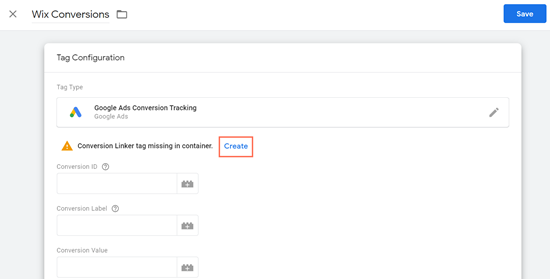
- Enter a name for the container.
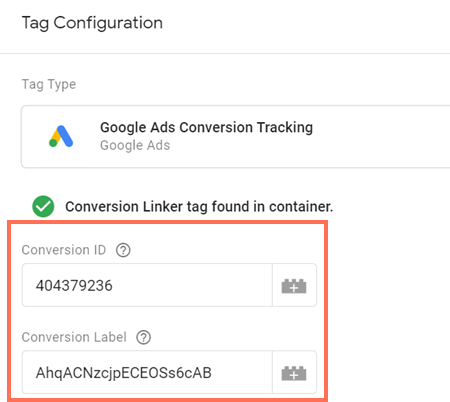
- Enter your Conversion ID and Conversion Label in the fields.
- Click Save.
- Click Add Trigger in the pop-up.
- Click Add trigger
 .
. - Enter a name for the trigger.
- Click Trigger Configuration.
- Choose a trigger type.
- Click Save to create your trigger.
- Click Save to save your tag.
