

Wix Stores: Importing Products to Wix Stores
8 min
In this article
- Step 1 | Download the Wix CSV Template File
- Step 2 | Add Your Products & Upload the File
- Adding your products
- Uploading the CSV file
- Dealing with Errors
- FAQs
Planning to move from another eCommerce platform to Wix Stores? We're glad to have you on board. You can import your products using our Wix CSV template file to get your store up and running.
Before you begin:
- To migrate products from a store built on another eCommerce platform, first go to that platform and export your product data. Then, go to step 1 below.
- To migrate from another Wix store, go to the site and export your products. Then, skip to step 2 below (Adding your products) to import the products to your new store.
- To learn how to export and import products from the same store, click here.
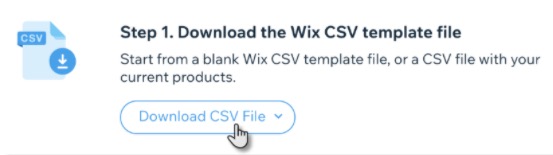
Step 1 | Download the Wix CSV Template File
Download the Wix CSV template file and save it on your computer. This file comes with 3 sample products, 2 of which have product variants. These are examples to help you understand how to add your products to the file.
To download the Wix CSV template file:
- Go to the Store Products tab in your site's dashboard.
- Click More Actions.
- Click Import.
- Click Download CSV File.
- Choose an option:
- Blank Wix CSV template: Import products from another store.
- Wix CSV with your products: Update existing products. Learn more
- Open the CSV file.
Note: Mac users should open the file with Numbers or Excel version 15 or higher. - Save the downloaded file in CSV (Comma delimited) format.
Note:
You can also click here to download the Wix CSV template file.
Step 2 | Add Your Products & Upload the File
Add your products to the template file you downloaded. Once you're ready, upload the file to your store.
Adding your products
- Enter the product data into the template, following the instructions in the table below. You must also follow these guidelines:
- Do not add or delete columns.
- Do not edit column names.
- Each product must have a handleId, name, fieldType, price.
- Each variant must have a handleId, fieldType, optionChoices.
- If you're unsure how to fill out non-mandatory fields, leave them blank and make changes to products later.
- Your file from another platform may have fields not found in the Wix CSV Template file. Do not add them.
- Delete the rows of sample data.
Note: You can also leave the sample data and delete the sample products after the import. - Save the file in a CSV format.
| Field | What is it? | Instructions |
|---|---|---|
handleId | A unique label used to identify the product. | Field is mandatory Variants of a product must have the same handleId as the product. |
fieldType | Whether item is a product or a variant | Field is mandatory Must be Product or Variant. |
name | The name you gave your product | Mandatory for products. Variants should be left blank. Max. length: 80 characters |
description | Your product description | Max. length: 8000 characters |
productImageUrl | Product images | Max. 15 images / GIFs per product separated by a semicolon ; . Do not add a space after semicolons. Must be a URL. Learn how to locate the URL. Note: Image URLs stored on other platforms won't load if that store (hosted on the other platform) has been deleted. Alternatively, you can leave this field blank and upload images directly to your Wix store after import. The accepted file formats are .jpg, png, and gif. |
collection | The collection(s) (categories) a product belongs to | Enter collection names, separated by a semicolon ;. Don't include the "All products" collection. |
sku | Stock keeping unit | Max. length: 40 characters Can be made up of characters or digits. Must be unique. |
ribbon | Ribbon appears on product on live site. (e.g. “On Sale”) | Max. length: 20 characters |
price | Product price | Mandatory for products. Leave blank for variants Positive number or zero. No more than 9 digits. No more than 2 digits after the decimal point. |
surcharge | Is variant price the same as the product price? Is it less? Is it more? | Leave blank for products. Leave blank if a variant has no surcharge. Can be a positive or negative number. No more than 9 digits. No more than 2 digits after the decimal point. |
visible | If item is hidden or visible in gallery | Must be TRUE or FALSE. Case sensitive If field is left blank, it's marked TRUE |
discountMode | Amount discount or percentage discount | Must be AMOUNT or PERCENT. Case sensitive |
discountValue | How much the discount is | No more than 9 digits If percent, must be between 1-99 If amount, must be less than product price. |
inventory | Product or variant inventory amount | Must be InStock, OutOfStock, or a number (e.g. 55). If field is left blank, it is marked InStock |
weight | Product weight | No more than 9 digits No more than 3 digits after decimal point |
cost | Cost of good (if you entered how much the product costs you to buy or make) | No more than 9 digits No more than 2 digits after decimal point |
productOptionName | Name of option type (e.g. color, size) | No more than 50 characters Maximum 6 option names |
productOptionType | Choose Color or "drop-down" for everything else | Mandatory for product options. Must be either COLOR or DROP_DOWN Case sensitive |
productOptionDescription | Option choices | In product rows, enter all products options (if present) separated by a semicolon ; In variant rows, enter the relevant variant description. Drop_Down: Enter a text description. Max. length: 20 characters per option COLOR: Enter an RGB value (+ text description) OR hexadecimal value (+ text description) per option. Note: Best to enter a value + text (e.g. #ffffff:white;#000000:black) OR RGB(255, 165, 0):Orange; RGB(94,162,38):Green |
additionalInfoTitle | Additional product information section title | Mandatory when there is additional info. A maximum of 6 allowed per product. Max. length: 50 characters |
Additional info description | Additional product information section contents | If you enter HTML code, make sure it is accurate because it won't be validated. Incorrect HTML tags may cause the Product Page to stop functioning. Max. length: 8000 characters |
customTextField | Title of custom text field on live site | Mandatory when there is custom text A maximum of 2 allowed per product. Max. length: 100 characters |
customTextCharLimit | Character limit customers can enter | Mandatory when there is custom text Enter a value between 1- 500 |
customTextMandatory | Whether customers are required to enter custom text | Must be either TRUE or FALSE Case sensitive |
Once all the data has been entered, you can go back to the Store Products tab and upload the file.
Uploading the CSV file
- Go to the Store Products tab in your site's dashboard.
- Click More Actions.
- Click Import.
- Click Upload CSV File.
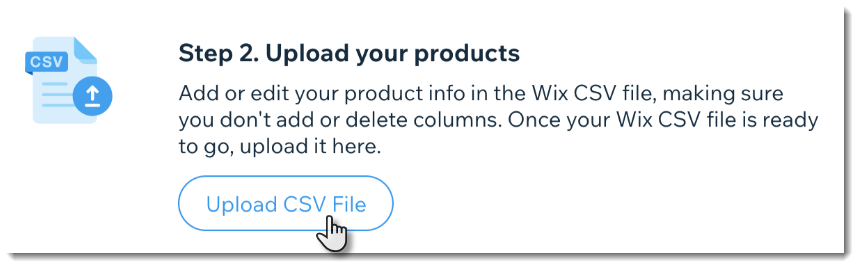
- Upload the updated file you saved and click Continue.
- Read the import review and check for error messages.
- Do one of the following:
- No products with errors: Click Import Products to complete the process.
- Products with errors: If you have products with errors, you can either correct the errors and import again (see instructions below) or import your products as is. If you go ahead and import without fixing errors, only products without errors are imported.
Note: If you decide to import without correcting the errors, first click View Errors so that you know which products or variants are not imported.
Important:
Product images may take up to one hour to upload if you have many products. You can continue to make changes in your store while the images upload in the background.
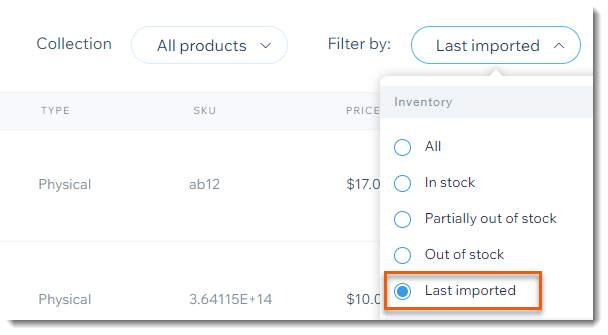
Tip:
To view your imported products, go to the Store Products tab in your site's dashboard and select Last imported from the Filter by by drop-down.
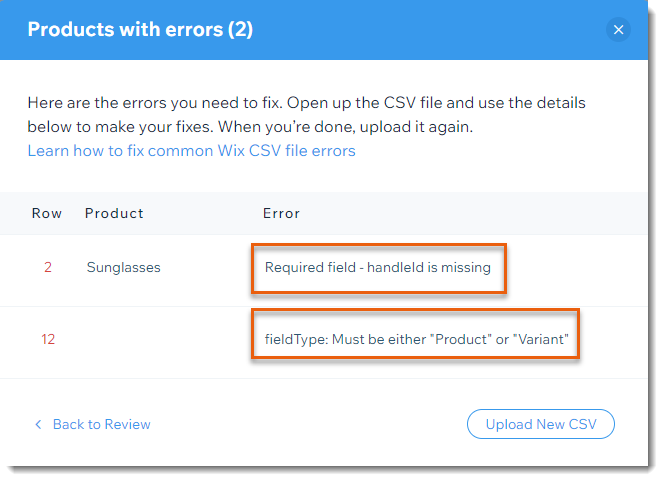
Dealing with Errors
If any of the rows in the file contain a critical error, it is displayed in the Import review.

To handle errors & upload a corrected file:
- Click View Errors.
- View the specific error in the Error column.
Note: For information on what each error means, click here.
- Open the CSV file.
- Correct the errors.
- Save the CSV file.
- When you're ready, click Upload New CSV to import the corrected file.
Note: It may take a few minutes to complete the import process.

FAQs
Can I use the import tool to make bulk edits to products in my existing Wix store?
Can I use the import tool to move products from one Wix store to another?
Are there other ways to migrate from other eCommerce platforms?
How many products can I import using one file?
Can I import digital products?
I need to add image URLs to the template. How do I find an image URL?

Can I import a product file with non-Latin characters?

Can I upload a file with superscript or subscript characters?
What happens if I import from a store with a different currency?
