Editor X: Editing Permissions Per Page
4 min read
Editor X is transitioning to Wix Studio, our new platform for agencies and freelancers.Learn more about Wix Studio
Manage who can edit pages and masters on your site directly from Editor X. Whether it's team members or site collaborators, you can control their access level so that they're only able to edit relevant content. The exact actions they can perform still depend on their specific role.
How do I access page editing permissions?
In this article, learn how to:
Important:
This feature is only available to the Owner and Co-Owner of the site.
Viewing and changing permissions per page
Decide who's allowed to edit your pages and master sections. The Editing Permissions Per Page panel shows a list of everyone who has access to this Editor, whether they have a site role or a team role (or both).
As the site owner, you can give someone permission to edit all pages and all master sections, or just the specific pages that you select.
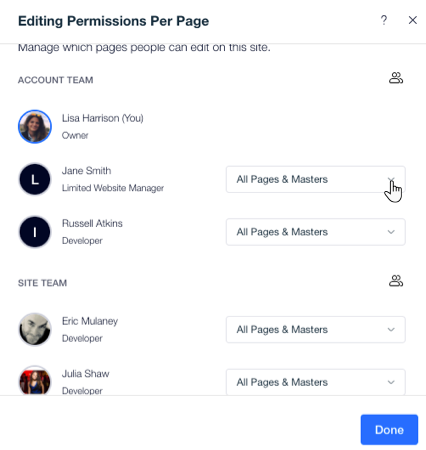
To view and change permissions per page:
- Click Site at the top of Editor X.
- Select Page Editing Permissions.
- Click the drop-down next to a person's name to edit their permissions.
- Select the checkbox(es) next to the relevant access level:
- All pages: Can edit all site pages.
- Specific pages: Select the pages this person should be able to edit.
- Masters: Can edit all master sections.
Note:
To grant someone permission to edit Masters, you must first select the All pages checkbox.
Using Velo to add code?
People with the Edit Code permission can edit code across all of your site pages, regardless of their page editing permissions. However, if they don't have the right page permission, they won't be able to select elements, adjust their design and other actions on the actual canvas.
Changing an existing role
Hover over a person's name and click the Settings icon  to change their role on your site or account.
to change their role on your site or account. 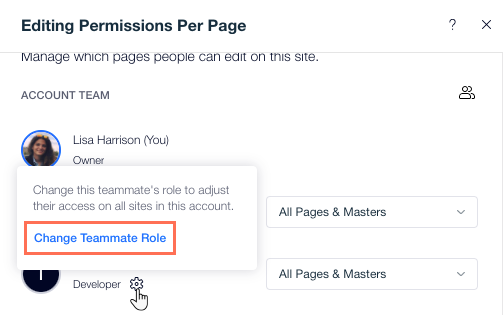
To change someone's role:
- Click Site at the top of Editor X.
- Select Page Editing Permissions.
- Hover over the person's name and click the Settings icon .
- Click Change Teammate Role / Change Site Role.
- Select the checkbox next to the relevant role(s).
- Click Save.
Important:
Changing someone's role automatically resets their page editing permissions. Make sure to come back to this panel and update their permissions.
Managing Site or Team Roles
While working on your page editing permissions, you can adjust your site or team roles on the spot. For example, if you want to create a new role for someone or change the permissions associated to an existing role.
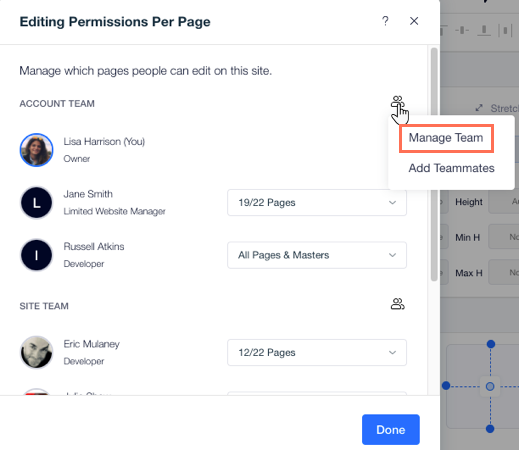
To manage your roles:
- Click Site at the top of Editor X.
- Select Permissions Per Page.
- Click the Manage icon
 next to Account Team / Site Team.
 - Select Manage Team / Manage Roles.
Inviting people to your Site or Team
Need more help with this site? Invite people to your site or account team. Once they accept your invite, they'll appear in the Page Editing Permissions panel so you can adjust their permissions.
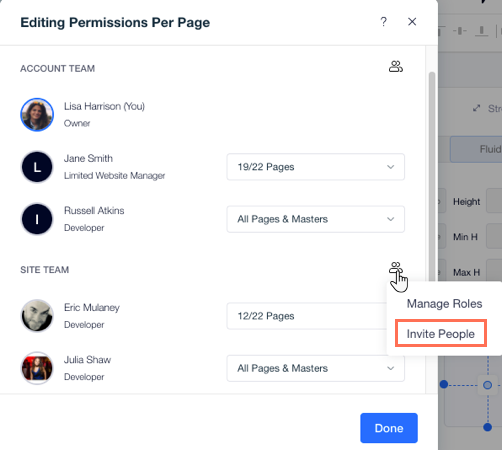
To invite people to your site / team:
- Click Site at the top of Editor X.
- Select Permissions Per Page.
- Click the Manage icon next to Account Team / Site Team.
- Select Add Teammates / Invite People.
- Fill in the person's email address and select their role(s).
- Click Send Invite.
Note:
People must accept your site or team invite before they appear in the Editing Permissions Per Page panel
