

Wix Stores: Adding and Customizing Product Options
10 min
In this article
- Creating product options
- Displaying different images for product option choices
- Setting inventory preferences
- Setting different prices for variants
- Setting the cost of goods for variants
- Adding weights to variants
- Making bulk edits to product variants
- FAQs
Create product options so you can sell different versions of the same product. You can manage inventory for each variant separately, set different prices for different variants, make bulk changes and more.

Creating product options
Before you create product options, make sure you understand the product option terminology.
- Product Options: This refers to the type of option, for instance "Color".
- Product Option Choices: This term refers to the available choices for a product option. For the "Color" option, your choices might be "Blue" or "Green".
- Variants: This term refers to the specific item you sell. For example, if your product has 2 product options (size and color), and each of them has 2 choices (small or large; blue or green), your product has 4 variants:
- Small - blue
- Small - green
- Large - blue
- Large - green
To create product options:
- Go to the Store Products tab in your site's dashboard.
- Do one of the following:
- Click to select an existing physical product.
- Click New Product and select Physical.
- Scroll down to the Product Options section.
- Click + Add Options.
- Choose what you want to do:
Create color-swatch options for your product

 .
.
Create text options for your product

Tip:
You can change a product option name (e.g. Size). When you do, it updates for all products. Click the Settings icon next to Product Options to get started.
next to Product Options to get started. Displaying different images for product option choices
Help customers visualize your product options by displaying separate images.

Note:
Each image can be linked to one set of option choices. For example, if a product has 2 colors and 2 shapes, you can link a different image to each color or each shape, but not to all 4 variants. You can vote for this feature.
To link images, GIFs, and videos to product option choices:
- Go to the Store Products tab in your site's dashboard.
- Select a product with product options.
- Scroll down to the Product Options section and click Connect Images.
- If you created more than one type of option, select the relevant option.
- Click the Plus icon
 next to the first option choice.
 - Select or upload up to 15 images for each option choice and click Done.
- Click Apply.

Setting inventory preferences
You can manage inventory for product variants in two ways:
- Tracking inventory: Track how many of a specific product variant you have in stock. When you make a sale, the inventory amount is automatically updated.
- In Stock / Out of Stock: You can manually assign product variants an "In Stock" or "Out of Stock" status. When you run out of a product variant, you can manually change the status to "Out of Stock".
To set how you manage inventory for variants:
- Go to Store Products in your site's dashboard.
- Select a product with product options.
- Scroll down to the Product Options section.
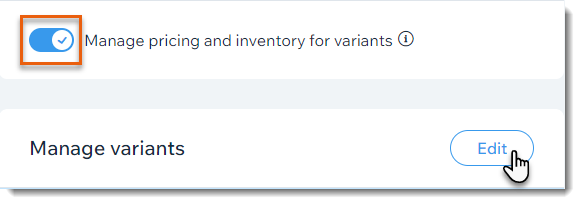
- Click the Manage pricing and inventory for variants toggle to enable it.
- (Optional) Enter a unique SKU (Stock Keeping Unit) for each variant.
- Select an inventory management option:
- Track inventory:
- Click the Track Inventory toggle at the top right to enable it.
- Enter the total number of products in stock in the Inventory field.
- Mark inventory as In Stock / Out of Stock:
- Click the Track Inventory toggle at the top right to disable it.
- From the drop-down, select In stock or Out of stock.
- Track inventory:
- Click Apply.

Setting different prices for variants
You may prefer to sell different variants at different prices, for instance if you sell the same earrings in gold and silver.
After you enter a price for the product itself, you can add an additional charge to more expensive variants. Alternatively, you can make a negative price difference to reduce the base price.
To increase or decrease a variant price:
- Go to Store Products in your site's dashboard.
- Select a product with product options.
- Make sure the Manage pricing and inventory for variants toggle is enabled.
- If you previously saved variant inventory options, click Edit.

- Select an option:
- Increase the base price: Under Price Difference, enter the price increase (e.g. enter 10 to raise the price by $10).
- Decrease the base price: Under Price Difference, enter the price reduction (e.g. enter -10 to lower the price by $10).
- Click Apply.
Notes:
- If you set different prices, you can show that the price has a range (e.g. From $12.00).
- If you display a price per unit (e.g. $5 / 1 lb.) on your site, and you raise or lower the prices for product options, the correct price per unit does not adjust automatically. You can vote for this feature.
Setting the cost of goods for variants
The cost of goods is the amount it costs for you to make or buy the product.
You can enter a single cost of good for a product that has variants. The profit and margin are calculated automatically.
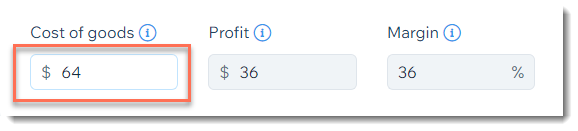
Alternatively, you can enter a separate cost of goods amount for each variant.
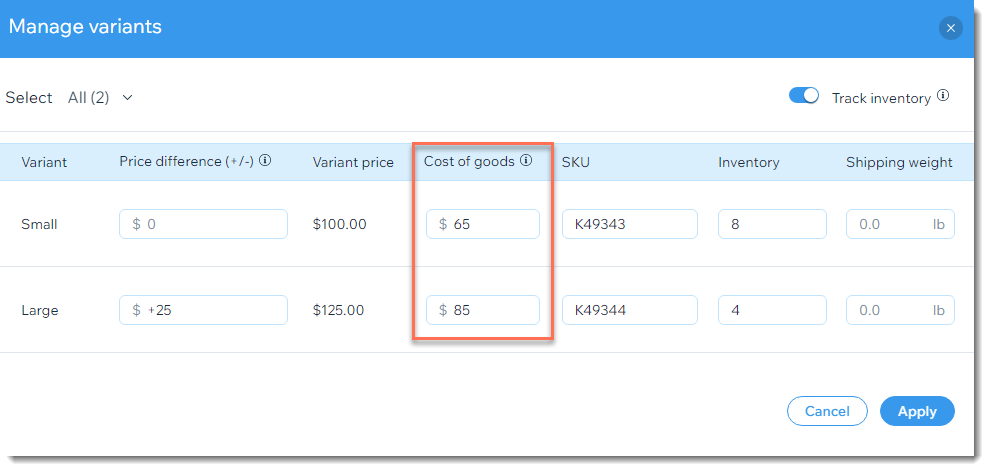
To set the cost of goods for individual variants:
- Go to Store Products in your site's dashboard.
- Select a product with product options.
- Make sure the Manage pricing and inventory for variants toggle is enabled.
- If you previously saved variant inventory options, click Edit.
- Enter the cost of goods for each variant.
Adding weights to variants
If you calculate shipping charges according to product weight, you need to enter a weight for each of your product variants.
To add weights to variants:
- Go to Stores Products in your site's dashboard.
- Select a product with product options.
- Make sure the Manage pricing and inventory for variants toggle is enabled.
- If you previously saved variant inventory options, click Edit.

- Select an option:
- Enter a weight in the Shipping Weight field for each variant.
- Enter the same weight for each variant:
- Click Select All at the top left.
- Click Set Weight.
- Enter the weight.
- Click the Checkmark icon
 .
.
- Click Apply.
Making bulk edits to product variants
After you create the product options you need, you can edit the price, weight, and inventory amount of multiple variants at once. For example, if you sell a product in 10 colors and 3 sizes, and want to add a weight to all 30 variants, you can do so in one go.
To update multiple variants:
- Go to Store Products in your site's dashboard.
- Select a product with product options.
- Make sure the Manage pricing and inventory for variants toggle is enabled.
- Click Edit.
- Select which variants you want to update:
- All variants: Select the checkbox at the top left to select all variants.
- Variants with specific product options: Click the All drop-down at the top left and select a product choice (e.g. "Small").

- Specific variants: Select the checkboxes next to the variants you want to update.
- Select the update you want to make from the options at the top right:
- Edit Cost of Goods: Enter the cost of good (how much it costs you to make or buy the product).
- Edit Price Different: Enter a positive or negative price difference to raise or lower the product's base price (e.g. enter -5 to reduce the variant price by $5).
- Edit Inventory: Enter an inventory amount (e.g. enter 20 to set the inventory amount to 20).
Tip: Go to the Inventory tab to do advanced bulk edits. - Set Weight: Enter a weight.
- Click Apply.

What's next?
- Update your inventory whenever you get more merchandise.
- Use the Wix app to scan barcodes.
- Click the Visibility icon
 to hide any variants you don't want to display in your store.

FAQs
Can I create product options for any product?
How many options, choices, and variants can I create?
How many product options can be displayed in the category page or grid gallery?

