header-logo
Getting started with WixLearn how to build your website and business using Wix.
Creating a websiteDesign and manage your site with smart functionalities.
Account & billingManage subscriptions, plans and invoices.
Using the Wix mobile appsRun your business and connect with members.
Connecting a domainLearn to purchase, connect or transfer a domain to your site.
Managing your businessGet tools to grow your business and web presence.
Promoting your siteBoost your visibility with SEO and marketing tools.
Studio, Partners & EnterpriseGet advanced features to help you work more efficiently.
Need more help?Find solutions, learn about known issues or contact us.
placeholder-preview-image
Wix LearnImprove your skills with our courses and tutorials.
Wix BlogGet tips for web design, marketing and more.
SEO Learning HubLearn to increase organic site traffic from search engines.
Website developmentBuild a custom site using our full-stack platform.
Hire a ProfessionalGet matched with a specialist to help you reach your goals.
placeholder-preview-image

Adding a DKIM (TXT) Record

2 min
A Domain Keys Identified Mail (DKIM) record is an email authentication tool. Adding it to your business email verifies that your email was sent from a reliable, trustworthy source and was not modified en route to your recipients. 
Important:
If your domain is connected via pointing, these directions do not apply. Contact your domain host to add DKIM records with them, as they control your DNS. 
Before you begin:
  • You need to get the DKIM record from your email provider.
  • The DKIM key bit length can be either 2048 or 1024 characters.

To add or update a DKIM record:

  1. Go to Domains in your Wix account.
  2. Click the Domain Actions icon  next to the relevant domain.
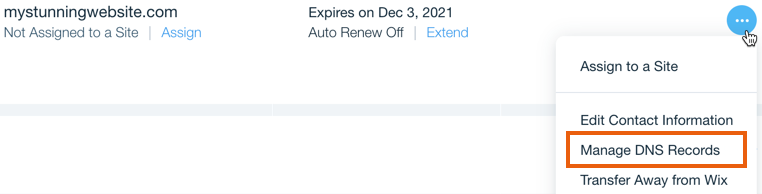
  3. Select Manage DNS Records
A screenshot showing the Manage DNS Records option in the Domain Actions menu.
  1. Scroll to the TXT (Text) section and click + Add Record.

A screenshot showing the Add Record button to add a TXT record in a Wix account.
  1. Enter the DKIM selector under Host Name
    Note: For Google Workspace business emails, click here to generate a DKIM record.
  2. Enter the DKIM signature under Value.
  3. Click Save

Helpmate

Hello

Need a bit more guidance?
Summary of this article
Unlock personalized helpLog in to get the most out of Helpmate.