

Wix Stores: Setting Up a Rate by Weight Shipping Rule
5 min
In this article
- Setting up a rate by weight rule
- Add weights to your products
- FAQs
Setting up Rate by Weight shipping rules makes sense for businesses that sell both lightweight and heavy items. This lets you charge for shipping in a way that reflects your actual shipping costs.
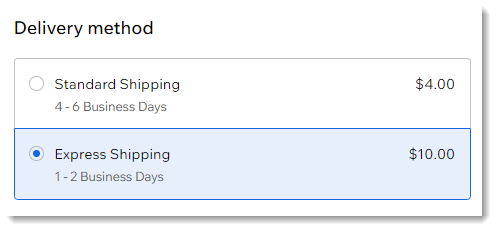
When customers check out, they'll only see the rates that apply to their order.
Setting up a rate by weight rule
After selecting a shipping region, you can create one or more sets of weight rules for that area.
For example, you can offer customers 2 shipping options, each with its own prices:
- Standard Shipping: $5 for packages under 2 pounds and $10 for packages over 2 pounds.
- Express Shipping: $8 for packages under 2 pounds and $16 for packages over 2 pounds.
Before you begin:
If you previously set up shipping (and tax) in a merchant account (e.g. in PayPal), remove these settings before starting.
To set up a rate by weight rule:
- Go to Shipping, delivery & fulfillment in your site's dashboard.
- Select an option:
- Create a new region: Click +Create Region and set up a new delivery area, then click Continue and select Shipping.
- Add a rate to an existing region: Click Add Rate next a region and select Shipping.
- Select Rate by Weight from the drop-down.
- Enter a name in the Name at checkout field (e.g. Standard Shipping).
- (Optional) Enter a time in the Estimated delivery time field (e.g. 2 - 4 business days).
- Enter your first weight range (e.g. 0 lb. to 2 lb.).
- Enter your second weight range (e.g. 2 lb. and up or add a maximum weight).
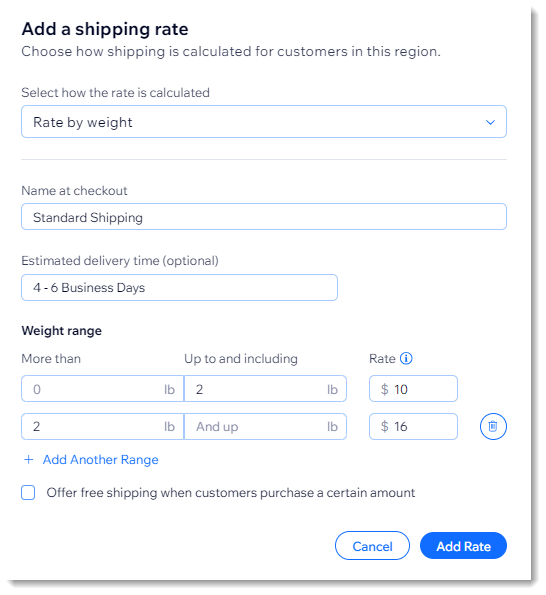
- Click Add Range to add additional weight ranges.
- (Optional) Offer free shipping over a certain amount:
- Select the Offer free shipping when customers purchase a certain amount checkbox.
- Enter the amount.
- Click Save.
- Follow the instructions below to add weights to each of your products.
Tip: If a product doesn't have a weight added, it's calculated as though it weighs 0.
Next steps:
Click Add Rate next to the region name to set up any of the following:
- An additional shipping option (e.g. Express Shipping)
- Local delivery
- Pickup
- Real-time USPS shipping calculations (US only)
Add weights to your products
To calculate shipping costs correctly, add a weight to each of your products. If you created product options and are managing inventory separately for each variant, make sure to enter the weight for variants.
To enter product weights:
- Go to Products in your site's dashboard.
- Select a physical product.
- Select an option:
- For products without product options:
- Scroll down to the Shipping and fulfillment section.
- Enter the product's weight in the Shipping weight field.
- For products without product options:

- For products with product options:
- Click Edit Variants.
- Enter a weight for each variant.
Tip: If the Shipping weight field isn't visible, click the Customize column icon and select the checkbox next to Shipping weight to display it.

FAQs
Click a question below to learn more.
What happens if there's no shipping rule in a particular region?

Can I add a handling fee?
 and select Add handling fees. Then, select the checkbox, enter the handling fee and save your changes.
How can I delete or deactivate a region or a rate?
 next to the region name and click Delete region.
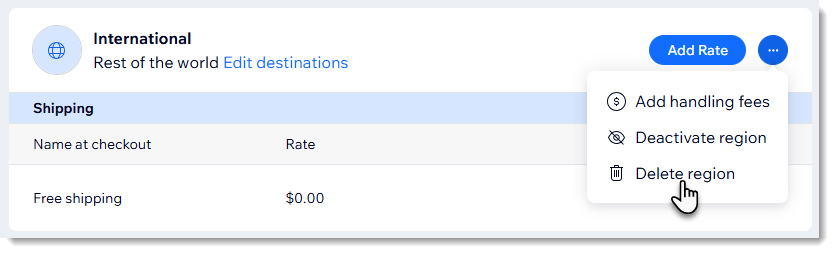
 .
.
What is the maximum number of weight ranges I can create?
