

Wix Restaurants: Setting Up DoorDash Drive for Your Restaurant
5 min
In this article
- Step 1 | Register with DoorDash Drive
- Step 2 | Enable online payments for your site
- Step 3 | Enable tips for restaurant orders
- Step 4 | Customize your delivery settings
- Step 5 | Enable DoorDash Drive
- FAQs
Important:
- DoorDash Drive is only available in the United States and Canada.
- You can set up orders with DoorDash Drive only for your default location.
Optimize your restaurant's delivery process with the pre-installed DoorDash Drive app on your site. Allow customers to order directly from your site while seamlessly managing all your deliveries. You can choose to handle some deliveries yourself, or let DoorDash Drive manage them for a straightforward flat fee per delivery.
Step 1 | Register with DoorDash Drive
To add DoorDash Drive as a delivery partner, register through your site's dashboard and follow the steps on screen.
Before you begin:
Make sure that your business info is up to date.
To register with DoorDash Drive:
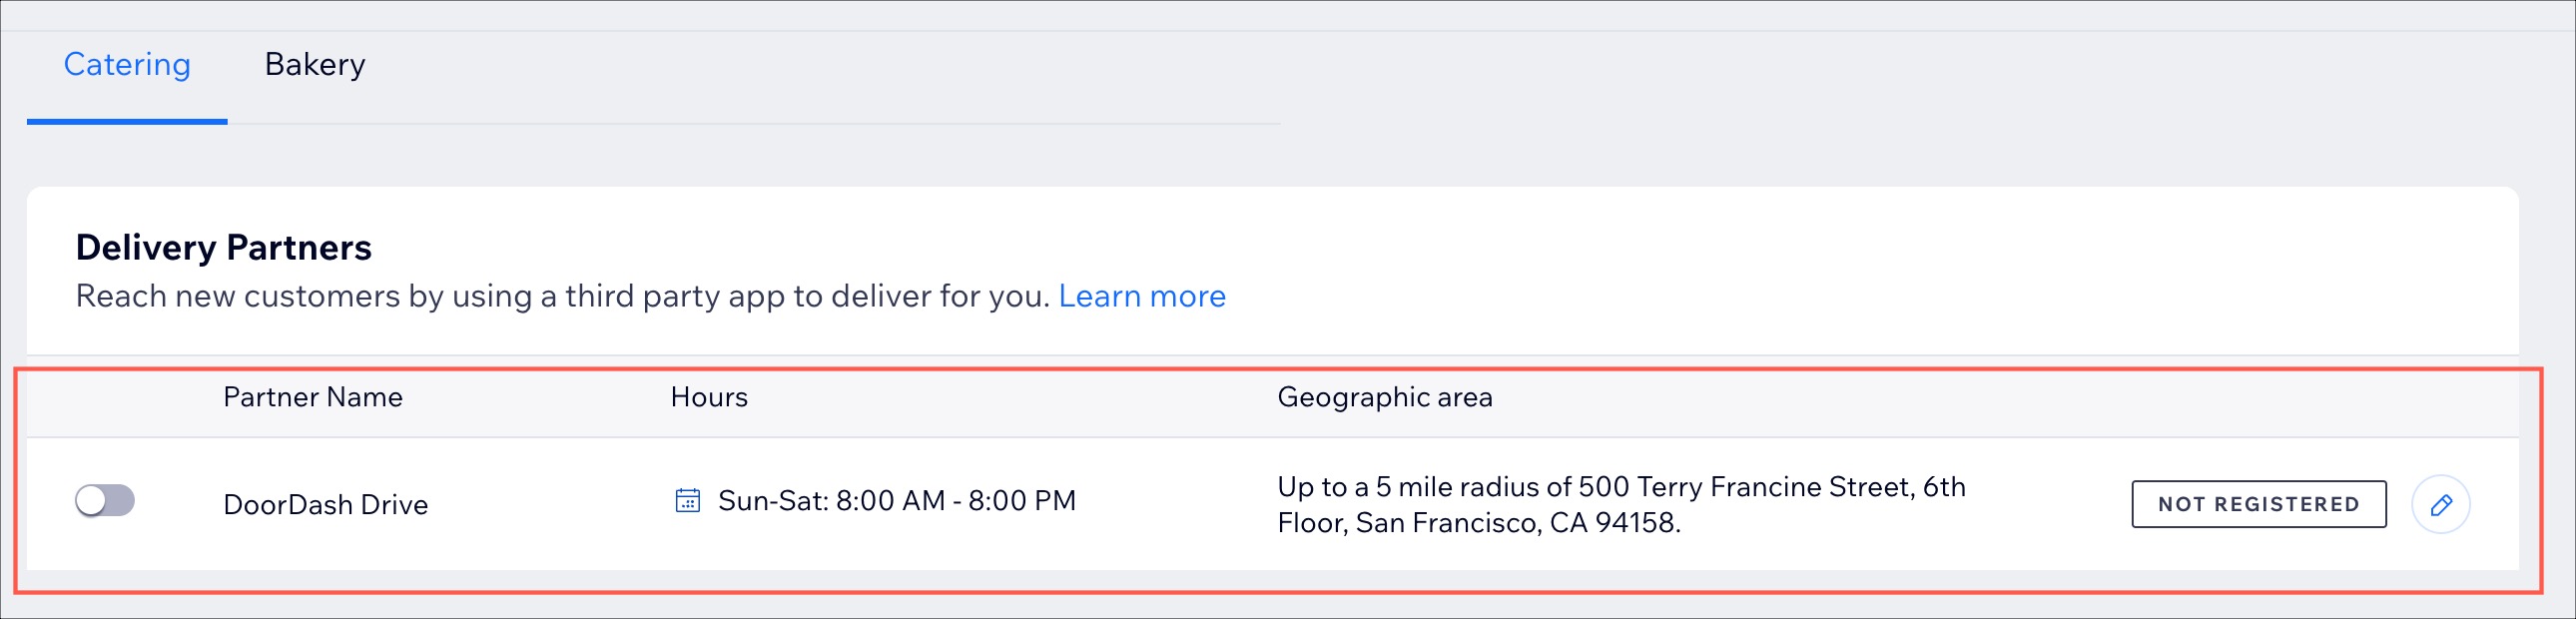
- Go to Pickup and Delivery in your site's dashboard.
- Click the Edit icon
 next to DoorDash Drive under Delivery Partners.
 - Click Register to begin the registration with DoorDash Drive:
- Click Agree & Continue to allow DoorDash Drive to manage restaurant orders and read basic site and business info.
- Enter your credentials and click Sign in.
- Enter your business information to sign the Wix integration contract and click Submit.
Step 2 | Enable online payments for your site
Accept payments directly through your site. Choose from various payment methods and providers, and select the options you want to display on your checkout page.
Important:
- Upgrade your site to accept payments.
- Disable manual payments to deliver with DoorDash Drive. DoorDash only accepts online payments and doesn't accept cash.
To enable online payments on your site:
- Go to Pickup and Delivery in your site's dashboard.
- Click the Edit icon next to DoorDash Drive under Delivery Partners.
- Click Go to Payments to set up online payments and disable manual payments.
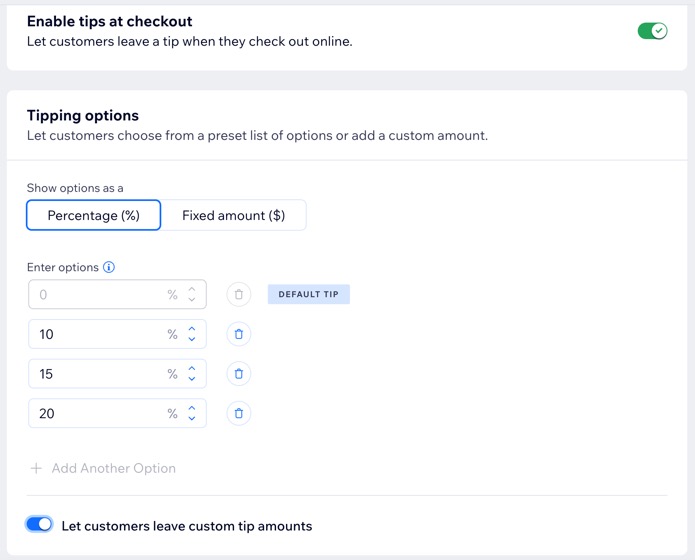
Step 3 | Enable tips for restaurant orders
Enable tips for DoorDash Dashers. DoorDash receives the tips customers leave at checkout when you fulfill deliveries with DoorDash Drive.
To enable tips:
- Go to Pickup and Delivery in your site's dashboard.
- Click the Edit icon next to DoorDash Drive under Delivery Partners.
- Click Go to Tips to start collecting tips at checkout.
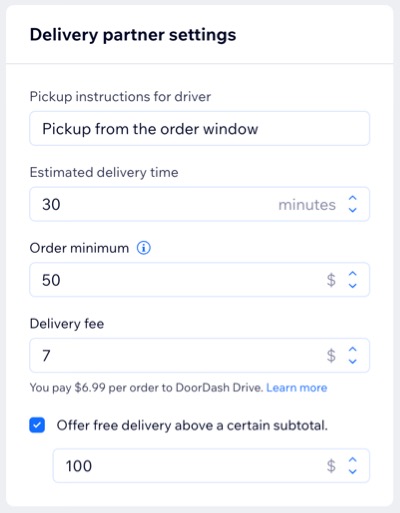
Step 4 | Customize your delivery settings
Customize delivery options such as pickup instructions, estimated delivery time, order minimum, and fees. Orders within a 5-mile radius of your business address are automatically assigned to DoorDash Drive.
To customize delivery settings:
- Go to Pickup and Delivery in your site's dashboard.
- Click the Edit icon next to DoorDash Drive under Delivery Partners.
- Enter your Delivery hours.
- Enter the Delivery partner settings:
- Pickup instructions for driver: Guidelines for drivers on how to collect the order.
- Estimated delivery time: The projected timeframe for the order to arrive at the destination.
- Order minimum: The minimum amount required for an order to be placed.
- Delivery fee: The charge applied for delivering the order.
- (Optional) Select if you want to Offer free delivery above a certain subtotal. Then, enter the subtotal.
- Click Save.
Step 5 | Enable DoorDash Drive
To complete the setup, enable the toggle to start delivering orders with DoorDash Drive.
To enable DoorDash Drive:
- Go to Pickup and Delivery in your site's dashboard.
- Enable the toggle next to DoorDash Drive under Delivery Partners.

FAQs
Click a question below to learn more.
How is DoorDash Drive different from DoorDash Marketplace?
What are the fees associated with using DoorDash Drive for my restaurant?
How does DoorDash Drive collect payment?
Can customers pay cash for DoorDash Drive deliveries?
Can I set up DoorDash Drive alongside my own delivery?
Can I use DoorDash Drive with Square POS?
