Wix Hotels by HotelRunner: Managing Your Reservations
9 min
In this article
- Adding reservations
- Filtering reservations
- Updating reservations
- Canceling upcoming reservations
Important:
This article refers to the latest version of Wix Hotels by HotelRunner. For information on the previous version of Wix Hotels, click here.
The Reservations tab is where you can add, filter and update your reservations and guest information. You can also customize how you view your reservations by adding or removing columns.
Adding reservations
You can add reservations manually and include important information such as the reservation dates, room, meal plan, and more. You can also update these details in the Reservations tab at any time.
Important:
- Make sure to add room identifiers. If a reservation doesn't have a room identifier, it doesn't appear properly in the reservation calendar, and only shows that the room is booked. You can find missing reservations (without a room identifier) in the Reservations page.
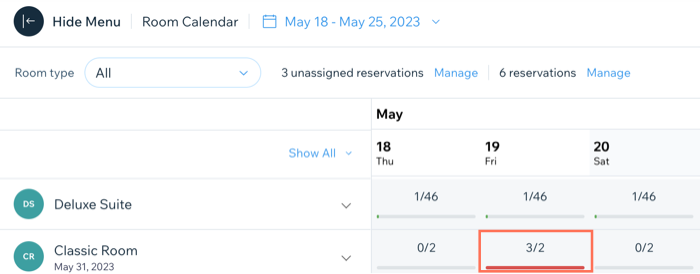
- When you manually add reservations, be careful not to accidentally overbook a room. Make sure to check your availability in the Reservation calendar before making the booking. When you overbook, a red line displays under the overbooked room in the reservation calendar.
To add a reservation:
- Go to Reservations in your site's dashboard.
- Click + Add Reservation at the top.
- Fill out the Reservation details:
- Check-in: Click to select the relevant Check-in date and time.
- Check-out: Click to select the relevant Check-out date and time.
- Adults/Children: Select the relevant number of guests from the relevant drop-downs.
- Room type: Select the relevant option from the drop-down.
- Rate plan: Select the relevant option from the drop-down.
- Meal plan: Select the relevant option from the drop-down (if you include a meal plan with the room type).
- Room identifier: Select the relevant option from the drop-down. This can include room numbers or room names, for example, "Presidential Suite" or "Beach Hut."
- Price calculated: Choose whether you apply the price Per night or for the Entire Stay.
- Price: Choose from the following options:
- Apply rate plan: Click Apply rate plan to assign the relevant rate plan pricing for the room.
- Custom price: Click to enter a custom price in the Price field. This is useful to make up for any inconvenience or issues guests may have experienced making their reservation or arriving at the hotel.
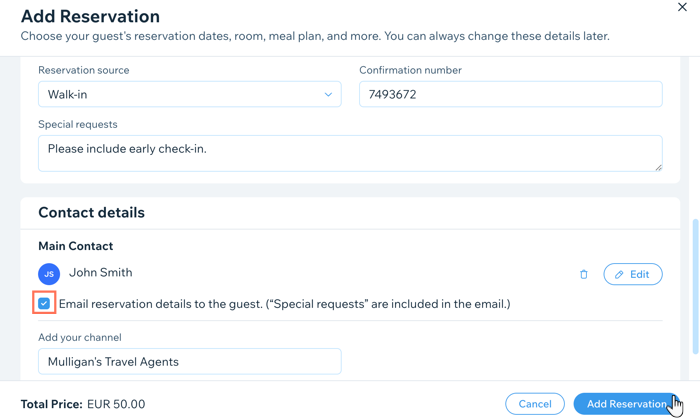
- Fill out the Contact details:
- Add your main contact: Enter the guest's name and select them from the list or click + Add New Contact.
Tip: After adding the main contact, click Edit to add their phone number, email and billing address. You can update their details at any time from the Guest Relations tab in your site's dashboard. - Email reservation details to the guest: Select the checkbox to send reservation details to guests via email.
- Add your channel: Enter the relevant channel through which the guest learned about your hotel.
- Add your main contact: Enter the guest's name and select them from the list or click + Add New Contact.
- Fill out the Extra details:
- Reservation source: Choose the relevant option from the drop-down. Tracking your reservation sources is useful for understanding your guests and how effective your marketing is.
- Confirmation number: Enter a confirmation number in the field.
- Special requests: Enter any special requests from the guests, including "early check-in" or "late check-out."
Note: If you email the reservation details to the guest, their special requests are included in the email.
- Click Add Reservation.
Filtering reservations
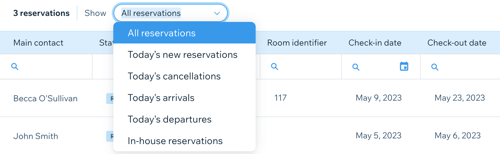
Organize and filter your reservations so you can see only the most relevant and useful information. You can filter the Reservations tab by reservation type, date range, room type, source and status.
To filter your reservations:
- Go to Reservations in your site's dashboard.
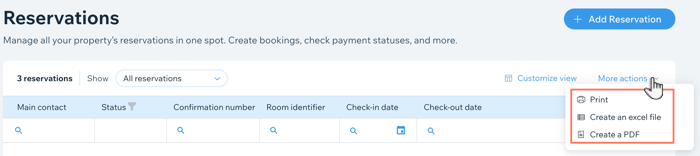
- Click Customize view at the top.
- Select the checkboxes next to all relevant data you want to view. This can include check in/out dates, contact name, booking date, and more.

- Click the drop-down at the top and select the relevant option.
What's next?
Click More actions at the top to Print, Create an excel file or create a PDF of the filtered view. This is useful for storing your records offline as well as for future reference and analysis.
Updating reservations
You can update reservation details, such as the guest's name, dates of stay, or room type at any time. This is great for last-minute changes in guest's plans or to correct errors in the initial reservation.
To update a reservation:
- Go to Reservations in your site's dashboard.
- Hover over the relevant reservation.
- Click Edit.
- Choose what information you want to add or update:
Check-In

Mark as paid

General info

Guests and contacts
 next to Guests and contacts.
Daily rates

Payments
Notes and special requests
Additional fees
 to Edit an existing additional fee.
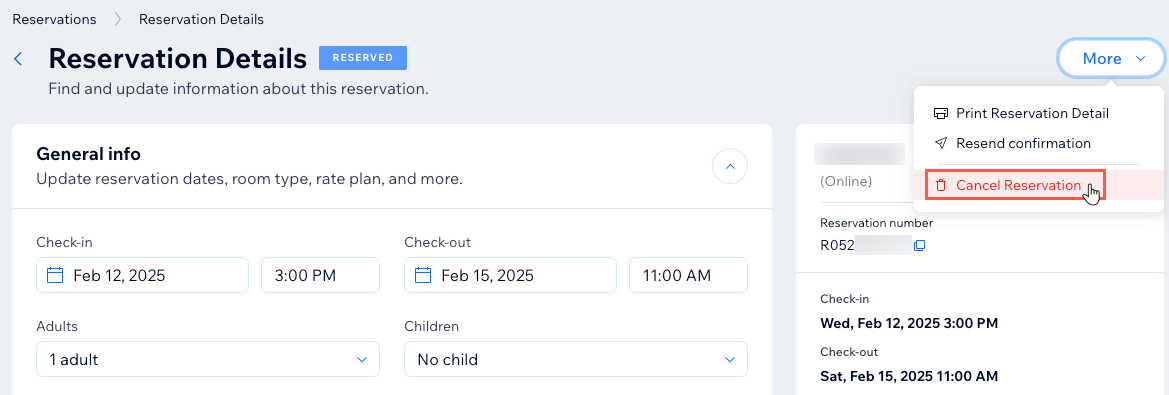
 Canceling upcoming reservations
You can cancel reservations at any time, but make sure the client definitely wishes to cancel, as you cannot undo this action, and will have to create a new reservation manually.
To cancel an upcoming reservation:
- Go to Reservations in your site's dashboard.
- Hover over the relevant reservation and click Edit.
- Click the More drop-down in the top right.
- Click Cancel Reservation.
Note: This action cannot be undone.
Note:
Sometimes, the cancel reservation option may not appear if it is already past the check-in date.
To cancel the reservation:
- Change the check-in date to a date in the future.
- Click Update Reservation.
- Follow steps 1-4 in the section above to cancel.