Wix Bookings: Sending Payment Requests Using the Wix App
6 min
In this article
- Sending an invoice while scheduling an appointment
- Sending an invoice for an existing booking
- FAQs
Send payment requests to clients while you're on the go, using the Wix app. This is a great way to collect online payments for booked sessions. You can send payment requests before or after the sessions take place.
When you send the payment request, your client receives an invoice with all the requirements of the session. You can send payment requests before or after the booked sessions take place.
Sending an invoice while scheduling an appointment
Email clients a payment request link as you schedule an appointment for them. This makes it more convenient for the client to pay online before or after their appointment.
To send an invoice while scheduling an appointment:
- Go to your site in the Wix app.
- Tap Manage
 at the bottom.
 - Tap Booking Calendar.
- Tap the Add icon
 .
. - Tap Appointment.
- Tap an existing client or create a new contact.
- Choose the Service, Staff Member, and Location.
- Set the start date and time.
- Set the end date and time.
- Tap the Payment drop-down under How will you charge your client? and select Charge with invoice.
- (Optional) Tap to select the Notify client with an email checkbox.
- Tap Save.
- Tap the Due Date drop-down to select the relevant date.
- (Optional) Add products to the invoice:
- Tap + Add items under Products & Services.
- Tap to select the relevant item you want to add.
- Tap the field under Quantity to choose the number of products you want to add to the invoice.
- Tap the field under Price to adjust the price.
- (Optional) Add tax to the invoice:
- Tap + Add Tax.
- Tap the field under Name to add the type of tax you are applying (e.g. "Sales tax").
- Tap the field under Rate (%) to add the relevant percentage of tax you wish to apply.
- (Optional) Tap + Create New Tax to add another tax (e.g. "State tax").
- Tap Add to Invoice.
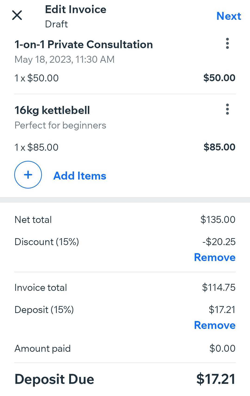
- Tap Add next to Discount (%) to add any relevant percentage discounts and tap Apply.
- Tap Add next to Deposit to add either a percentage or flat rate deposit amount to the invoice and tap Apply.

- Tap Add next to Notes to include any additional information in the invoice.
- Tap Add next to Terms to include your terms and conditions to the invoice.
- Tap Next.
- Choose how you want to send the invoice from the following options:
Send via email
Share link
Sending an invoice for an existing booking
You can send invoices for existing sessions in the Booking Calendar using the Wix app. For class and courses sessions, you can send invoices from the Manage Participants section.
To send an invoice for an existing session:
- Go to your site in the Wix app.
- Tap Manage
 at the bottom.
 - Tap Booking Calendar.
- Choose the relevant date in the calendar.
- Tap the existing session in the Booking Calendar and follow the relevant steps below:
- Appointments:
- Tap Collect payment.
- Tap Charge with Invoice.

- Classes or courses:
- Tap Manage Participants.
- Tap the More Actions icon
 next to the relevant participant.
 - Tap Charge with Invoice.

- Appointments:
- Tap the Due Date drop-down to select the relevant date.
- (Optional) Tap + Add items to add any relevant products to the invoice.
- Tap to select the relevant item you want to add.
- Tap the field under Quantity to choose the number of products you want to add to the invoice.
- Tap the field under Price to adjust the price
- (Optional) Tap + Add Tax.
- Tap the field under Name to add the type of tax you are applying, e.g. "Sales tax".
- Tap the field under Rate (%) to add the relevant percentage of tax you wish to apply.
- (Optional) Tap + Create New Tax to add another tax, e.g. "State tax"
- Tap Add to Invoice.
- Tap Add next to Discount (%) to add any relevant percentage discounts and tap Apply.
- Tap Add next to Deposit to add either a percentage or flat rate deposit amount to the invoice and tap Apply.
- Tap Add next to Notes to include any additional information in the invoice.
- Tap Add next to Legal Terms to include your terms and conditions to the invoice.
- Tap Next.
Send via email
Share link
FAQs
We are here to help with all your questions. Click a question below to learn more.
Can I resend an invoice?
What happens if I don't send the invoice right away?


 in the top right.
