

Wix Bookings: Adding and Setting Up an Appointment Waitlist
6 min
In this article
- Adding the appointment waitlist in the dashboard
- Adding the appointment waitlist to your live site
- Adding clients to your appointment waitlist
- Managing clients on the appointment waitlist
- FAQs
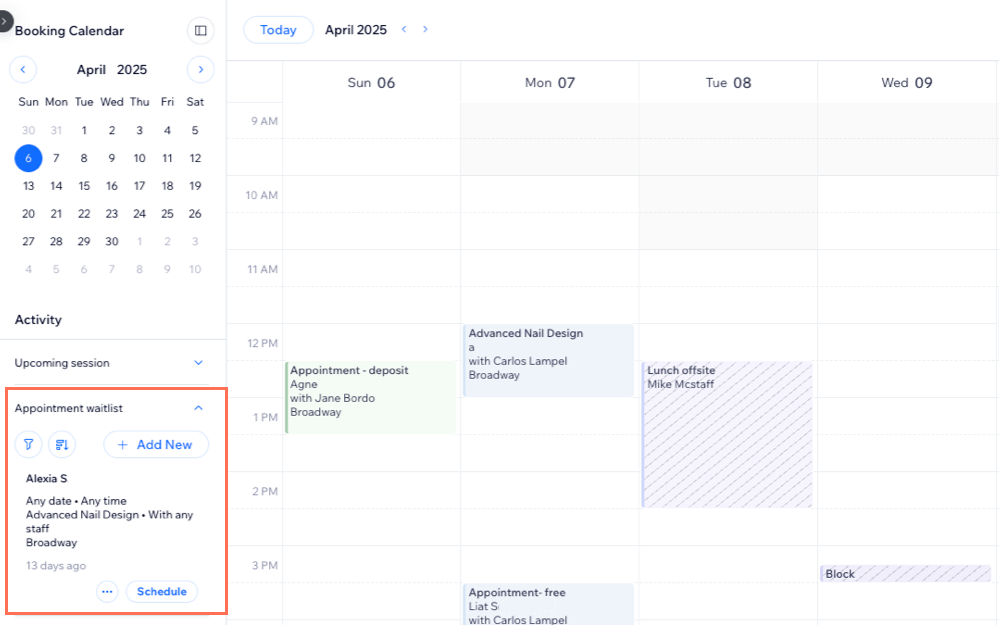
The appointment waitlist helps increase your earnings by filling schedule gaps caused by last-minute appointment cancellations or reschedules. It's also a great way to collect leads and accept more appointments on a certain day, even if there are no cancellations.
For example, if your client sees no relevant slots are available for a haircut on their preferred day, or if they can’t find a relevant slot, they can join the waiting list. As soon as a spot becomes available, you can contact them and book them in.
Adding the appointment waitlist in the dashboard
You can add an appointment waitlist that is only available for your internal staff members to use from the booking calendar in your dashboard. This is a great way to stay as booked as possible throughout each day, as cancellations or reschedules occur.
Need a waitlist that clients can add themselves to?
To allow clients to add themselves to an appointment waitlist, you must add the waitlist to your live site. See the steps in the next section for details.
To add the appointment waitlist in the dashboard:
- Go to Booking Calendar in your site's dashboard.
- Click Appointment waitlist on the Activity panel on the left.
- Click Activate.
- Click Add Plugin.
- Choose what you want to do:
- Go to Editor: Publish your site to make the waitlist plugin live.
- Publish Later: Add the waitlist now and publish later. Customers don’t see the waitlist until you publish your site.
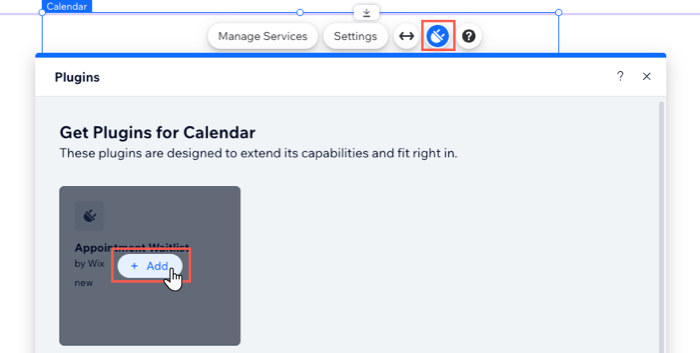
Adding the appointment waitlist to your live site
Add a waitlist to your booking calendar on your live site, so clients can easily join if their desired time is unavailable.
To add the appointment waitlist to your live site:
Wix Editor
Studio Editor
- Go to your editor.
- Go to your Booking Calendar page:
- Click Pages & Menu
 on the left side of the editor.
 - Click Bookings Pages.
- Click the Booking Calendar page.
- Click Pages & Menu
- Click the Booking Calendar element on your page.
- Click the Plugins icon
 .
. - Hover over Appointment Waitlist and click + Add.
Adding clients to your appointment waitlist
You can add clients to the waitlist for your appointments at any time from the booking calendar in your site's dashboard.
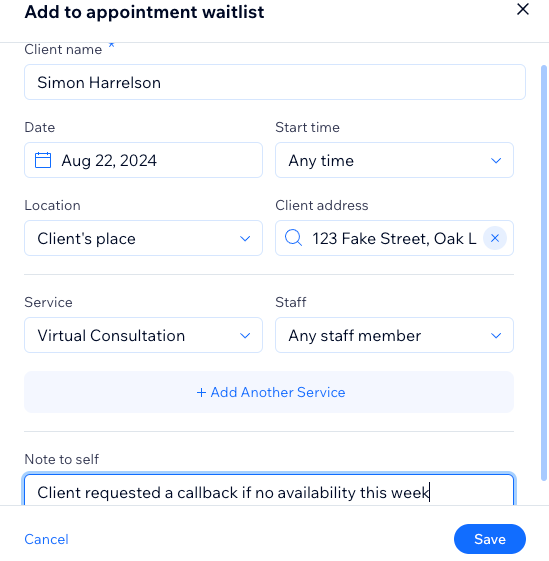
To add a client to your appointment waitlist:
- Go to Booking Calendar in your site's dashboard.
- Click Appointment waitlist on the Activity panel on the left.
- Click + Add New.
- Enter the Client name.
- Enter the appointment details, including the Date, Start time, and Location.
- Select the relevant appointment from the Service drop-down.
- Select the relevant staff member from the Staff drop-down.
- (Optional) Click + Add Another Service if the client wants to be added to the waitlist for another service, and repeat steps 4-8 above.
- (Optional) Enter a Note to self with any additional instructions. For example: "Client requested a phone call if no slots become available so they can schedule an appointment next week."
Managing clients on the appointment waitlist
You can sort and filter your appointment waitlist to make it easier to manage. You can also share the service calendar for the requested service to arrange alternative dates and times with the client.
To manage clients on the appointment waitlist:
- Go to Booking Calendar in your site's dashboard.
- Click the Waitlist icon
 at the top right.
 - Choose what you want to do:
Filter and sort the appointment waitlist
 .
.Schedule an appointment from a waitlist application

FAQs
Click on a question below to learn more.
How do clients add themselves to the appointment waitlist for a service?


Can clients change their time slot preferences on the waitlist?
Are clients notified immediately when an appointment slot becomes available?
Is it possible to prevent clients from adding themselves to the waitlist?
Can I allow my staff members to manage the waitlist?
