

Velo: Working with Velo Packages
7 min
In this article
- Package Content
- Setting Up a Package
- Backend Events
- Installing a Package
- Using an Installed Package
- Velo Package Examples
- Updating a Package’s Version
- Uninstalling a Velo package
- Requesting a Velo package
Velo packages are code libraries built by Wix using Velo code that allow you to add specific functionality to your site, without spending hours writing complex code. Find an existing package containing the same functionalities that you want, add it to your site, and import the functions you need. You can also decide to build your own private app using Wix Blocks with your own specific functionalities, and reuse it across multiple sites. To learn more, see Working with Private Apps.
The following describes some of the advantages of using Velo packages:
- The use cases for Velo packages are specific to Wix websites.
- Velo packages work seamlessly with Wix elements and apps.
- You can view all the exposed functions in a Velo package.
- Each Velo package contains a detailed readme file explaining the package’s functionality and the steps required for implementation.
Package Content
Velo packages can include read-only backend code files, public code files, and npm packages. An editable config.json file may also be included for defining specific configurations for your package’s backend code.
A package’s functionality is available for use through its exported functions. You can import the functions and use them in your code just like you import and use exported functions that you write in .js and .jsw files.
Notes
- The package’s backend and public files aren’t exposed. Only readme and config files are exposed.
- Some package functions are internal and can't be used directly in your site. See the package’s readme for the list of exposed functions available for use.
- If a Velo package includes an npm package, you won't see the npm package in the npm section of the Velo Sidebar.
Setting Up a Package
Velo packages can work with other Wix apps or include integrations with 3rd-party services, and may require initial setup and configuration before use. To set up your site to use a package, follow the steps in the Setup section of the package’s readme file.
Package prerequisites may include:
- Creating an account with a 3rd-party service.
- Storing API keys and other secrets from a 3rd-party service in the Secrets Manager.
- Adding a Wix App to your site. For example, you might need to add a Wix Store or a Member's Area to your site.
- Editing the package’s config.json file to define specific settings that affect how the package works on your site.
Backend Events
A package may also include an events.js file for running backend events related to the package. You do not need to perform any action to run the backend events. Just like backend events are defined in your site's events.js file, events in your package’s events.js are triggered automatically once you have published your site and the specific conditions associated with the event are met.
Note
To better demonstrate the next few steps, we created a user account with the name "rebecca".
Installing a Package
To install a Velo package:
- Go to the Packages & Apps section of the Velo Sidebar.

- Under Velo Packages, click Install Velo Package to open the Package Manager.
- In the Velo Packages tab, search for the Velo package you want to add to your site. Note that you can view the readme for each package on the right side of the Package Manager.
- Click Install. The Install button changes to a View button, and you can see an option to turn on automatic updates for future minor build versions of the package. When this option is turned on, you won't need to do anything if there are any minor updates to the package. When this option is turned off, you have to manually update the package if there are any minor updates to the package. To learn more, see the Updating a Package’s Version.
Clicking View directs you to the Packages & Apps section of the Velo Sidebar where you can see the installed Velo package.


Note
By installing a Velo package that uses an npm package, you agree to that npm module's license agreement.
Using an Installed Package
Once you install a Velo package, read the package’s readme file. The readme file includes all the information you need to work with the package: initial setup prerequisites, which exported functions are available for use, and how to use the package.
To use the package functions, you need to import them in your code. Use the @velo namespace to import Velo Packages. Note that import statements within the @velo namespace differ depending on the location and type of package file the function is exported from.
To import backend functions, use the following syntax:
1import { <functionName> } from '@velo/<package-name>-backend';For example, assuming the twitter-integration package has been installed, you can use its tweet() function as follows:
1import { tweet } from '@velo/twitter-integration-backend';To import public functions, use the following syntax:
1import { <functionName> } from '@velo/<package-name>';For example, assuming the wix-data-helpers package has been installed, you can use its getRandomItem() function as follows:
1import { getRandomItem } from '@velo/wix-data-helpers';Notes
- If you want to use backend functions from a .js file in your page code, wrap the function in a web module (.jsw file), and import the web module to your page code.
- Some Velo packages include web modules (.jsw files). You can call web module functions directly from your backend code, public code, or page code. Import them with the syntax for importing backend functions.
To learn more about which import statements to use for each Velo package, see the package's readme file.
Velo Package Examples
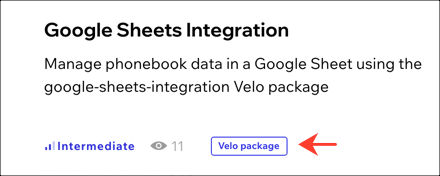
To help you understand how to use specific Velo packages on your site, we added some examples to the Velo Examples page that integrate Velo packages. You can open an example site and see the code we added to work with the package. You'll see a Velo Package tag on examples that integrate a Velo Package.
Updating a Package’s Version
If there is a minor update to a Velo package installed on your site:
- If the automatic updates option toggle is turned on, the package will update automatically.
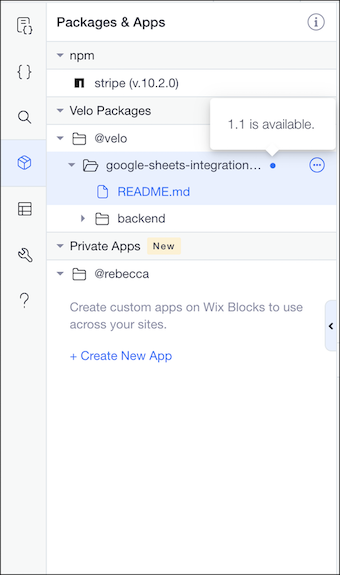
- If the automatic updates option toggle is turned off, you can see a blue dot next to the package in the Velo Sidebar.
If there is a major update to a Velo package installed on your site, you can see a blue dot next to the package in the Velo Sidebar. If you hover over the dot, you can see the package’s updated version number.
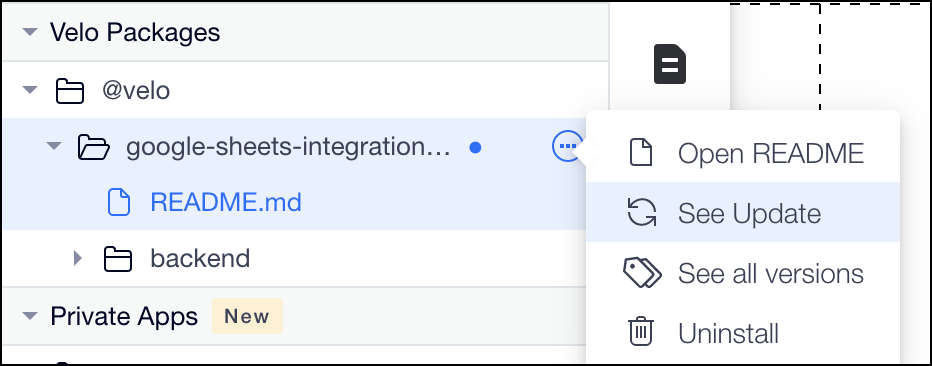
To update the package on your site:
- Click the ellipsis
icon. Then click See Update.
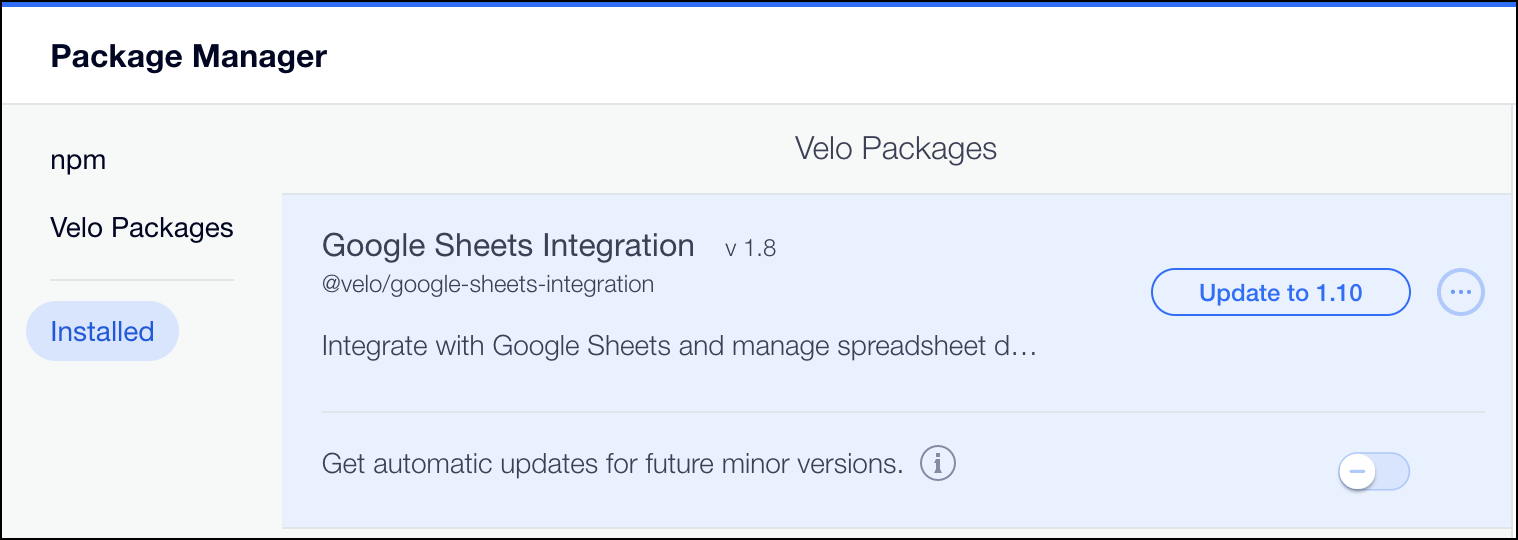
- The Package Manager opens and you can see the available update. To update the package, click Update to X.X.X.
You can view all previous versions of a package by clicking the ellipsis

Important
After applying a package update, make sure that the code on your site is compatible with the updated version of the package.
Uninstalling a Velo package
To uninstall a Velo package:
- In the Velo packages section of the Velo Sidebar, hover over the package you want to uninstall, click the ellipsis
icon, and select Uninstall.
- The package is removed from the Velo packages section of the Velo Sidebar.
Warning
When you uninstall a package, you may break code that relies on that package.
Requesting a Velo package
To request that a package be added to the list of Velo packages, click Make a request for a new Velo package at the bottom of the Package Manager.

You can also request a new Velo package from Wix using the Velo Wishlist.
You can also request a new Velo package from Wix using the Velo Wishlist.
