

Velo Tutorial: Creating an Expanding Mega Menu
- Overview
- Add Collections
- Menu Collection
- SubTitles Collection
- Set Up the Home Page
- Add Code
- Step 1: Imports and Global Variables
- Step 2: When the Page Loads
- Step 3: Main Menu Button Clicked
- Step 4: Hover over Submenu 1 Button
- Step 5: Hide Submenu 2 When Mouse Moves Away
- Step 6: Populate Submenu 1 Repeater
- Step 7: Create a Unique ID for Submenu 2 Repeater Items
- Step 8: Set Up Submenu 2
- Learn More
Overview
- Three menu levels: Main menu, Submenu 1, and Submenu 2. We used repeaters to create the menus.
- Two collections to store the content for menu labels and links.
- Identify the visitor's choice for each menu.
- Filter the collection data for the next submenu based on the visitor's choice.
- Load the submenu repeater button labels with the filtered collection data. For the final menu, also load the repeater buttons with links to product listing pages.
Add Collections
Menu Collection
- rootTitles: Choices for Main menu (Men, Women)
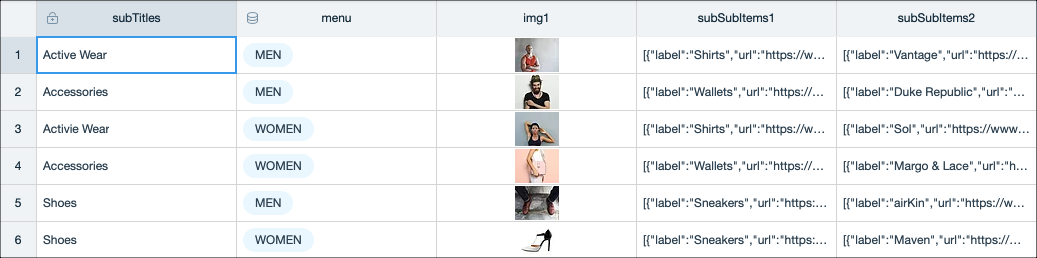
SubTitles Collection
- subTitles: Labels for Submenu 1
- menu: Reference to the Main menu collection. This field is used to filter the collection data according to the visitor's Main menu choice.
- img1: Image displayed in Submenu 2
- subSubItems1: Data for Submenu 2 Shop by Product repeater
- subSubItems2: Data for Submenu 2 Shop by Brand repeater
The subSubItems fields contain arrays of JSON objects stored as text. They define the button label and link for each button in Submenu 2.
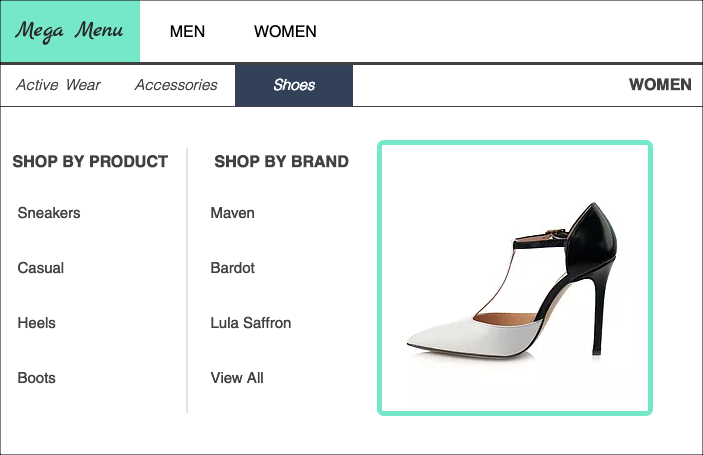
Set Up the Home Page
- Main menu: A repeater with buttons

- Submenu 1: A repeater with buttons, hidden on load, and a text element that shows the Main menu selection (Men or Women).

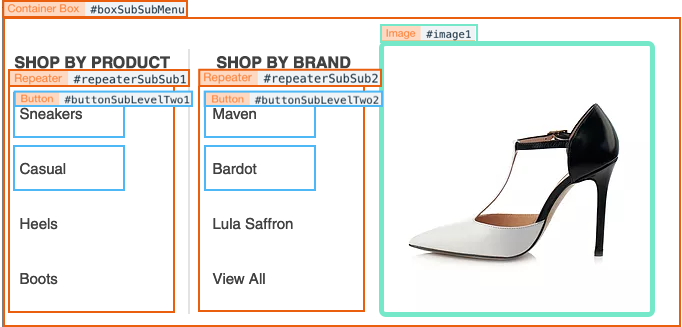
- Submenu 2: A container box, hidden on load, containing the following elements:
- Shop by Product repeater with a button for each choice
- Shop by Brand repeater with a button for each choice
- Image
Add Code
Step 1: Imports and Global Variables
1//-------------Imports-------------//
2import wixData from 'wix-data';
3
4//-------------Global Variables-------------//
5
6//Number of Submenu 2 repeaters.
7const subLevel2RepeaterCount = 2;
8
9//Object containing all menu data from subTitles database collection.
10let menuData;
The subLevel2RepeaterCount variable represents the number of repeaters in Submenu 2. We'll use this variable later (Step 2) when we loop through the repeaters to populate them with data.
Step 2: When the Page Loads
1$w.onReady(async () => {
2  //Get the menu data from the collection.
3  menuData = await wixData.query("subTitles").find().then(result => result.items);
4
5  //Set up each Submenu 2 repeater as it is loaded.
6  for (let i = 1; i <= subLevel2RepeaterCount; i++) {
7    $w(`#repeaterSubSub${i}`).onItemReady(($item, itemData, index) => {
8      //Get the repeater button from its ID.
9      const repeaterButton = $item(`#buttonSubLevelTwo${i}`)
10      //Set the item label.
11      repeaterButton.label = itemData.label;
12      //Set the item link.
13      repeaterButton.link = itemData.url;
14    });
15  }
16});
When the page loads, we get all the data required to build the submenus from the subTitles collection. Later we'll filter this data according to the visitor's menu choices.
Note on Populating Repeaters
Populating a repeater with data is a 2-step process:
- Set the repeater’s data using
.data. This triggers the second step for all items with a new ID in thedataarray. - Populate the repeater with data from the new items using the
onItemReadyfunction.
In this example, we load the repeaters with data using 2 different methods:
- Submenu 1: We use the simpler method of wiring an
onItemReadyevent handler to the repeater using the Properties & Events panel (in Steps 3 and 6). - Submenu 2: Because there is more than 1 repeater, we populate the repeaters using a loop and call
onItemReadyinside our loop (see Line 7 above). Note that although this code is in theonReadyfunction, it's only triggered later when the data for the Submenu 2 repeaters is set (Step 8).
Step 3: Main Menu Button Clicked
1//Set actions that occur when the main menu button is clicked.
2export function buttonMainMenu_click(event) {
3    $w("#title").show();
4    $w("#title").text = event.target.label
5 $w("#boxSubSubMenu").hide();
6 //Get the ID of the clicked main menu button.
7 const selectedMainMenuId = event.context.itemId;
8 //Get all the data of the Submenu 1 related to the main menu selection.
9 const repeaterData = menuData.filter(item => item.menu === selectedMainMenuId);
10 //Set the data to the Submenu 1 repeater.
11 $w('#repeaterSubLevelOne').data = repeaterData;
12 //Show the repeater of Submenu 1.
13 $w('#repeaterSubLevelOne').show();
14}
In this event handler, we use event.target and event.context to grab and use information based on the visitor's selection in the Main menu.
Then we use the JavaScript filter function to filter the menuData object based on the clicked button's ID. menuData contains all the data from the subTitles collection.
We use the filtered data to load the labels for Submenu 1. Note that by setting the data for the repeater in Line 11, we trigger the onItemReady event handler in Step 6.
Step 4: Hover over Submenu 1 Button
1//Set an action that occurs when the mouse hovers over a Submenu 1 button.
2export function buttonSub_mouseIn(event) {
3 //Get the ID of the Submenu 1 button the mouse hovers over.
4 const selectedRootId = event.context.itemId;
5 //Get all the data of the Submenu 2 related to Submenu 1.
6 const repeaterData = menuData.filter(item => item._id === selectedRootId)[0];
7 //Set up the box element corresponding to the selected button in Submenu 2.
8 setSubSubMenu(repeaterData);
9 //Show the Submenu 2 box.
10 $w('#boxSubSubMenu').show();
11    }
Here we run similar code as for Step 3. One difference is that since there are 2 repeaters in Submenu 2, we need to run a loop to load the repeaters with data. For that we call the setSubSubMenu function (Step 8).
Step 5: Hide Submenu 2 When Mouse Moves Away
1//Set an action that occurs when the mouse pointer is moved away from the Submenu 2 box.
2export function boxSubSubMenu_mouseOut(event) {
3 $w('#boxSubSubMenu').hide();
4}Step 6: Populate Submenu 1 Repeater
1//Set up each item in the Submenu 1 repeater as it is loaded.
2export function repeaterSubLevelOne_itemReady($item, itemData, index) {
3 $item('#buttonSub').label = itemData.subTitles;
4}
This onItemReady event handler is triggered when the data for the Submenu 1 repeater is set in Step 3.
Step 7: Create a Unique ID for Submenu 2 Repeater Items
1//-------------Utility Functions for Repeater Setup-------------//
2
3function createUniqueId() {
4 //Creating a Unique Id for each of the menu sub-items by getting the current millisecond and adding a random number from 1 to 1000
5 let id = String(+new Date() + Math.floor(Math.random() * 1000))
6 return id;
7}
When loading data into a repeater, new repeated items are created only for objects with an _id value not already present in the current array of data objects. Since only items with IDs will populate repeaters, we used JavaScript Date and Math functions to create a unique ID for each of the Submenu 2 items. This function is used in Step 8.
Step 8: Set Up Submenu 2
1function setSubSubMenu(repeaterData) {
2 //Set the image of the Submenu 1
3 $w('#image1').src = repeaterData.img1;
4 for (let i = 1; i <= subLevel2RepeaterCount; i++) {
5  //Convert the Submenu 2 string to a Javascript object.
6  const dataSubSub = JSON.parse(repeaterData[`subSubItems${i}`]);
7  //Set a unique ID for each item.
8  dataSubSub.forEach(subSubItem => {
9   subSubItem._id = createUniqueId();
10  })
11  //Set the Submenu 2 data in the repeater.
12  $w(`#repeaterSubSub${i}`).data = dataSubSub;
13 }
14}
Here we set up the final submenu.
This function takes repeaterData as a parameter, which is the data from the subTitles collection that's been filtered according to the visitor's 2 previous selections.
The function does the following:
- Sets the image for Submenu 2.
- Runs a loop to convert the
subSubItemsJSON objects into JavaScript objects so they can be used in the code. - Calls the
createUniqueIdfunction (Step 7) to create a unique ID for each item in Submenu 2. - Sets the data for the Submenu 2 repeaters. This triggers the
onItemReadyfunction in Step 2 and the Submenu 2 repeaters are populated.
Learn More
- API Reference: Repeaters
- API Reference: Events
- API Reference: Query data
