Studio Editor: Managing and Customizing Flexboxes
5 min
In this article
- Managing flexbox items
- Customizing your flexbox display
- Resizing flexbox items
Manage and customize your flexboxes to create a unique experience for your visitors. You can resize items to fit your page structure, adjust the display settings, and add, delete, and re-order items as you go.
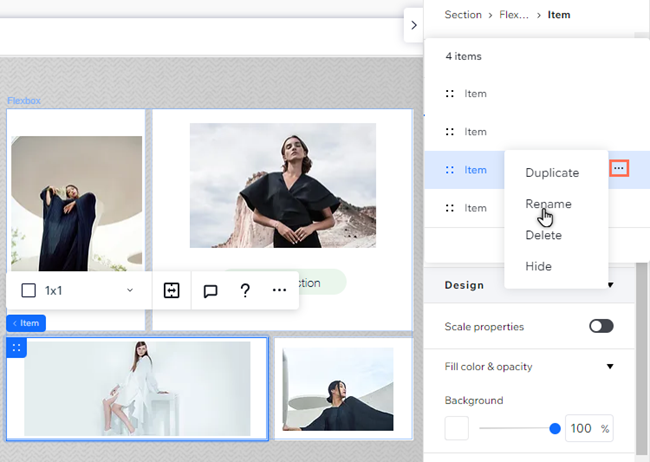
Managing flexbox items
Manage your flexbox items to further personalize your content and keep it up to date. You can hide items from breakpoints, change their order, and more.
To manage your flexbox items from the Inspector:
- Select the relevant flexbox.
- Click the Open Inspector icon
 at the top right of the editor.

- (In the Inspector) Click Manage next to the number of items.
- Choose what you want to do with your items:
- Reorder: Hold the Reorder icon
 next to the relevant item and drag it to its new position.
 - Manage:
- Click the More Actions icon
 next to the relevant item.
 - Manage the items using the options:
- Duplicate: Make a copy of a specific item.
- Rename: Give each item a name you can recognize.
- Delete: Remove the item completely.
- Hide: Hide this item from the specific breakpoint you're working on.
- Click the More Actions icon
- Reorder: Hold the Reorder icon
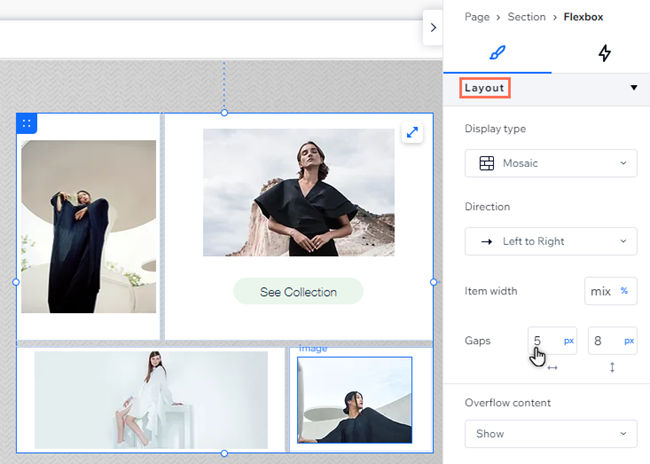
Customizing your flexbox display
Select a flexbox display to complement your page's structure. Change the display type directly on the canvas, or head over to the Inspector panel if you want to customize settings like gaps, direction, and width.

To customize the display:
- Select the relevant flexbox.
- Click the Open Inspector icon at the top right of the editor.
- Scroll down to Layout.
- (Optional) Click Display type and select a type from the drop-down.
- Customize your flexbox based on the display type you choose:
- Direction: Decide whether your items are organized from left to right or right to left.
- Item proportions: Click Equalize to give all flexbox items the same size definitions.
- Item width: Select the width of the flexbox items in percentage, or set them all as the max width.
- Gaps: Enter a value (in px, vh, vw, or to scale) for the horizontal and vertical spaces between the flexbox items. Note: If you choose the slider or slides display, the available options (horizontal or vertical) depend on the slider direction you choose.
- Item alignment: Choose how your items should be aligned and positioned. Depending on the look you want to achieve, you can align the items to the flexbox edges (start or end), or create space between / around the items.
- Overflow content: Select whether to hide or display overflow content.
- Slider direction: Display your items on a horizontal or vertical slider.
- Scroll snap align: Click the toggle to enable it. When scrolling through the slides of your flexbox, it "snaps" to each item (slide) so visitors don't miss it.
- Items per slide: Set how many items are displayed per slide action.
- Navigation: Add arrows, a button, or text to help visitors navigate through the items.
- Show scrollbar: Show or hide a scrollbar for your visitors to scroll through the items.
Notes:
- The available settings vary based on the layout you choose.
- Some older browsers don't support gaps (e.g. Chrome 76-83, Safari 12-14 and Edge 79-83). This means visitors who access your client's site from these browsers don't see the gaps you set between flexbox items.
Working with breakpoints:
- You can set a different flexbox layout for each breakpoint.
- We recommend the column or slider layout on smaller screens such as mobile devices.
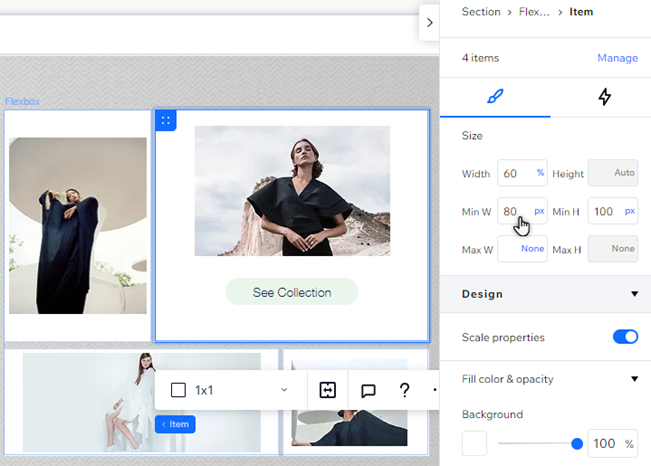
Resizing flexbox items
You can resize each individual flexbox item to make them bigger or smaller than the others. Use the Inspector panel to adjust each item's width and height, as well as the horizontal and vertical margins around items.
To resize an item:
- Select the relevant flexbox.
- Select the item you want to resize.
- Click the Open Inspector icon at the top right of the editor.
- Choose how to adjust the item:
- Size: Enter your chosen size into the fields at the top of the Inspector panel. You can click the current unit of measurement to change it.
- Margins: Scroll down to Position in the Inspector panel to set top, bottom and side margins for this specific item.