

CMS Request: Dynamic Popups
Collecting votes
Currently, it is not possible to make popups dynamic by connecting them to CMS collections. However, you can connect a popup's attached elements to CMS collection content to make the elements dynamic (e.g. text, images, buttons).
We are always working to update and improve our products, and your feedback is greatly appreciated.
Workaround
Using Velo, you can create a popup that opens from a dynamic item page and displays the same item as shown on the page that the popup was opened from.
For example, if you have dynamic item pages that display the services you offer, you could link a button on the page to a popup. In the popup, you could connect elements like text, images, and buttons to a dataset that connects to the same collection. As a result, when visitors click the button on your dynamic item page, a popup opens with more info about the same item displayed on the page.
Before you begin:
Make sure your site has the following:
- A popup.
- A dynamic item page with a button that links to the popup.
- Collection fields for the content that will appear in the popup elements.
Wix Editor
Studio Editor
- Go to your editor.
- Go to relevant dynamic item page.
- Enable Velo Dev Mode:
- Click Dev Mode at the top of the editor.
- Click Turn on Dev Mode.
- Copy the code snippet below and paste it at the top of your page code:
1import wixWindowFrontend from 'wix-window-frontend';
- Copy the code snippet below and paste it after: $w.onReady(function () {
1$w('#openLightbox').onClick(async () => {
2        const item = await $w('#dynamicDataset').getCurrentItem();
3        const id = item._id;
4        wixWindowFrontend.openLightbox("Dynamic Lightbox", id);
5    })
6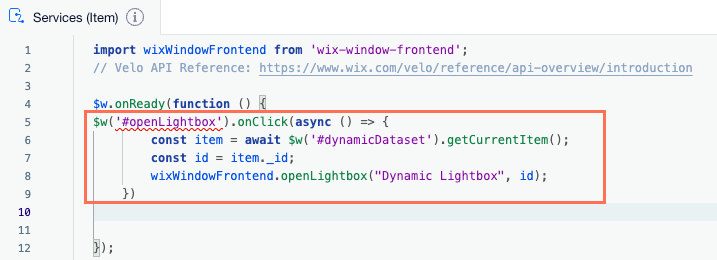
- In the sample code you pasted, replace the IDs listed below with those used by your site:
- openLightbox: Replace with the ID of the button that opens the popup.
- dynamic Dataset: Replace with the ID of the dynamic item page dataset.
- Dynamic Lightbox: Replace with the name of the popup.

- In your editor, go to the popup.
- Add a dataset and connect it to the same collection as your dynamic item page:
- Click CMS
 on the left side of the editor.
 - Click Add Content Elements.
- Click Dataset.
- Click the Choose a collection drop-down and select the same collection that connects to your dynamic item page.
- Click Create.
- Click CMS
- Click the Items per load field in the dataset settings and type the number 1.
- Connect the elements in your popup (e.g. text, images, buttons) to the dataset:
- Click the relevant element on the popup.
- Click the Connect to CMS icon
 .
. - Click the dropdowns under Connections and select the relevant collection fields or dataset actions.
- Repeat these steps for each element on your popup that you want to connect.
- Copy the code snippet below and past it at the top of your popup code:
1import wixWindowFrontend from 'wix-window-frontend';
2import wixData from 'wix-data';
- Copy the code snippet below and paste it after: $w.onReady(function () {
1const getData = async () => {
2       const id = await wixWindowFrontend.lightbox.getContext();
3       $w('#dataset1').setFilter(wixData.filter().eq('_id', id));
4}
5getData();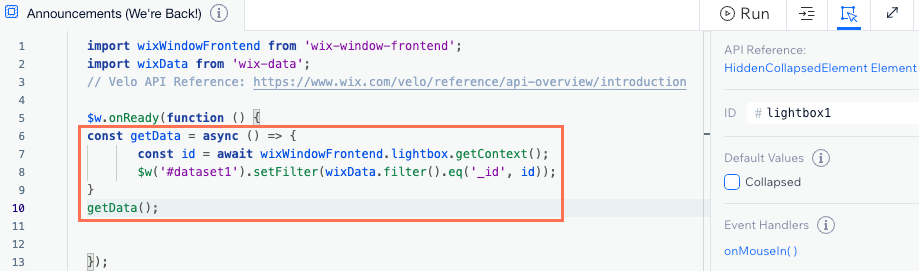
- In the sample code you pasted, replace dataset1 with the ID of your popup dataset.
- Preview your site to test the functionality.
- When ready, publish your site.
