

Connecting a TikTok Pixel to Your Wix Site
3 min
In this article
- Step 1 | Create a pixel in your TikTok account
- Step 2 | Connect your pixel to your Wix site
- Step 3 | Verify your pixel connection
- Managing your TikTok Pixel
- Visitor actions that you can track with your TikTok Pixel
A TikTok Pixel is a piece of HTML code that you can add to a site to track visitor actions such as viewing a page or making a purchase.
You can use Wix's TikTok Pixel integration to add a pixel to your site and gain insights into your audience. Track conversions to your site for your Tiktok ad campaigns and get data that you can use to optimize your ads and improve your retargeting.
Want to learn more?
Check out Tiktok's article about how the pixel works.
Important:
- To use this integration you need to have a Premium plan, a connected domain, and a TikTok account.
- By using this service, you are engaging directly with a third-party service provider. We recommend reviewing the service provider's Privacy Policy and Terms of Use prior to your use of such third-party service. You acknowledge that we are not liable for any loss or damage resulting from your use of such third-party service, including any liability arising from any personal data exchanged between you and such third-party.
Step 1 | Create a pixel in your TikTok account
First, you need to create a pixel in the Events section of your TikTok Ads Manager dashboard. After you create it, you'll see an ID for the pixel that you'll need to add to your Wix site.
To create a pixel:
- Go to your TikTok Ads Manager dashboard.
- Hover over Assets.
- Select Events.
- Click Manage under Web Events.
- Click Create Pixel.
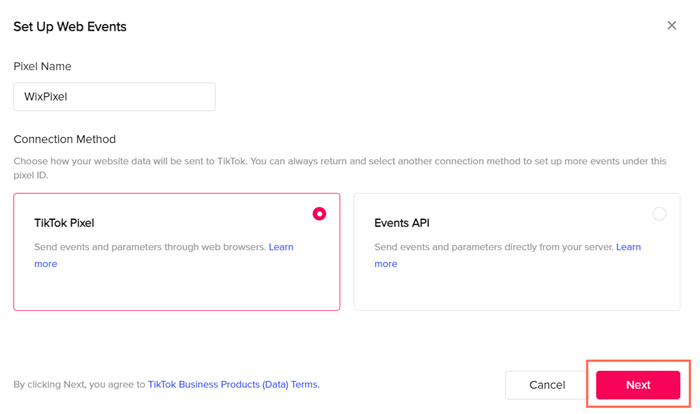
- Enter a name for your pixel.
- Select TikTok Pixel under Connection Method.
- Click Next.
- Select Manually install pixel code.
- Click Next.
- Select Event Builder.
- Click Copy Pixel Code.
Step 2 | Connect your pixel to your Wix site
Next, you need to connect your new pixel in the Marketing Integrations section of your site's dashboard. This lets you track your visitor actions in your TikTok dashboard.
To connect your pixel:
- Go to Marketing Integrations.
- Click Connect under TikTok Pixel.
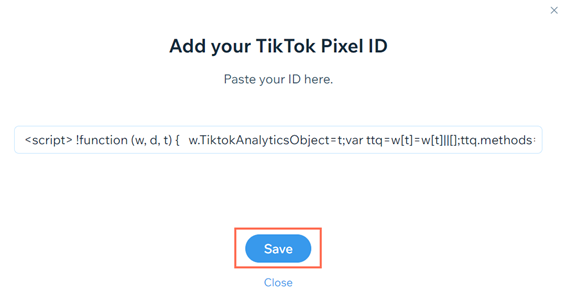
- Click Add TikTok ID.
- Paste your pixel code in the pop-up.
- Click Save.
Step 3 | Verify your pixel connection
It's a good idea to confirm that your pixel is working after you've connected it to your site. You can do this by using Tiktok's Pixel Helper extension in a Chrome browser.
To verify the connection:
- Go to the TikTok Pixel Helper page.
- Click Download Pixel Helper here.
- Click Add to Chrome.
- Click Add extension.
- In another tab, open your site's homepage.
- Open the TikTok Pixel Helper. You should see a message that tells you that it found your pixel.
Managing your TikTok Pixel
You can edit your TikTok Pixel or delete it if you don't need it anymore in the Marketing Integrations section of your site's dashboard.
To manage your pixel:
- Go to Marketing Integrations.
- Click View under TikTok Pixel.
- Click the More Actions icon
 in the top right corner.
 - Select what you want to do:
- Select Edit if you need to add a different pixel code.
- Select Disable to temporarily stop your pixel from tracking actions.
- Select Delete to delete the pixel from your site.
Visitor actions that you can track with your TikTok Pixel
You can find out the types of events you can use the pixel to track on your site in table below.
| Event | Description |
|---|---|
Add to Cart | When a visitor adds an item on your site to their cart |
Complete Payment | When a visitor completes a purchase |
Complete Registration | When a visitor signs up as a site member |
Contact | When a visitor contacts you through contact form |
Initiate Checkout | When a visitor opens your checkout page |
Subscribe | When a visitor subscribes to your website using a subscription form |
View Content | When a visitor opens a product page |
