

Email Marketing: Authenticating Your Custom Email Domain
5 min
In this article
- Step 1 | Get the DNS records provided by Wix
- Step 2 | Sign in to your external domain provider and go to your DNS settings
- Step 3 | Copy and paste the Wix records into your domain provider settings
- Step 4 | Wait for the records to propagate
- FAQs
Before you begin:
This article refers to domains purchased outside of Wix (e.g. GoDaddy.com). If you purchased a Wix domain, the authentication process starts automatically. However, if the process did not happen automatically, follow the troubleshooting steps.
It's recommended to first authenticate a custom domain if you have an email address associated with it (e.g. contact@customdomain.com). Emails sent from authenticated domains are less likely to be marked as spam because email providers such as Google and Outlook view them as legitimate.
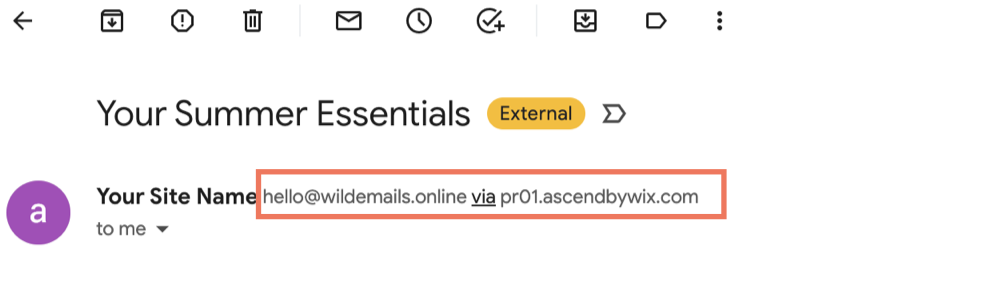
If your domain isn't authenticated, Wix automatically adds an authenticated Wix domain (e.g. ascendbywix.com) like in the image below. This helps with email deliverability. To remove the Wix signature, manually authenticate your domain by following the below steps.
Step 1 | Get the DNS records provided by Wix
The first step to manually authenticate your custom domain is locating the DNS records provided by Wix. You can find these either from your Email Marketing dashboard or when creating an automation using 'send an email' as a follow up action. Before viewing the records you must first confirm your email address with a confirmation code.
To get your DNS records:
- Go to Email Marketing in your site's dashboard.
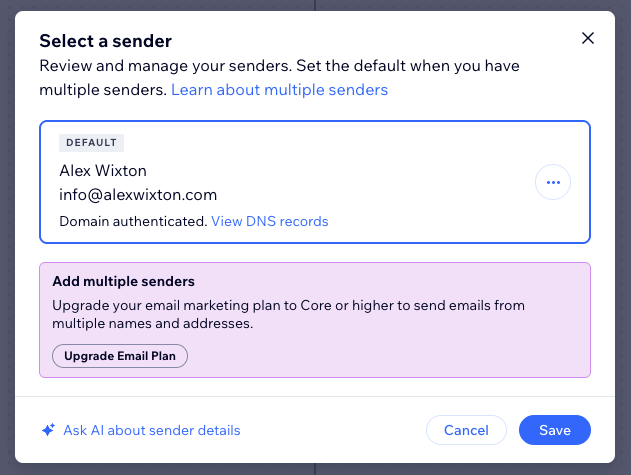
- Under Sender Details on the right, click Manage Senders.
Note: If you've previously entered an email address, click the Edit icon instead.
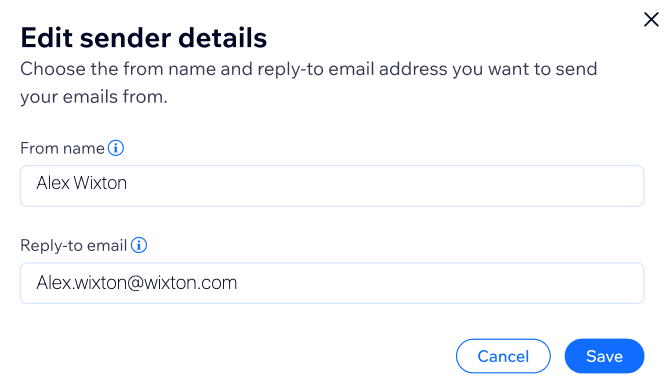
 - Enter a Sender's name in the field. Recipients see this name as the email sender.
- Enter a Reply-to email. Use the email address that is connected to your custom domain.
- Click Save.
- Confirm your email address by entering a confirmation code. The code is sent to the address you just added. Paste the code into the field and click Confirm.
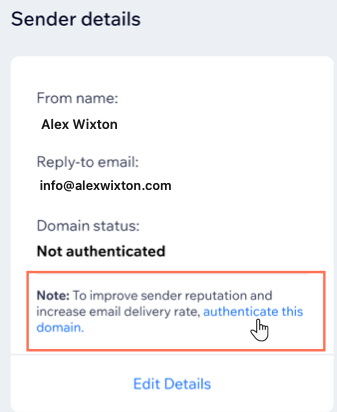
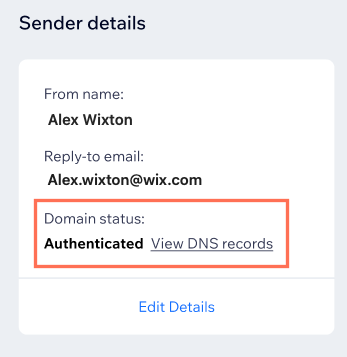
- Once your email is confirmed you will see 'Not authenticated' under Domain status. Click Authenticate this domain.
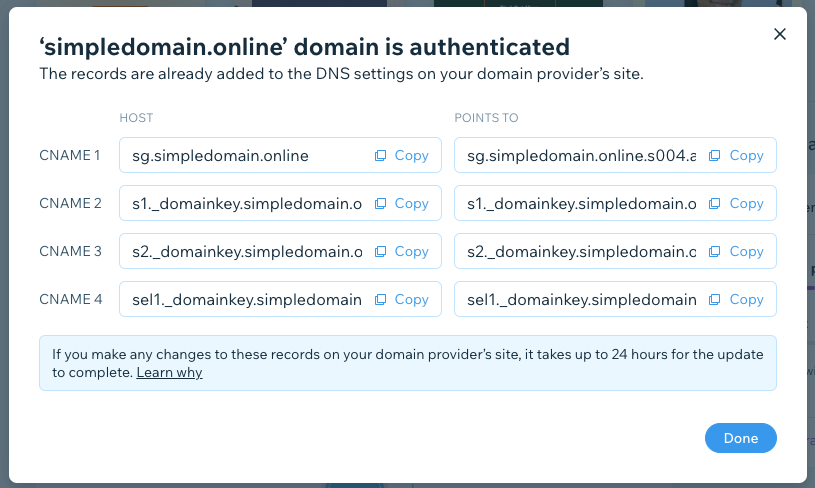
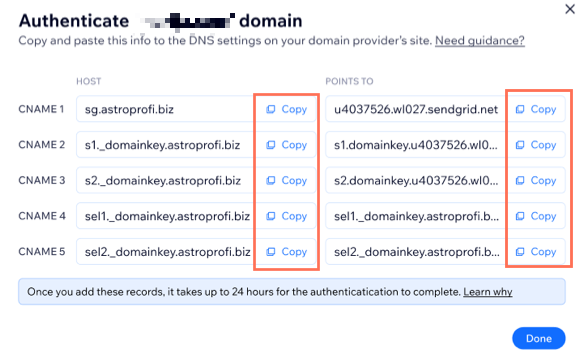
A list of CNAME records opens. This is the information you need to copy and paste into your external domain provider settings. Keep this information available as you move to the next step.
Tip:
You can also view DNS records by clicking Edit under Sender details when setting up an email automation. Go to Automations in your site's dashboard to get started.
Step 2 | Sign in to your external domain provider and go to your DNS settings
Once you have the DNS records provided by Wix, go to your external domain provider (e.g. GoDaddy.com) and sign in to your account.
Locate the DNS settings of your account. Once you find the DNS records, you are ready to copy and paste the Wix provided records from Step 1 into the relevant fields.
Note:
Depending on the domain provider, domain authentication process might be slightly different from what is described in this article. There might also be some other specific steps you need to take in your domain provider account that are not described in this article. In case your domain is still not authenticated, please contact your domain provider.
Step 3 | Copy and paste the Wix records into your domain provider settings
Now that you have both your Wix records and the DNS settings of your domain provider open, copy the CNAME record from Wix and paste it into the corresponding fields of your domain provider settings.
Once you've copied all the records exactly as they appear, click the confirm message in your domain provider DNS settings.
Note:
Depending on your provider, the domain authentication process might be slightly different from what is described in this article. You may only need to copy the first part of the CNAME record in the HOST column (i.e. without your domain name) to authenticate your domain. If you are unsure of which to copy, contact your provider.
For example:
- If the CNAME in your HOST column is s1._domainkey.j-scale.com you need to only copy s1._domainkey
- If the CNAME in your HOST column is sg.j-scale.com you need to only copy sg
Step 4 | Wait for the records to propagate
Once you've copied the DNS records over to your domain provider it can take a few hours for the records to propagate and the authentication to be completed. If you don't see it, allow up to 24 hours for the authentication to be completed.
You can always check the status of the domain in your Email Marketing dashboard under Sender Details. Refresh the page to see Domain status.
FAQs
Click a question below to learn more.
Why do I need to authenticate my custom domain?
What is a CNAME record?
Will authenticating my custom domain using the steps above mean that my DMARC record will also be set up?
What is a DMARC record?
What happens if I don't authenticate my domain?
