

Adding Store Products to Your Facebook Catalog
3 min
In this article
- Step 1 | Create a Facebook Catalog
- Step 2 | Upload your products to your Facebook Catalog
- Step 3 | Connect your Facebook Catalog to your Wix site
- Step 4 | Add your Checkout URL to Meta
- FAQs
Adding a Facebook Catalog to your online store lets you easily integrate with your Facebook campaigns.
After you set up your Facebook Catalog in your Meta Commerce Manager, all the important information about your products such as the name, description, and price are automatically updated in your Facebook Catalog.
Important:
- By using this service, you are engaging directly with a third-party service provider. We recommend reviewing the service provider's Privacy Policy and Terms of Use prior to your use of such third-party service. You acknowledge that we are not liable for any loss or damage resulting from your use of such third-party service, including any liability arising from any personal data exchanged between you and such third-party.
- You must have your Wix online store set up in order to create a Facebook Catalog.
Step 1 | Create a Facebook Catalog
To get started you need to create a Facebook Catalog for your products in Meta Commerce Manager.
To create a catalog:
Step 2 | Upload your products to your Facebook Catalog
The next step is to upload the physical products you want to add to your Facebook Catalog.
To upload your products:
- Click Data Sources under Catalog.
- Select Data File.
- Click Next.
- Select Use a URL under Choose how to upload your file.
Note:
Keep this tab open as you continue into the next step. You'll need 2 tabs open to complete the set up process.
Step 3 | Connect your Facebook Catalog to your Wix site
Next, connect your Facebook Catalog into the marketing integrations on your Wix site.
To connect your Catalog:
- In a new tab, go to Marketing Integrations in your site's dashboard.
- Click Connect under Facebook Catalog.
- Click Get Data Feed.
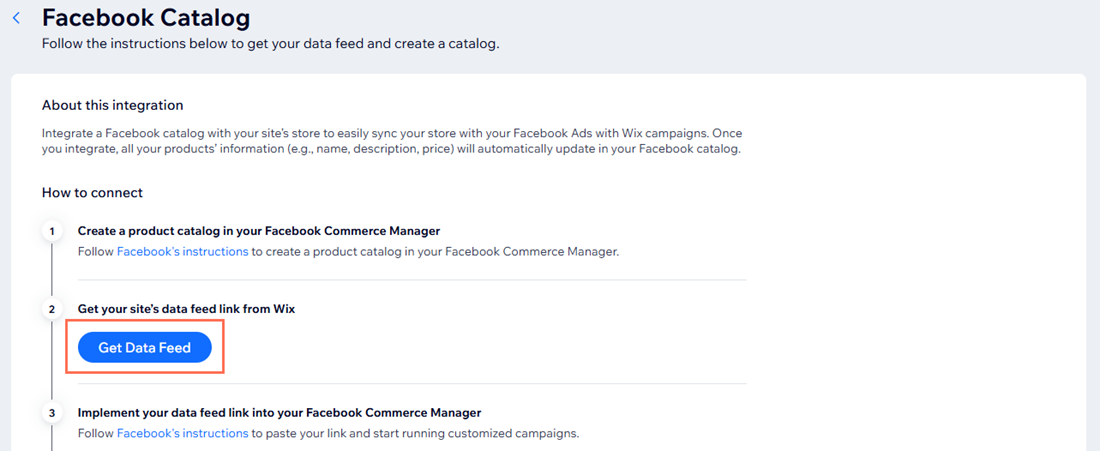
- Click Copy to copy the URL on the Here's Your Facebook Catalog Feed pop-up.
- Click Close.
- Go back to Meta Commerce Manager and paste the URL under Enter URL.
- Click Next.
- Set the schedule for how often you want the data feed to be updated.
- Click Next.
- Add a name for your data source and choose a default currency.
- Click Upload.
Step 4 | Add your Checkout URL to Meta
The last step is to add your checkout URL to your Meta Commerce Manager.
To add your checkout URL:
- Go back to Marketing Integrations in your site's dashboard and click Get Checkout URL.
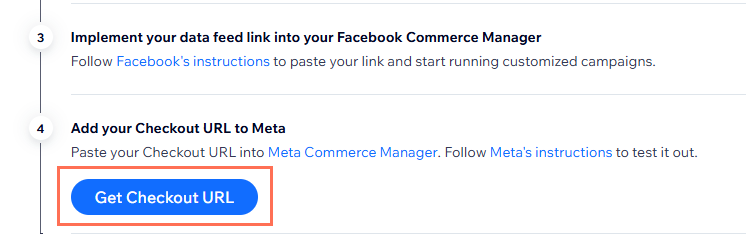
- Click Copy to copy the checkout URL.
- Click Close.
- Go back to Meta Commerce Manager.
- Add your checkout URL to your Facebook shop.
FAQs
Click a question to learn more about your Facebook Catalog.
What is a Facebook Catalog?
How can I optimize and collect relevant data from my Facebook ads?
Can digital products be added to my Facebook Shop with the Facebook Catalog Feed?
