

Wix Editor: Adding a Link to an Element
6 min
In this article
- Types of links
- Adding a link to an element
- Adding a link to your menu
- Adding links to galleries
- Adding links in Velo
- Advanced SEO settings
Add links to elements on your site to help visitors navigate your content, and direct them to relevant and important content.
There are many types of links you can add, including page links, external URL links, and links to email addresses.
Types of links
There are a many types of links you can add to your elements to direct your site visitors to whatever content you like; including links to popups, anchors, and external URLS.
Click an option below to learn more about the link types:
Web address
Page
Section or anchor
Top / bottom of page
Document
Email
Phone number
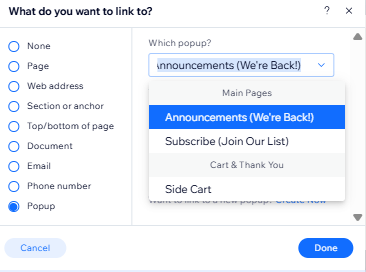
Popup
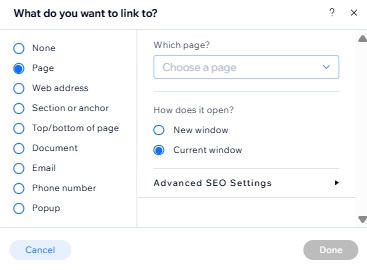
Adding a link to an element
Add links to a variety of elements including images, text, buttons, and vector art.
To add a link to an element:
- Click the Link icon
 .
. - Select the link type and enter the details.
- Click Done.
Want to remove a link?
You can remove a link from an element at any time. Just select None in the What do you want to link to? Popup and click Done.
Adding a link to your menu
Your site menu contains items that link to pages or page sections on your site. However, you can also link a menu item to another destination.
These links look like regular menu items, and you can name them whatever you like.
To link a menu item:
- Click Menus & Pages
on the left side of the editor.
- Click the Add a Link icon
 .
. - Select the link type and enter the link details.
- Choose whether your link opens in a new window or the current window.
- Click Done.
- Enter the name for the menu item.
Adding links to galleries
Add links to the media in your galleries so that they open when a visitor clicks them. You can add links to media in both the Pro Gallery, and in a regular gallery.
Click an option below to learn more about adding links to gallery items.
Show me how to add a link to Pro Gallery media
Show me how to add a link to a gallery image
 .
.Adding links in Velo
If you are using Velo by Wix, be aware that having 2 onClick functions (one set from the Editor link panel, and one set from Velo) can cause a conflict. When using 2 onClick functions on the same element, the link should be added using code.
If you are using the CMS (Content Management System), be aware that click actions can also conflict with links if the link is added via the link panel. The CMS can be connected to URL's and document field types. Learn more about working with dataset action for buttons.
Advanced SEO settings
When you link an element to a site page or web address, you can choose the rel attribute for the link. Rel attributes define the relationship between your pages and the links you add to them, and the page / search engine treats it accordingly.
Important:
Rel attributes are an advanced topic, and assigning the incorrect attribute can cause issues with your site and links. Therefore, we recommend that only advanced users choose a rel attribute for their links.
To add a rel attribute:
- Click the relevant element in your editor.
- Click the Link icon.
- Select whether to link the element to a site page or web address on the left of the panel.
- Click Advanced SEO Settings.
- Select which attributes you want to apply from the drop-down menu:
- noopener: This attribute prevents the page / site you have linked from gaining access to (or information about) the page you've linked it from. We recommend using this in most cases, as it protects your site's security.
- noreferrer: This attribute prevents the page / external site you are linking to from gaining access to information about your site and its pages.
- nofollow: The nofollow attribute tells search engines to ignore the link, as it is not related to your site. Therefore, search engines do not crawl the link.
- sponsored: This attribute lets search engines know that the link is an ad or placement, and that you've been paid to add it to your site. We recommend using this attribute for all paid ads or placement links on your site, as it makes it less likely that your SEO ranking will be penalized for attempting to manipulate result rankings.
