Wix Stores: Creating and Displaying Product Categories
5 min
In this article
- Creating and displaying a new category
- Displaying existing categories in a product gallery
- FAQs
Important:
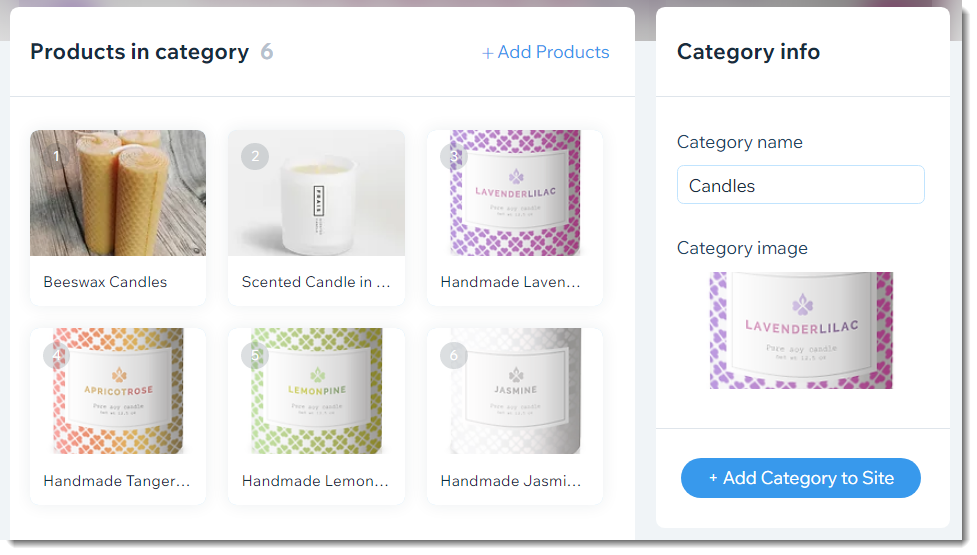
We're releasing a new version of product categories that is not yet available for all users. If your category creation page doesn't match the image below, click this link and the links inside the article to learn how to add and display categories.
Group products into categories (previously called collections) to make it easy for customers to find what they're looking for. For example, you might create separate categories for candles, ceramics, and posters and display each category on a different page.

Tips:
- To display all your products on one page, you don't need to create new categories.
- You can create categories to use for custom filters. Learn more about custom filters
Creating and displaying a new category
Create the categories you need to organize your products. After saving the new category, you'll be prompted to display it on a new or existing site page.
Note:
Category names and images do not appear on your live site.
To create and display a category:
- Go to Categories in your site's dashboard.
- Click + New Category.
- Enter a name under Category Name on the right.
- Add a category image (Doesn't appear on your site):
- Click the Add icon
 under Category image.
 - Add an image and click Add to Page.
- Click the Add icon
- Add products to the category :
Tip: You can add the same product to more than one category.- Click Add Products.
- Select the checkbox next to products you want to add.
- Click Add.
- Click Save.
Note: If you don't want to display this category on your site, no need to follow the rest of the steps.

Tip:
As soon as you click Save to create a category, a popup appears. You can continue the category display flow from the pop-up or connect from the category tab link.
- Add the category to your site from the categories tab:
- Do one of the following:
- From the Popup: Click Add Now.
- From the Category tab:
- Click the category you want to display.
- Click +Add Category to Site on the right.
- Click Add Now.
- Choose where to add the category:
- Create a new page for this category:
- (Optional) Enter a page name.
- Click Create Page.
- Add this category to an existing page: Displays the category on a page you already have on your site.
- Expand the Which Page arrow
 and select the relevant page.
 - Click Add Category.
- Click the category gallery and drag it to where you want to display it on the page.
- Expand the Which Page arrow
- Create a new page for this category:
- Do one of the following:

Displaying existing categories in a product gallery
You can select which category you want to display in any of your product galleries.
Tip:
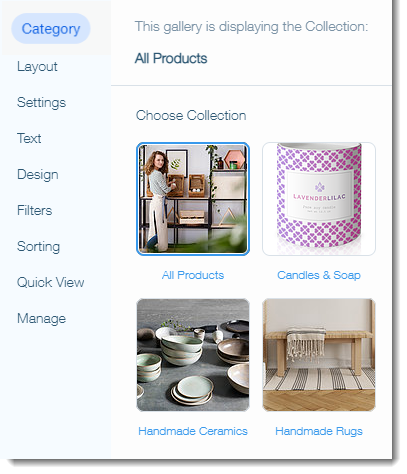
By default, product galleries display the All Products category.

To select which category to display in a product gallery:
- Navigate to the page containing the relevant product gallery in the editor.
- Click the product gallery.
- Click the Settings icon
 .
. - Click the Category tab.
- Click to select the category you want to display.

FAQs
Click a question below to learn more about categories.
Does every category need to be displayed on my site?
Do customers see the category image and name?
Can I add the same product to multiple categories?
Can I set up pages with categories inside categories?
Can I change the display order of products in a category?
Dig deeper:
- Learn how to:
- Or check out the full Wix Learn course on getting started with Wix eCommerce. Skip to the second video to learn more about creating categories.


