

Wix Stores: Importing Reviews into the Wix Reviews App
7 min
In this article
- Step 1 | Download the Wix CSV template file
- Step 2 | Add your reviews and upload the file
- a | Add your reviews
- b | Upload the CSV file
- Handling errors
- FAQs
Import your previous reviews to make sure you don't lose any that you've collected on other platforms or through other review apps. After you import them, you can display them on your site.
Note:
Make sure you installed the Wix Reviews app onto your site.
Step 1 | Download the Wix CSV template file
Download the Wix CSV template file and save it on your computer. You'll use this template later to add review data from other sources.
Tip:
This file comes with 5 sample reviews. These are examples to help you understand how to add your reviews to the file.
To download the Wix CSV template file:
- Go to Reviews in your site's dashboard.
- Click Import Reviews.
- Click Download Sample CSV.
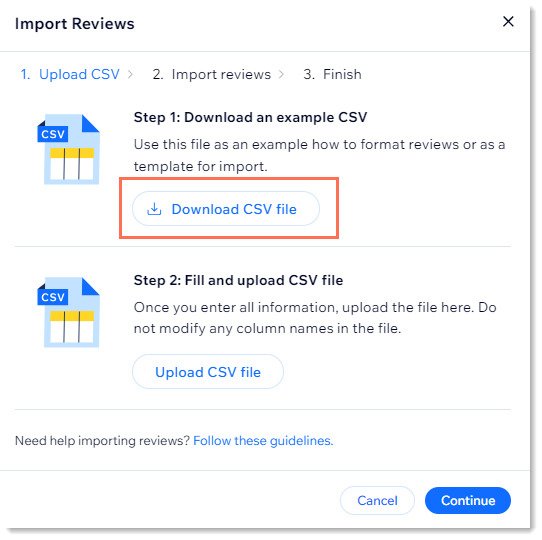
- Open the CSV file.
Note: Mac users should open the file with Numbers or Excel version 15 or higher. - Save the downloaded file in CSV (Comma delimited) format.
Step 2 | Add your reviews and upload the file
Now you can add reviews from another source to the template file you downloaded and saved.
The table below is to help you stick within the format guidelines for each column. Follow the instructions to enter data in the correct format and connect reviews to the right product.
Important:
- Each review app collects data in a different format. For example:
- Dates can be 12/20/2023 or 20.12.23.
- Product ID numbers in one platform (e.g. Amazon) won't match your Wix product ID.
- Do not add or delete columns.
- Do not edit column names.
- Each review must have a value in the product_id, rating, and customer_email columns. Other data is optional.
- Your file from another platform may have fields not found in the Wix CSV Template file. Do not add them.
a | Add your reviews
- Enter the data into the template using the guidelines in the table below.
- Delete the rows of sample data so they won't be imported.
- Save the file in a CSV format.
Field | Instructions |
|---|---|
created_at | Any of the following formats are acceptable: mm/dd/yyyy (e.g. 12/20/2023) yyyy-mm-dd (e.g. 2023-12-20) Mth d, yyyy (e.g. Dec 20, 2023) yyyy-mm-dd hh:mm:ss (e.g. 2023-12-20 14:55:25) Tip: The date can also include a time stamp (e.g. 2024-02-27 14:55:25) |
customer_name | Mandatory field Max. 100 characters |
customer_email | Mandatory field Max. 320 characters |
rating | Mandatory field The accepted format is any whole number from 1 to 5. |
title | Optional field. You can enter the review title. Max. 3000 characters |
body | Optional field. You can enter the review text. Max. 3000 characters |
store_reply | Optional field. You can enter your reply to the review text. Max. 1000 characters |
store_replied_at | Any of the following formats are acceptable: mm/dd/yyyy (e.g. 12/20/2023) yyyy-mm-dd (e.g. 2023-12-20) Mth d, yyyy (e.g. Dec 20, 2023) yyyy-mm-dd hh:mm:ss (e.g. 2023-12-20 14:55:25) |
product_id | Mandatory field This field connects your review with the correct product. The product_id should have the following form where the x's are digits or letters: xxxxxxxx-xxxx-xxxx-xxxx-xxxxxxxxxxxx Important: * An incorrect product_id will not prompt cause an error message. The review will be imported but does not appear on your site. * Check the FAQ below to learn how to locate product IDs. |
review_image_url | Max. 5 images or 4 images + 1 video per product separated by a semicolon ; . Do not add a space after semicolons. Must be a URL. Check the FAQ below to learn how to locate an image URL. The accepted file formats are .jpg, png, and gif. |
review_video_url | Max. 1 video. Must be added as a URL. |
Once all the data has been entered and saved, you can go back to the Reviews tab in your dashboard and upload the file.
b | Upload the CSV file
- Go to Reviews in your site's dashboard.
- Click Import Reviews to go back to the popup.
- Click Upload CSV File.
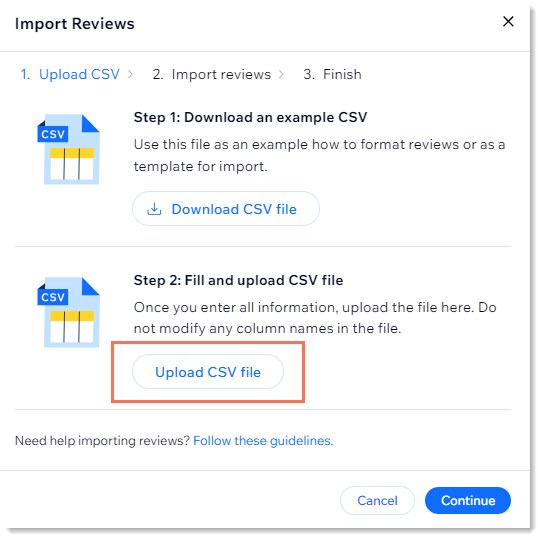
- Upload the updated file you saved and click Continue.
Tip: You'll receive an import review showing how many reviews will be imported and listing row which contain errors. - Do one of the following:
- No errors: Click Import Reviews to complete the process.
- Products with errors: If you have products with errors, you can either correct the errors and import again (see instructions below) or import your products as is. If you go ahead and import without fixing errors, only products without errors are imported.
Note: If you decide to import without correcting the errors, first click View Errors so that you know which reviews were not imported.
Important:
Images may take up to 1 hour to upload if you have many reviews. You can continue to make changes while images upload in the background.
Handling errors
If any of the rows in your template file contain a critical error, you'll see this indicated. In the image below, you can see a sample of an import where 55 reviews (55 rows in the template) are ready to be uploaded and 5 reviews have errors which prevent them from being uploaded.
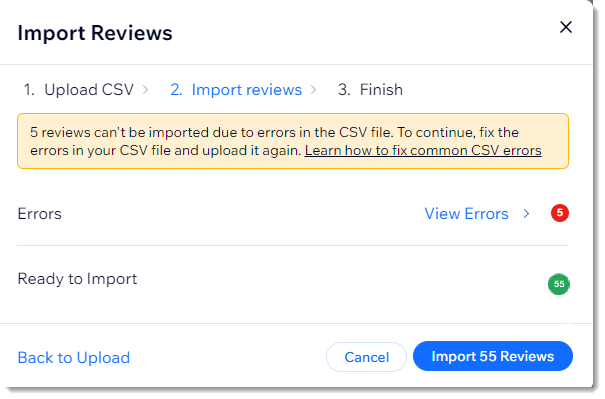
You can click Import Reviews to upload the reviews that don't have errors. Alternatively, you can fix the errors and upload the corrected file.
To handle errors and upload a corrected file:
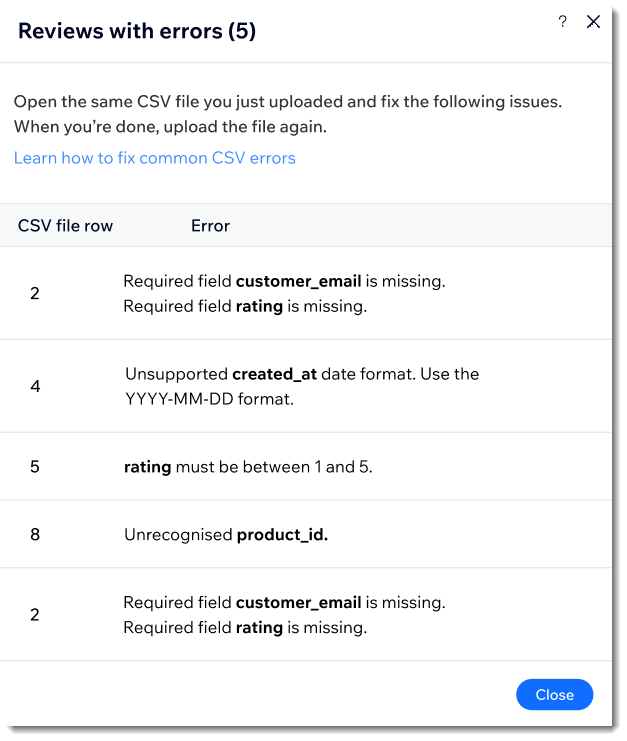
- Click View Errors.
Tip: Each error relates to a specific row. - View information about the error in the Error column.
Learn how to understand and fix import errors.
- Reopen the CSV file.
- Correct the errors.
- Save the CSV file.
- When you're ready, click Upload New CSV to import the corrected file.
Note: It may take a few minutes to complete the import process.
FAQs
Click a question to learn more about importing reviews.
How can I find and add the product_id for each of my Wix Stores products?


Why don't I see a review on my live site even though it was imported successfully?
 next to the relevant review.
How can I find and add the review_image_url?

How many reviews can I import?
Can I import a product file with non-Latin characters?

