

Wix Hotels by HotelRunner: Managing Prices and Availability with the Inventory Calendar
7 min
In this article
- Filtering your Inventory Calendar
- Changing your rates using the Inventory Calendar
- Limiting availability
- Preventing bookings using stop sell
- Adjusting the minimum stay
- Closing to arrivals
- Closing to departures
Important:
This article refers to the latest version of Wix Hotels by HotelRunner. For information on the previous version of Wix Hotels, click here.
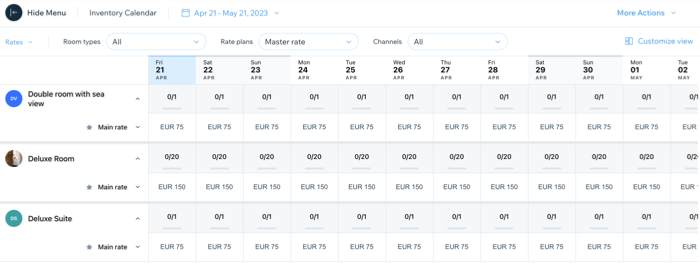
The Inventory Calendar allows you to visualize and manage your room inventory and reservations. Customize the inventory calendar using filters to view the relevant room types, and rate plans during a specific time period. You can then set up your pricing and availability in one place.
The calendar also allows you to add restrictions on arrivals and departures and general availability.
Filtering your Inventory Calendar
Filter your inventory calendar to get a clear view of your room availability and reservations based on your preferences. You can apply filters such as room type, rate plan, date range, and more. This allows you to quickly see which rooms are available or sold out for a particular period, and make informed decisions about pricing and promotions.
You can then update the relevant rate plans, in the correct time period, following the instructions in the sections below.
To filter your inventory calendar:
- Go to Inventory Calendar in your site's dashboard.
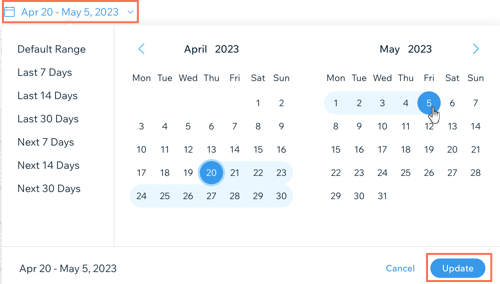
- Select the relevant dates from the calendar drop-down:
- Choose from the presets list on the left, for example, "Next 30 days".
- Select specific dates and months using the calendar.
- Click Update to save the date range.
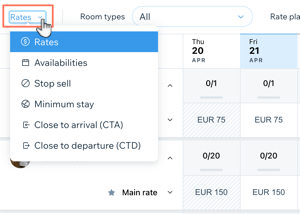
- Click the drop-down in the top left corner and choose the relevant filter from the available options.
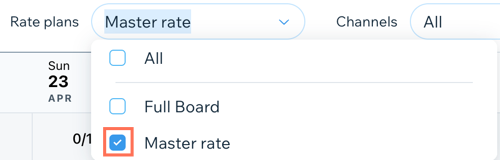
- Click the Rate plans drop-down and click the checkbox next to the relevant rate plan(s) you want to view.
- Click the Channels drop-down and click the checkbox next to the relevant Channel(s) you want to view.
Changing your rates using the Inventory Calendar
The Inventory Calendar allows you to change the main rate in your rate plans during specific time periods. The rules you set in the rate plan still apply. For example: 2 guests can book a room for $150, more than 2 guests can book the same room for $150 + $50 per each additional guest.
You can choose a specific date or extend the new pricing across multiple dates. This a great way to respond to sudden changes in demand and make quick changes to rates and maximize your revenue.
Note:
You set up pricing rules in your Rate Plans which adjust your rates based on certain criteria, such as occupancy or length of stay. Using the inventory calendar and Rate Plans together, you can ensure that your rates are always competitive.
To change your rates using the Inventory Calendar:
- Go to Inventory Calendar in your site's dashboard.
- Select the relevant date range from the drop-down at the top.
- Click Update.
- Select Rates from the drop-down on the left.
- Select the relevant Room types, Rate plans and Channels from the drop-downs at the top.
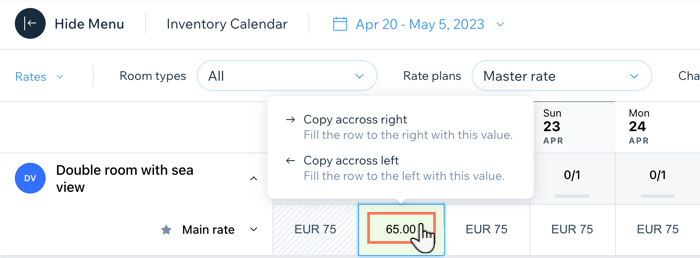
- Click on the rate you want to edit.
- Enter the new rate for that date.
- (Optional) Click Copy across right or Copy across left to fill all other dates before or after the selected date within the selected date range.
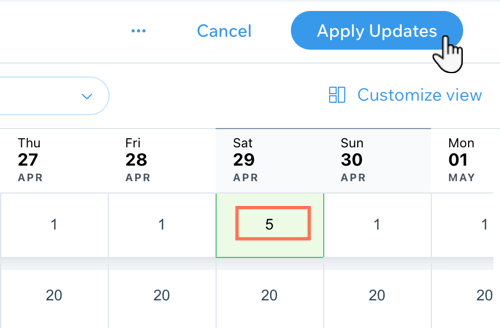
- Click Apply Updates in the top right.
Limiting availability
Use the Inventory Calendar to adjust the number of rooms or units available for booking on specific dates or for a certain period. This is great for when you need to accommodate more guests and maximize revenue or when you want to prevent overbooking.
To limit availability:
- Go to Inventory Calendar in your site's dashboard.
- Select the relevant date or date range from the drop-down at the top.
- Click Update.
- Select Availabilities from the drop-down on the left.
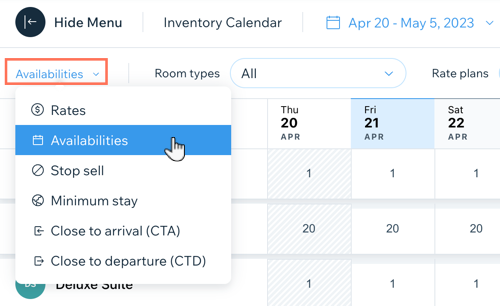
- Select the relevant Room types, Rate plans and Channels from the drop-downs at the top.
- Click to edit the availability on the relevant date(s) for each room type.
- (Optional) Click Copy across right or Copy across left to fill all other dates before or after the selected date within the selected date range.
Preventing bookings using stop sell
Stop sell allows you to restrict the sale of specific room types or rates for a certain period. This is useful when you have capacity constraints, are carrying out maintenance or want to drive up demand.
To prevent bookings using stop sell:
- Go to Inventory Calendar in your site's dashboard.
- Select the relevant date range from the drop-down at the top.
- Click Update.
- Select Stop Sell from the drop-down on the left.
- Select the relevant Room types, Rate plans and Channels from the drop-downs at the top.
- Enable the toggle(s) on the relevant date(s) on which you want to prevent bookings.
- (Optional) Click Copy across right or Copy across left to fill all other dates before or after the selected date within the selected date range.
- Click Apply Updates in the top right.
Adjusting the minimum stay
Adjust the minimum stay using the Inventory Calendar on specific dates or for a certain period. This useful for maximizing revenue during busy periods and making sure you have enough staff available for check-in and check-out.
To adjust the minimum stay:
- Go to Inventory Calendar in your site's dashboard.
- Select the relevant date range from the drop-down at the top.
- Click Update.
- Select Minimum stay from the drop-down on the left.
- Select the relevant Room types, Rate plans and Channels from the drop-downs at the top.
- Click to edit the minimum stay on the relevant date(s) for each room type.
- (Optional) Click Copy across right or Copy across left to fill all other dates before or after the selected date within the selected date range.
- Click Apply Updates in the top right.
Closing to arrivals
Closing arrivals allows you to restrict new bookings on specific dates or for a certain period. This is useful when you have scheduled renovations, special events or for seasonal closures. You can also allow check-ins on specific days of the week to better manage your staff.
To close to arrivals:
- Go to Inventory Calendar in your site's dashboard.
- Select the relevant date or date range from the drop-down at the top.
- Click Update.
- Select Close to arrival (CTA) from the drop-down on the left.
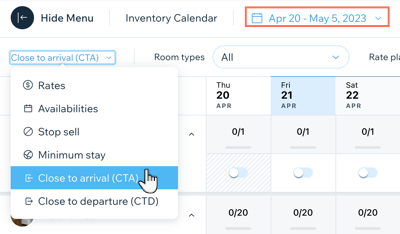
- Select the relevant Room types, Rate plans and Channels from the drop-downs at the top.
- Enable the toggle(s) on the relevant date(s) you want to close to arrival.
- (Optional) Click Copy across right or Copy across left to fill all other dates before or after the selected date within the selected date range.
- Click Apply Updates in the top right.
Closing to departures
Closing to departures allows you to restrict check-outs on specific dates or for a certain period. This is useful when you are hosting special events and your staff are at capacity. It can also be helpful during the off-season when you have fewer staff available.
To close to departures:
- Go to Inventory Calendar in your site's dashboard.
- Select the relevant date or date range from the drop-down at the top.
- Click Update.
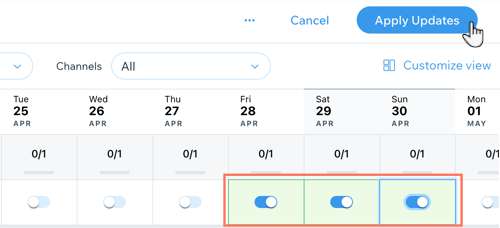
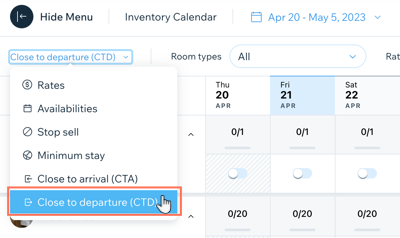
- Select Close to departure (CTD) from the drop-down on the left.
- Select the relevant Room types, Rate plans and Channels from the drop-downs at the top.
- Enable the toggle(s) on the relevant date(s) you want to close to arrival.
- (Optional) Click Copy across right or Copy across left to fill all other dates before or after the selected date within the selected date range.
- Click Apply Updates in the top right.
