Wix Editor: Customizing Text & Icon Buttons
3 min
In this article
- Changing the button text
- Designing the button
- Adjusting the button's layout
Personalize your text & icon button so it looks exactly how you want. Update the button text as needed, design the button's appearance and adjust the layout (e.g. positioning, spacing and more).
Changing the button text
Enter your button text to encourage visitors to interact with your site. Some examples of possible phrases are "Contact Us", "Read More", or "Buy Now".
To change the button text:
- Go to your editor.
- Click the button on your page.
- Click Settings.
- (Optional) Click the Choose what displays drop-down and select an option: Text and icon, icon, text only, or nothing.
- Edit the text that appears on the button under Text.

You can also choose what displays on your button (i.e. text, icon or both) from the Layout panel.
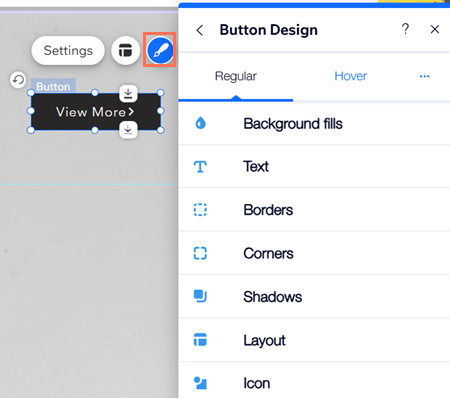
Designing the button
Designing your button is a great way to customize it to your site's look and needs. Adjust the design for each button state:
- Regular: How the button is displayed before it's been interacted with.
- Hover: How the button is displayed when a cursor is hovering over it.
To design the button:
- Go to your editor.
- Click the button on your page.
- Click the Design icon
 .
. - Click Customize Design.
- Choose a button state.
- Adjust the design to your needs:
- Background Fills: Choose a background color and adjust its opacity.
- Text: Adjust the text's theme, color, font, size, and format.
- Borders: Adjust the border's color, opacity, and width.
- Corners: Use the boxes to adjust the pixel size of the button's corner.
- Shadows: Add and customize a shadow on your button.
- Layout: Edit the layout and alignment of your button.
- Icon: Display an icon with your text and adjust its settings.
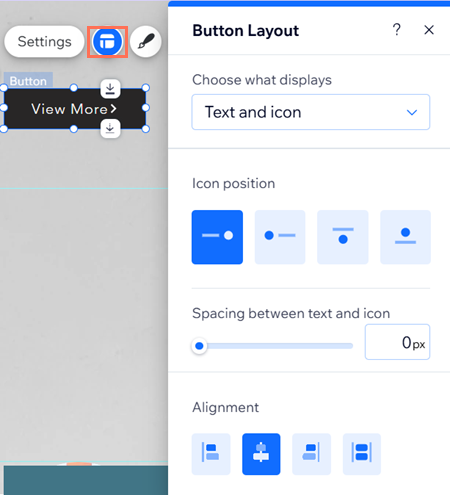
Adjusting the button's layout
Change the positioning, alignment and spacing between the text and / or icon on your button. You can also decide what happens when there isn't enough room on the button to show its full text.
To adjust the button's layout:
- Go to your editor.
- Click the button on your page.
- Click the Layout icon
 .
. - Adjust any of the following settings:
- Choose what displays: Decide what is displayed on your button: Text and icon, Text only, Icon only, or Nothing.
- Text and icon position: When choosing to show both text and an icon, decide how to position them: side by side, or one below the other.
- Spacing between text and icon: When choosing to show both text and an icon, drag the slider to set the spacing between them (in px).
- Alignment: Align the text and icon to the left, center or right side of the button. You can also align them to both margins of the button, by clicking Justify
 .
.
You can also choose what displays on your button (i.e. text, icon or both) from the Settings panel.