Wix Bookings: Adding and Setting Your Booking Policies from the Wix App
6 min
In this article
- Adding new policies
- Managing connected services
- Setting your default policy
- Deleting policies
You can set your booking policies to determine how far in advance and how close to a session you want your clients to be able to book. You can also set restrictions on how close to your services your clients can cancel or reschedule.
You can also choose whether to enable group bookings and allow bookings after the start date for certain services. Take advantage of creating distinct policies for different services to provide both your clients and your staff with greater flexibility.
Adding new policies
Create multiple policies for different services using the Wix app. This allows you to manage and customize the booking process for each service individually, ensuring that your clients have a seamless experience tailored to their specific needs.
Notes:
- Certain policy rules and options only apply to specific service types, such as classes or courses.
- When you add a new policy, the policy's rules take effect for all connected services for both current and future bookings.
- Go to Booking Settings from a desktop computer if you want to add cancellation and no-show fees, or require payment details for bookings.
Show me examples of new booking policies
To add a new policy:
- Go to your site in the Wix app.
- Tap Manage
 at the bottom.
 - Tap Booking Services, or tap Catalog and select Booking Services.
- Tap Settings at the top.
- Tap Booking Policies.
- Tap + Add a New policy.
- Tap to enter the Policy name.
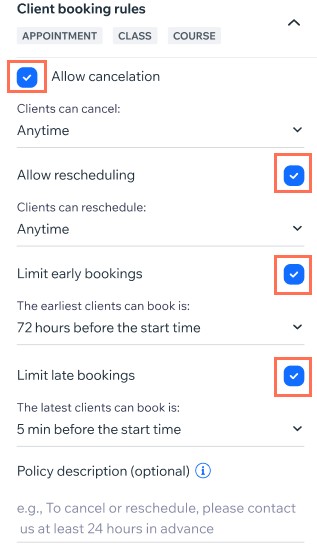
- Select the checkboxes and choose the timeframe next to the relevant Client Booking Rules below:
- Allow cancelation: Select the checkbox to allow clients to cancel their booked sessions. Define how much time before a session clients can cancel their booking by choosing one of the existing options from the drop-down or create your own custom timeframe.
Note: Only site members can cancel their upcoming bookings on your site. - Allow rescheduling: Select the checkbox to allow clients to reschedule their booked sessions. Define how much time before a session clients can reschedule their booking by choosing one of the existing options from the drop-down or create your own custom rescheduling timeframe.
- Limit early bookings: Select how long before a session a client can book from the Limit early bookings drop-down. You can also select Custom to choose a specific timeframe (e.g., 1 week) before which clients can't make a booking.
- Limit late bookings: Set how close to a session clients can book, for example, "24 hours before start time". Choose an existing option from the Limit late bookings drop-down. You can also tap Custom to choose a specific timeframe after which clients can no longer book a session.
- Allow cancelation: Select the checkbox to allow clients to cancel their booked sessions. Define how much time before a session clients can cancel their booking by choosing one of the existing options from the drop-down or create your own custom timeframe.
- (Optional) Enter your Policy description. Let clients know your policy terms and conditions by adding a note to your service pages. Clients see the policy on the checkout page when they book.
- (For classes only) Allow clients to join a waitlist:
- Tap to select the checkbox next to Allow clients to join a waitlist for fully booked classes.
- Tap to enter the Max. waitlist capacity.
- Tap to choose how long An open spot will be held for.
- (For classes and courses only) Tap to choose the Maximum number of participants allowed per booking for group bookings.
- (For courses only) Tap to select the checkbox to Allow clients book a course after it's already started.
- Tap Save Policy.
Managing connected services
In the Wix app, you have the ability to move or connect services to different policies at any time. This feature is great when you notice a spike in demand for particular services. You can then implement a more restrictive policy to effectively manage the number of bookings.
To manage the connected services of a policy:
- Go to your site in the Wix app.
- Tap Manage at the bottom.
- Tap Booking Services, or tap Catalog and select Booking Services.
- Tap to select the relevant service you want to add to a policy.
- Tap Edit service.
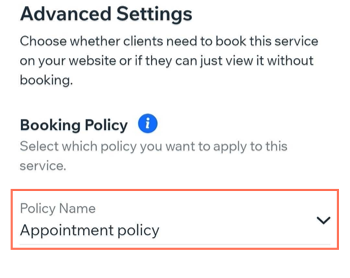
- Scroll down to Advanced Settings.
- Tap Booking Policies.
- Tap the Policy Name drop-down under Booking Policy.
- Tap to select the relevant policy you want to add the service to.
- Tap Save.
Setting your default policy
Choose which of your policies you want to automatically apply to all your services. This is useful when you are adding new services as your business grows. You can then link services to more customized policies whenever you need.
Important:
- You can't delete your default policy. However, you can make another policy the default, then delete the original default policy.
- When you change which of your policies is the default, and delete the original policy, all services automatically link with the new default policy.
To set your default policy:
- Go to your site in the Wix app.
- Tap Manage at the bottom.
- Tap Booking Services, or tap Catalog and select Booking Services.
- Tap Settings at the top.
- Tap Booking Policies.
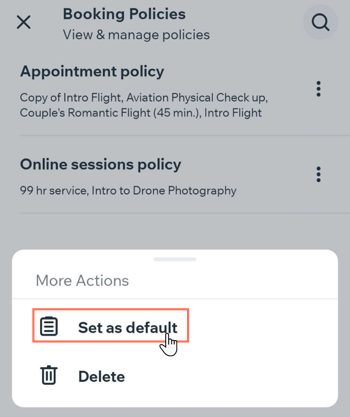
- Tap the More Actions icon
 next to the relevant policy you want to make your default policy.
 - Tap Set as default.
Deleting policies
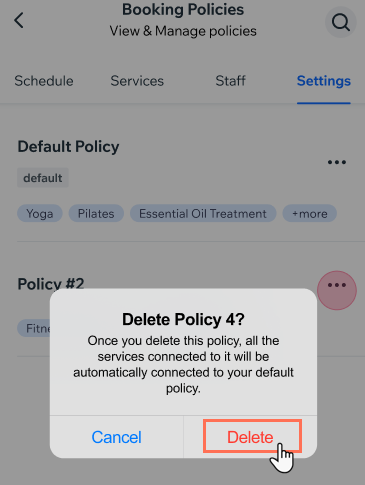
You can delete policies at any time, but make sure you choose your default policy before deleting any irrelevant policies. When you delete a policy, all connected services move to your default policy. You must have at least one booking policy at all times.
To delete a policy:
- Go to your site in the Wix app.
- Tap Manage at the bottom.
- Tap Booking Services, or tap Catalog and select Booking Services.
- Tap Settings at the top.
- Tap Booking Policies.
- Tap the More Actions icon next to the relevant policy you want to delete.
- Tap Delete.
- Tap Delete again to confirm.