

Studio Editor: Using Hamburger Menus
6 min
In this article
- Adding a hamburger menu
- Managing a hamburger menu
- Customizing a hamburger menu
Hamburger menus offer a clean, space-efficient solution that only appears when visitors click the menu icon.
In the Studio Editor, you have full control over the design elements of the hamburger menu, allowing you to tailor it to your client's specific branding and style. This flexibility helps create an intuitive navigation experience that aligns perfectly with their vision.

Adding a hamburger menu
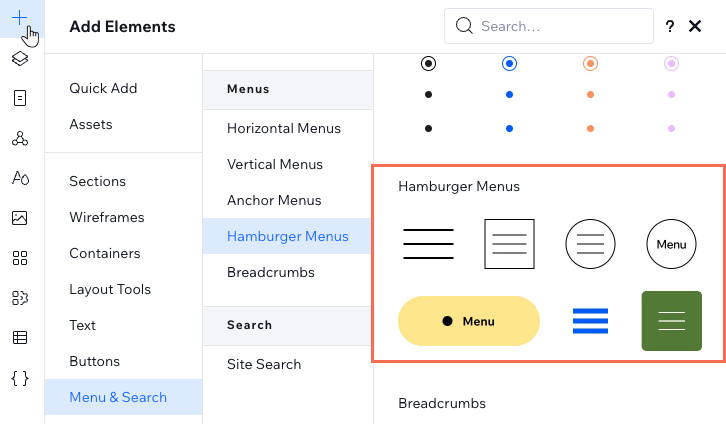
Add a hamburger menu at any point from the Add Elements panel. Depending on your client's needs, you can add multiple menus to the site and manage / customize them individually.
To add a hamburger menu:
- Click Add Elements
 on the left side of the editor.
 - Click Menu & Search.
- Click Hamburger Menus.
- Drag and drop the relevant menu to the desired location on the page.
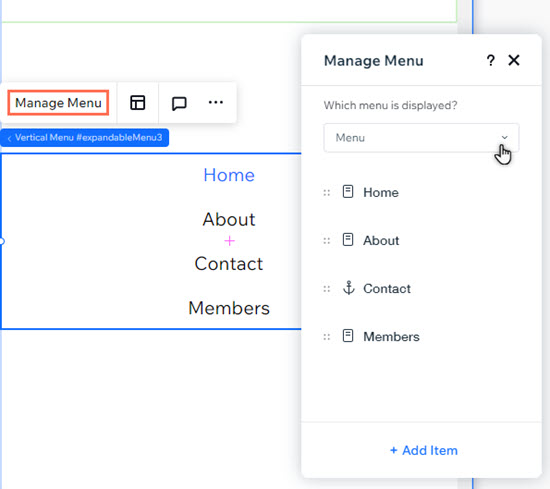
Managing a hamburger menu
After adding a hamburger menu to the site, choose the menu it displays. You can display different menus on each individual hamburger menu, providing context specific to the page / section it's on.
To manage a hamburger menu:
- Select the hamburger menu icon.
- Click Edit Menu.
- Select the vertical menu element.
- Click Manage Menu.
- Click the drop-down under Which menu is displayed?.
- Existing menu: Select your chosen menu from the drop-down.
- New menu:
- Click Manage Site Menus.
- Click + Add New Menu and create the custom menu.
Did you know?
You can add items to the menu you've chosen by clicking + Add Item at the bottom of the panel.
Customizing a hamburger menu
After adding a hamburger menu, personalize every part of it to match the site's look and feel.
To customize a hamburger menu:
- Select the hamburger menu icon.
- Choose what you want to customize:
Hamburger menu icon
 to decide which icon and / or text to show.
 to adjust the alignment of the icon / text. If you're showing both an icon and text, you can set the spacing between them and the icon's position.
Menu container and overlay
 so it takes up the entire screen, or simply adjust the size on the canvas.
 to choose whether or not to show a background overlay, as well as the option to tap outside to close the container.

Vertical menu
 .
.
Close Button icon

