Setting Up Enhanced Conversions with Wix
5 min
In this article
- Step 1 | Google Ads conversion action setup
- Step 2 | Create a Wix form
- Step 3 | Customizing form field names with Velo
- Step 4 | Conversion methods
- Method 1: Custom code implementation
- Method 2: Google Tag Manager implementation
- FAQs
Enhanced conversions improve the accuracy of conversion tracking by securely sending hashed first-party data to Google Ads. This is particularly beneficial for cross-device and cross-browser interactions.
Setting up enhanced conversions for leads and purchases with Wix helps you get more accurate reporting and better ad campaign optimization. For example, if you run an online store, using enhanced conversions can help you track customer actions more precisely, leading to better targeted ads.
Step 1 | Google Ads conversion action setup
First, configure a conversion action in Google Ads to track conversions accurately.
To configure a conversion action in Google Ads:
- Sign in to your Google Ads account.
- Create a new conversion action.
Tip:
Take note of the conversion ID and label for later use.
Step 2 | Create a Wix form
Important:
This step is for leads only. Skip to step 3 if you want to set up enhanced conversions for purchases.
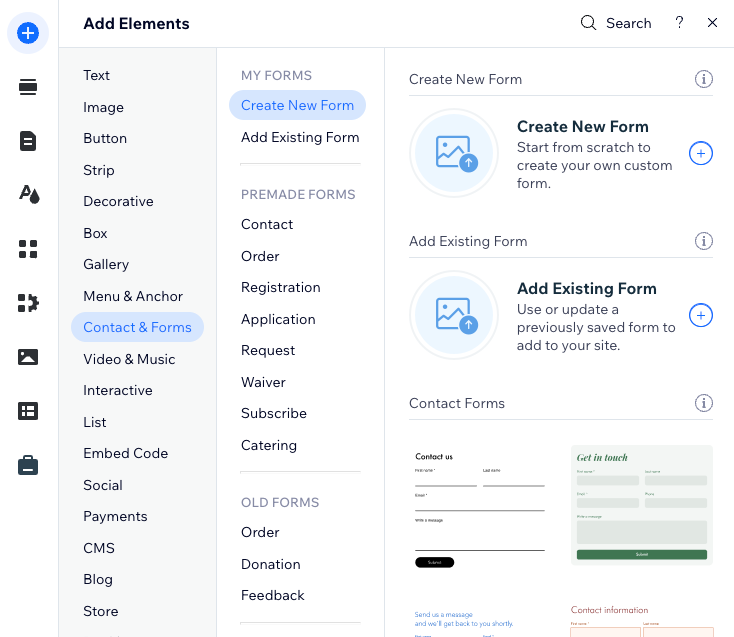
After setting up a conversion action in Google Ads, create a Wix form that triggers a lead event when the form is submitted. This form will collect the necessary data for enhanced conversions.
To create a Wix form:

Step 3 | Customizing form field names with Velo
Customize your form's field names with Velo to ensure they match Google's requirements.
To customize form field names:
- Click the form in your editor.
- Click Edit Form.
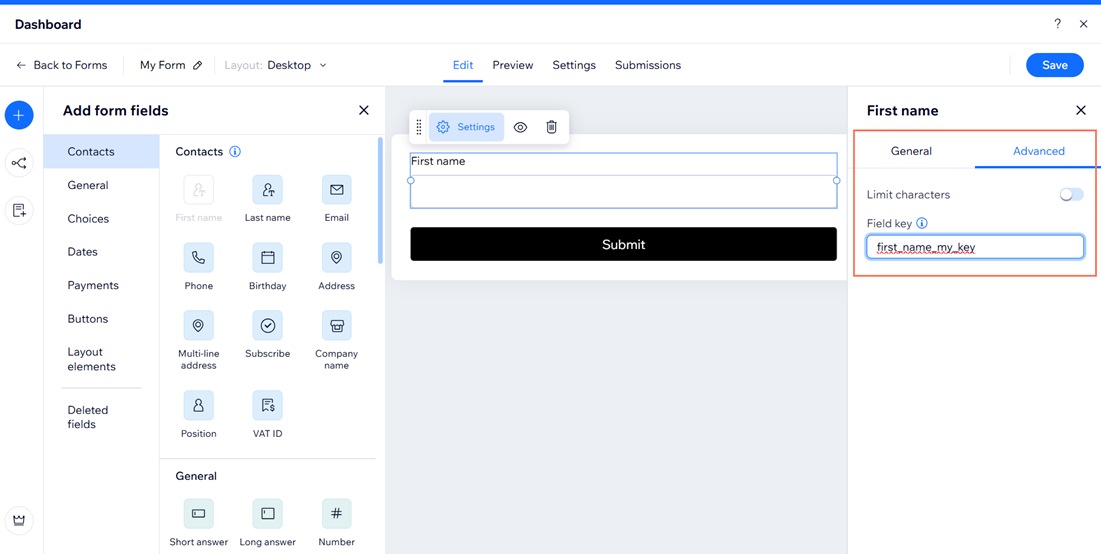
- Click the text field of a form field and click Settings.
- Click the Advanced tab.
- Edit the text after the last underscore in Field key. For example, change first_name_0099 to first_name_my_key.
Important:
The field key cannot be changed later. If you close the Settings menu before changing the field key, you will need to delete the field and add it again.

Step 4 | Conversion methods
Once your form fields have been customized, it's time to set up your enhanced conversions. Choose whether to implement custom code within your site's dashboard, or use Google Tag Manager to create a new tag and configure user data variables.
Method 1: Custom code implementation
Leads
Purchases
- Copy the code snippet provided below and enter it into a text editor.
1<script>
2   if (typeof conversion_id === 'undefined') {
3   //Replace 'AW-CONV-ID' with your conversion ID
4   var conversion_id = 'AW-CONV-ID'; //must be associated with Google Tag installed at Wix
5
6
7}
8   if (typeof conversion_label === 'undefined') {
9   //Replace 'CONVERSION-LABEL' with your conversion label
10   var conversion_label = 'CONVERSION-LABEL';
11}
12
13
14   function registerListener() {
15       window.wixDevelopersAnalytics.register('conversionListener', (e, p) => {
16           if (e === 'Lead') {
17               if (!dataLayer) {
18                   console.error('Google Tag (gtag) is not loaded. ');
19               } else {
20                   function gtag() { dataLayer.push(arguments); }
21
22
23                   const findKey = prefix => Object.keys(p.userData).find(k => k.startsWith(prefix));
24                   const addressKey = findKey('multi_line_address');
25                   const addressData = p.userData[addressKey] || {};
26                   const findAddressKey = prefix => Object.keys(addressData).find(k => k.startsWith(prefix));
27
28
29                   gtag('event', 'conversion', {
30                       'send_to': conversion_id + '/' + conversion_label,
31                       'user_data': {
32                           'email': p.userData[findKey('email')] || '',
33                           'phone_number': p.userData[findKey('phone')] || '',
34                           'address': {
35                               'first_name': p.userData[findKey('first_name')] || '',
36                               'last_name': p.userData[findKey('last_name')] || '',
37                               'street': addressData[findAddressKey('addressLine')] || '',
38                               'city': addressData[findAddressKey('city')] || '',
39                               'region': addressData[findAddressKey('subdivision')] || '',
40                               'postal_code': addressData[findAddressKey('postalCode')] || '',
41                               'country': addressData[findAddressKey('country')] || ''
42                           }
43                       }
44                   });
45               }
46           }
47       });
48}
49
50
51   window.wixDevelopersAnalytics ?
52   registerListener() :
53   window.addEventListener('wixDevelopersAnalyticsReady', registerListener);
54</script>- Replace the placeholder values with your values:
- AW-CONVERSION_ID: Your Conversion ID from Google Ads.
- LABEL_ID: Your Label ID from Google Ads.
- Copy the entire code snippet.
- Go to Custom Code in your site's dashboard.
- Click + Add Custom Code at the top right.
- Click the Code Type tab and select Marketing.
- Click the Code Settings tab and paste the code snippet into the text box.
- Enter a name for your code.
Tip: Give it a name that is easy to recognize so you can quickly identify it later. - Select an option under Add Code to Pages:
- All pages: This adds the code to all of your site's pages, including any new pages that you create in the future. Choose whether to load the code only once per visit, or on each page your visitor opens.
- Choose specific pages: Use the drop-down menu to select the relevant pages.
- Select the Head section under Place Code in.
- Click Apply.
Method 2: Google Tag Manager implementation
- Sign in to your Google Tag Manager account.
- Click Tags.
- Click New.
- Select Tag Configuration.
- Click Google Ads and select Google Ads Conversion Tracking.
- Enter your conversion ID and label.
- Enable Include user-provided data from your website.
- Click the drop-down and select New Variable.
- Select the Code option.
- Click the drop-down and select New Variable.
- Click Variable Configuration and select Data Layer Variable.
- Enter "user_data" into the Data Layer Variable Name text field.
- Save both variables.
- Click Triggering and select Custom Event.
- Enter "generate_lead" or "purchase" into the Event name text field.
- Save the tag configuration.
- Go to Marketing Integrations in your site's dashboard.
- Click Connect under Google Tag Manager.
- Click Add Google Tag Manager.
- Enter your Google Tag Manager ID.
- Click Save.
Learn more about setting up enhanced conversions for web with Google Tag Manager.
FAQs
Click a question below to learn more about setting up enhanced conversions.
Why should I use enhanced conversions?
How do I find my Google Ads conversion ID and label?
Can I use enhanced conversions with any form on Wix?
Do I need coding knowledge to set up enhanced conversions?
How do I test if enhanced conversions are working?


