

Wix Pro Gallery: Setting the Image Quality for Gallery Media
4 min
In this article
- Setting the image quality for individual media
- Setting the image quality for all media
- FAQs
The Wix Pro Gallery allows you to set and customize the image quality per individual media files, or for all of your media at once.
Setting the image quality for individual media
- Go to your editor.
- Click the pro gallery element on your page.
- Click Manage Media.
- Click the relevant image / video and click the More Actions icon
 .
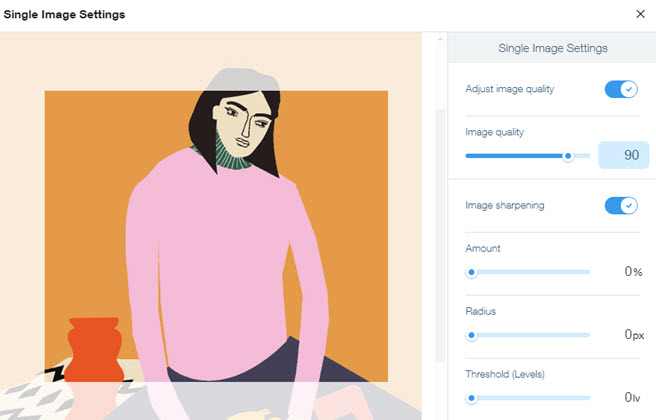
. - Click Adjust Quality and choose what you want to customize:
- Adjust Image Quality: Enable the toggle to adjust the image quality. Drag the slider to increase or decrease the quality.
Note: The higher the image quality, the longer it takes for your media to load. It is not recommended that you increase the image quality to above 90. - Image Sharpening: Enable the toggle to adjust the image sharpness and customize the following:
- Amount: Increase or decrease the amount of sharpening applied to the image.
- Radius: Increase or decrease the number of pixels from the edge that the sharpening affects.
- Threshold: Set how different a pixel must be from the surrounding area before it’s considered an edge pixel and sharpened by the filter.
Note: The lower the threshold number, the more intense the sharpening effect.
- Adjust Image Quality: Enable the toggle to adjust the image quality. Drag the slider to increase or decrease the quality.
- Click Apply.
Setting the image quality for all media
- Go to your editor.
- Click the pro gallery element on your page.
- Click Settings.
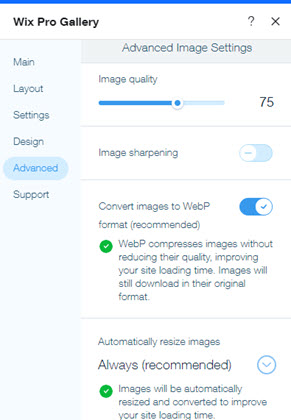
- Click the Advanced tab and scroll to the Advanced Image Settings section.
- Customize the image quality using the following options:
- Image Quality: Drag the slider to increase or decrease the quality.
Note: It is not recommended that you increase the image quality to above 90, as this may lead to a reduction in your site's performance. - Image Sharpening: Enable the toggle to adjust how the image sharpening is set:
- Image Quality: Drag the slider to increase or decrease the quality.
- Amount: Increase or decrease the amount of sharpening applied to your media.
- Radius: Increase or decrease the number of pixels from the edge that the sharpening affects.
- Threshold: Set how different a pixel must be from the surrounding area before it’s considered an edge pixel and sharpened by the filter.
Note: The lower the threshold number, the more intense the sharpening effect. - Convert images to a modern format: Converting your images to modern formats compresses the images without reducing their quality. This improves your site's loading time and images still download in their original format. Enable or disable the toggle according to your preference. We recommend keeping the toggle enabled, as disabling it may affect your site's loading time.
- Enabled: (Recommended) Images are converted to a modern format.
- Disabled: Images display in their original file format. This may affect site loading time.
- Automatically resize images: Wix automatically resizes gallery images to optimize media loading time and maintain site visitor's viewing experience. Click the drop-down to choose when images are resized. We recommend keeping the setting set to Always so that your site's loading time is not affected.
- Always (recommended): Gallery images are automatically resized to improve your site's loading time.
- Gallery Only: Only media in the main view of the Pro Gallery are resized. Images in the Expand Mode display in their original resolution.
- Never: Media load in their original resolution. This may affect your site's loading time, but also allows for better pinch zoom / zoom in with the magnifying glass in the Expand mode.
FAQs
Click a question below to learn more about setting the image quality for gallery images:
What is the recommended resolution to upload my image in?
Does sharpening my image affect the contrast of the whole image?
What can I do if my images look over-saturated?
Note:
By default, browsers automatically apply aliasing to images to prevent distortion. This is to reduce visual artifacts and other glitches that can result from images displayed in their original quality. A browser's down-scaling algorithm may lead to data loss in high-resolution images. As a result, rendering full-resolution images smaller than the image's actual size affects image quality. This generally results in a smoothening of colors or blurring of the image on your live site in comparison to the original file.
