

Enterprise Solution: Managing Approvals for Site Changes
7 min
In this article
- Setting up approvals
- Sending and reviewing changes
- Sending changes for approval
- Reviewing and approving a site change
- Publishing a site change
- Managing and tracking approvals
- Viewing your approvals
- Disabling approvals
- Filtering approvals
- Deleting approvals
- Auditing published approval requests
- FAQs
Important:
Approvals are only supported on sites built with the Studio Editor.
The approvals feature in the Wix Studio for enterprise solution lets your organization ensure all site changes are reviewed and approved before being published. With approvals, the relevant stakeholders can review and approve, or request further changes. This allows you to maintain site quality, brand consistency and compliance at the highest standard across your enterprise.
This feature is managed from the Approvals tab in your enterprise dashboard. You can enable approvals for all sites or select only the ones that require it.
Setting up approvals
Choose which sites in your enterprise need approval before publishing changes. You can activate this feature in the Approvals tab.
Before you begin:
- In order for a teammate to set up or manage approvals, they must be assigned a role that has the necessary permissions.
- By default, the workspace owner has the permission to view, set up and manage approvals, while admin (co-owners) only have the permission to view and manage approvals.
- All teammates who have access to the Studio Editor have permission to view approvals.
- You can also create a custom role with permissions to set up or manage approvals by going to Team in your enterprise dashboard, selecting a role, clicking Enterprise Dashboard under Permissions and selecting the relevant checkboxes.

To set up approvals:
- Go to Approvals in your enterprise dashboard.
- Click Set Up Approvals.
- Enable the Approvals required toggle.
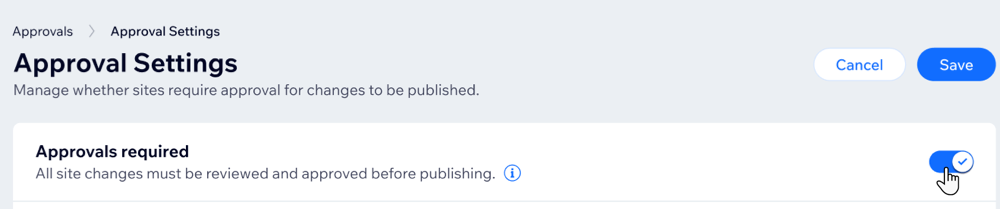
- Under Sites with approval, select the relevant option for your enterprise:
- All sites: Approvals are required for every site in your enterprise account.
- Specific sites: Approvals are required for specific sites only:
- Select the sites or folders that require approvals.
- Click Select.
- Click Save.
Sending and reviewing changes
Once approvals are enabled, teammates and collaborators making changes to a site will see the option to Send for Approval instead of the standard option to Publish. When changes are sent for review, the selected reviewer gets an email notification to review these changes. If the reviewer requests further changes, the person who sent the request is notified via email and can update the site before re-sending for approval.
All requests, active and past, appear in the Approvals tab of your enterprise dashboard.
Sending changes for approval
- Make your updates to the site as usual.
- Click Send for Approval in your editor.

- (In the pop-up) Click the Add reviewer drop-down under Send to and type the names of the stakeholders who need to approve the changes.
Note: At least one stakeholder needs to approve the changes in order to publish them. - (Optional) Add a comment or brief description of the changes under Add comments.
- Click Send for Approval.
Reviewing and approving a site change
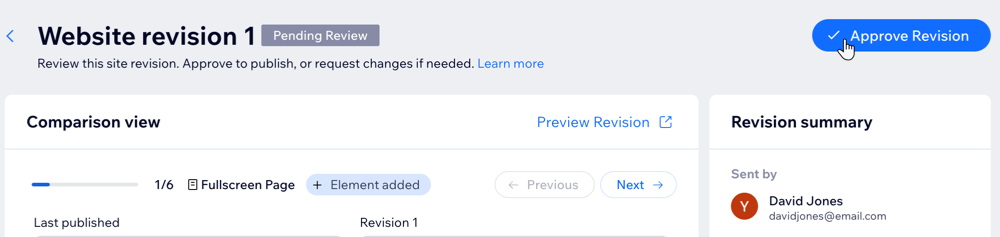
- Open the review email and click Review Changes.
Tip: You can also go to Approvals in your enterprise dashboard and select the pending request. - Browse through the changes by clicking Previous or Next.
Tip: You can find information about the type of change that was made in the Comparison view section, next to the site page name.
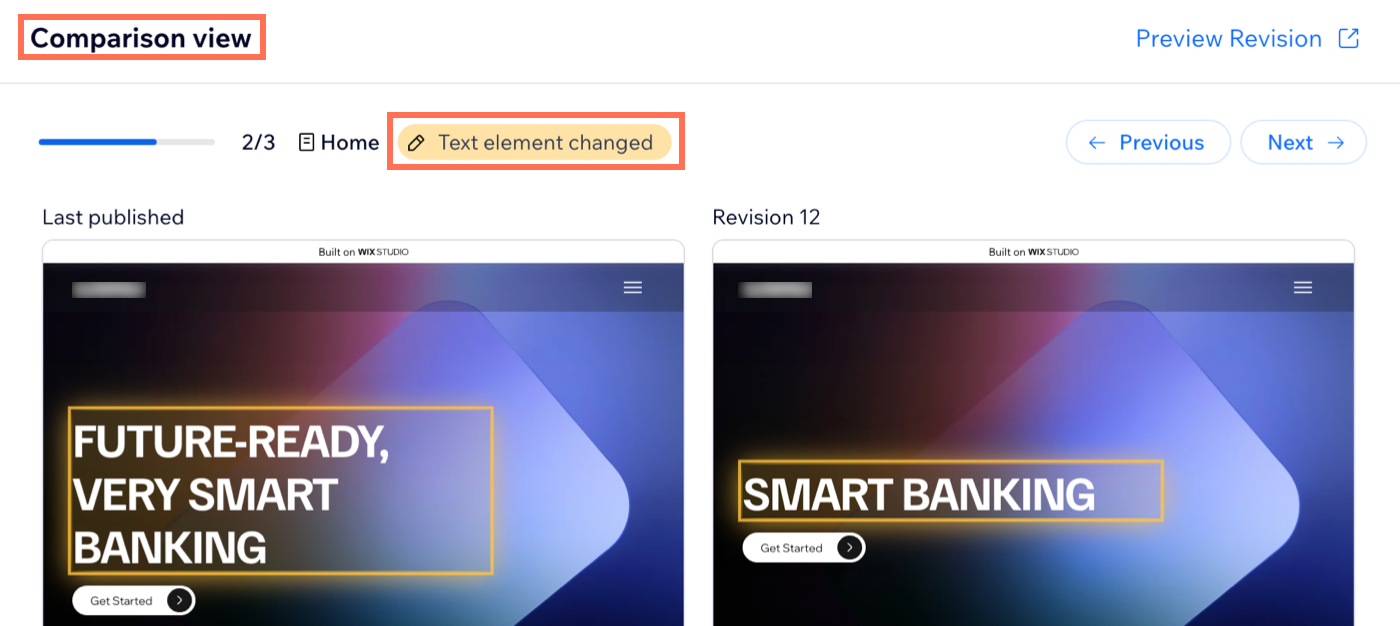
- (Optional) Click Preview Revision to open a new tab with a site preview of each change.
- Select the relevant option:
To request changes
To approve the changes
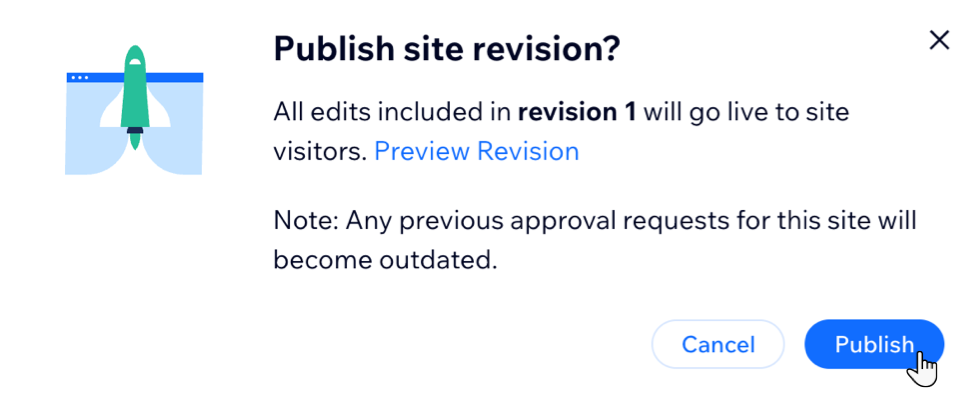
Publishing a site change
After all changes have been approved, publish the changes so they are live for site visitors.
- Go to Approvals in your enterprise dashboard.
- Hover over an approval with Approved status and click View.
- Click Publish Revision at the top right to proceed with making these changes live for visitors.
- (Optional) Click Preview Revision to preview all the approved changes in a new tab.
- Click Publish.
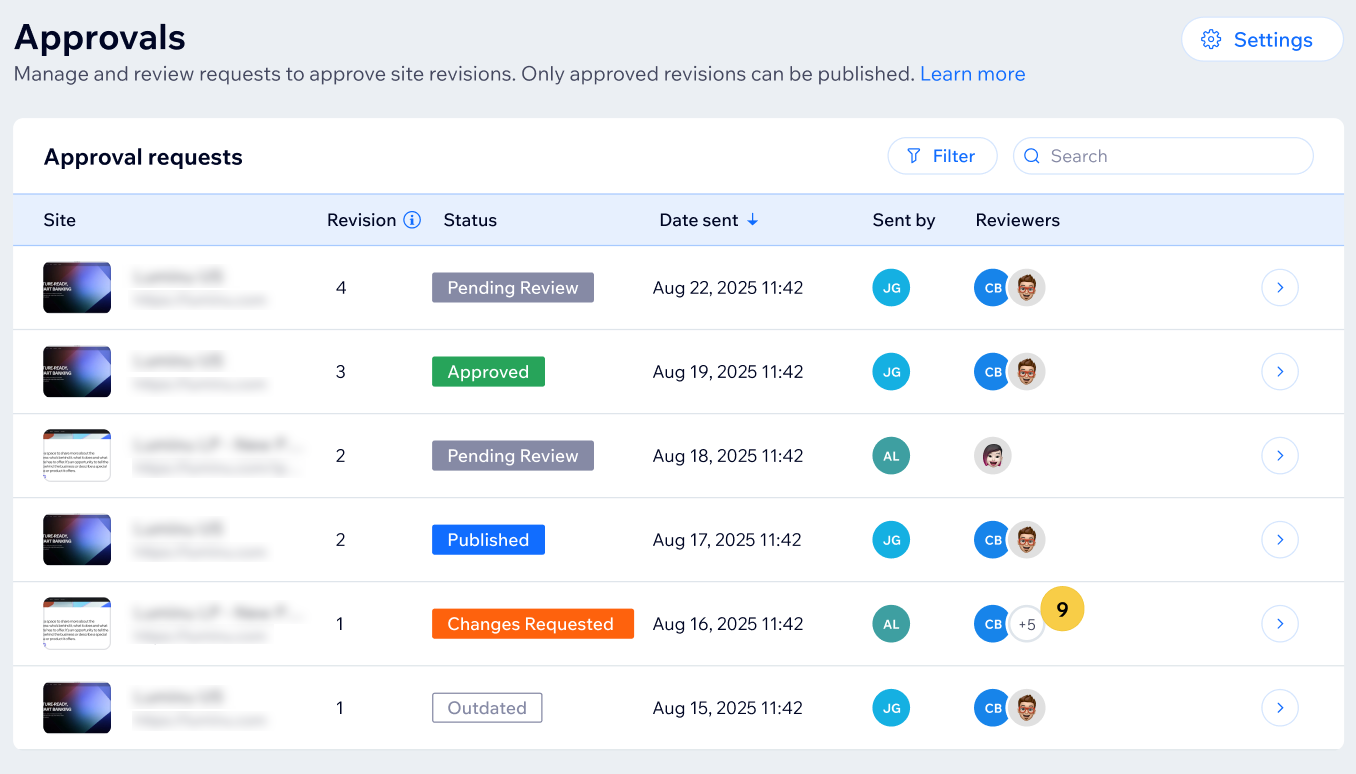
Managing and tracking approvals
All approval requests and their statuses appear in the Approvals tab of your enterprise dashboard. Under Approval requests, you can find the site name, the number of revisions for that site, the current status of the review and the date when the review was first sent for approval. You can also see who submitted each request, as well as who each request was sent to for approval.
Viewing your approvals
- Go to Approvals in your enterprise dashboard.
- Hover over an approval that is in progress and click View.
- Proceed to request changes or approve and publish changes as needed.
Notes:
- If a request is outdated, it can no longer be viewed because a newer version of the site has already been published. Requests also appear as outdated if approvals were disabled for that specific site, or for all sites.
- If a request is published, hover over it and click View to access a record of all previous changes. From there, you can also access the comparison view for published approval requests to support auditing.
Disabling approvals
- Go to Approvals in your enterprise dashboard.
- Disable the Approvals required toggle.
- Click Turn Off Approvals.
- Click Save at the top right.
Notes:
- To disable approvals only for a specific site, go to Approvals settings, hover over the relevant site and click Remove.
- If you enable approvals after disabling them, any previously added sites will still be selected.
Filtering approvals
In this tab, you can use the Search bar to search for a specific approval request by typing the site name, or you can use the Filter option to filter the requests list by status.
- Go to Approvals in your enterprise dashboard.
- Click Filter.
- Click Status.
- Select the relevant checkboxes.
Tip:
If there are no results found for your search, click Clear to remove the filters you applied.
Deleting approvals
After sending an approval request, you can choose to delete it. For example, you might want to delete a request if you made additional changes to the site and have sent a new request, or if you realize you want to make more updates before someone reviews your changes, making the earlier request no longer relevant.
- Go to Approvals in your enterprise dashboard.
- Hover over the relevant approval request.
- Click View.
- Click the Delete icon at the top of the page.
- Click Delete Request.
Auditing published approval requests
You can review published approval requests to see which changes were included in a specific revision. This is useful when you need to audit previous revisions for a site and confirm which changes were reviewed and published as part of each request.
- Go to Approvals in your enterprise dashboard.
- Hover over the relevant approval request.
- Click View.
- Use the comparison view to audit the revisions:
- On the left, you see the revision that was live at the time of the review.
- On the right, you see the revision that was reviewed and then published.
FAQs
Click a question below to learn more about using the approvals feature for enterprise.
If there are multiple reviewers, do they all need to approve?
If one reviewer approves without publishing and another reviewer requests changes, what happens?
Do changes to site settings need approval?
Can I delete an approval request I did not send?
What are the possible statuses of an approval request?
Can I integrate my own approvals system?
Can I access comparison view for published approval requests?
