

CMS: Displaying Blogs from Selected Categories Using Dynamic Pages
5 min
In this article
- Step 1 | Add a dynamic page for your blog category
- Step 2 | Add a repeater or table
- Step 3 | Add and connect a second dataset and filter
- Step 4 | Connect your repeater or table
Use dynamic pages to display blog posts from particular categories with a more customized layout.
The dynamic page option lets you display only the categories you want, showing a preview of selected blog posts with a direct link to each blog post. Your dynamic page has its own URL that you can link to with a button, an image or a menu item.
Link to them from other pages, directly from menu items, show specific information (e.g. date, author), and display specific collections on any page.
Important:
When using dynamic pages to display blog categories, there are restrictions you need to be aware of. Site visitors can't share posts, edit posts, or follow post features on dynamic blog pages. Site visitors also can't 'like' blog posts.
Before you begin, make sure you have:
- The Wix Blog installed. Learn More
- Wix App Collections enabled. Learn More
- A few posts and categories created. Learn More
- An additional dataset. Learn More
Step 1 | Add a dynamic page for your blog category
Add a dynamic page to host your blog category.
To add a dynamic page:
- Click CMS
 on the left side of the Editor.
 - Click Wix App Collections.
Note: If you don't see Wix App Collections, make sure you've enabled them. - Under Blog, hover over Categories and click the More Actions icon
 .
. - Click Add Blank Dynamic Page.
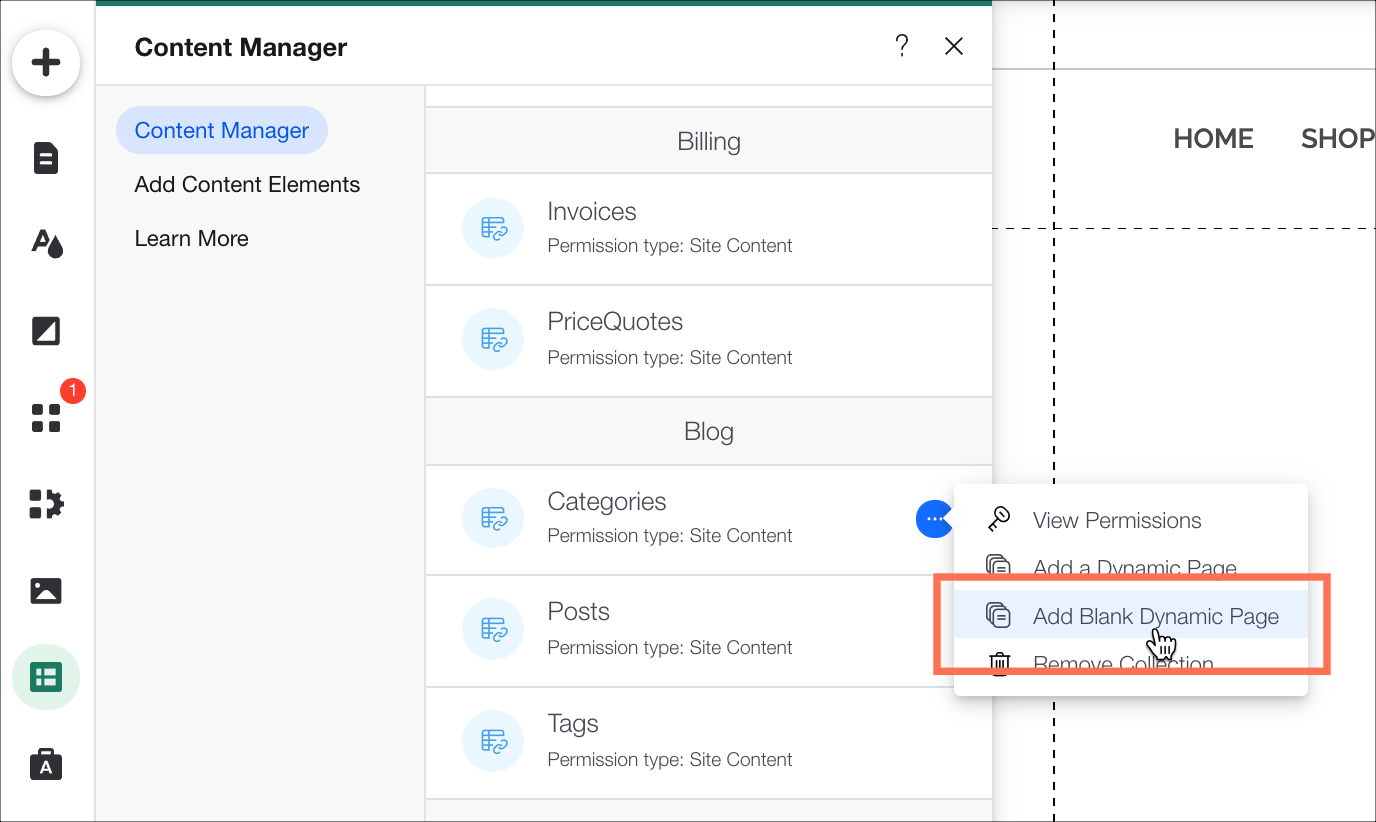
You can see in the dynamic page URL that the name of the collection matches the dynamic value of the page.
Show me how
 Pages on the left side of the Editor.
 next to Categories (Label).
Step 2 | Add a repeater or table
Choose how you want to display your blog collections by using a repeater or a table. A repeater displays your collection using a layout that you can change. For example, you can add another text box, image, or button. A table also displays your collection, but it uses layouts that you cannot change.
To add a repeater or table:
- Click
 Add on the left side of the Editor.
 - Click List.
- Drag and drop your selected repeater or table onto the page.
Step 3 | Add and connect a second dataset and filter
Repeaters and tables can show items from collections where you have filtered one dataset by another dataset. A dynamic page is automatically created with a dataset - in this case, it is set up to host the blog categories collection. Now, we add a second dataset to host our blog posts.
We also add a filter to the second dataset, to reference the categories the blog posts are in.
To add and connect a second dataset and filter:
- Click CMS
 on the left side of the Editor.
 - Click Add Content Elements then click the Add icon
 next to Dataset.

- Click the newly added dataset.
- Click Settings.
- Select Posts from the Connect a collection drop-down.
- Click + Add Filter.
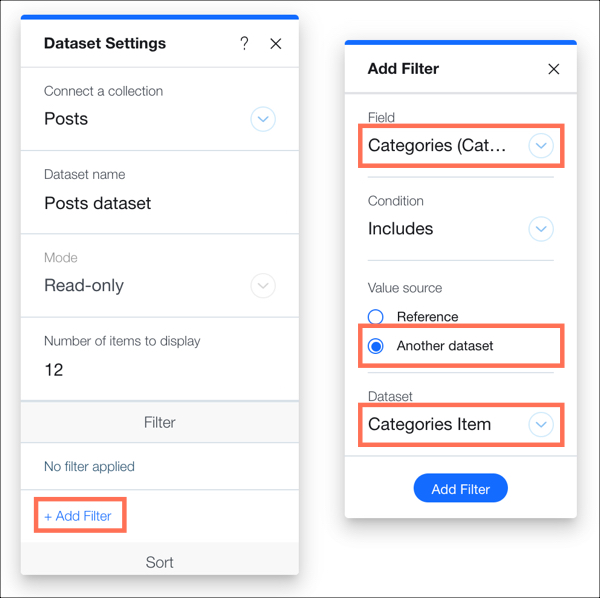
- Select Categories (Categories) from the Field drop-down.
- Click Another dataset under Value source.
- Select Categories Item from the Dataset drop-down.
- Click Add Filter.
Step 4 | Connect your repeater or table
Connect your repeater or table to the blog posts collection.
To connect your repeater or table:
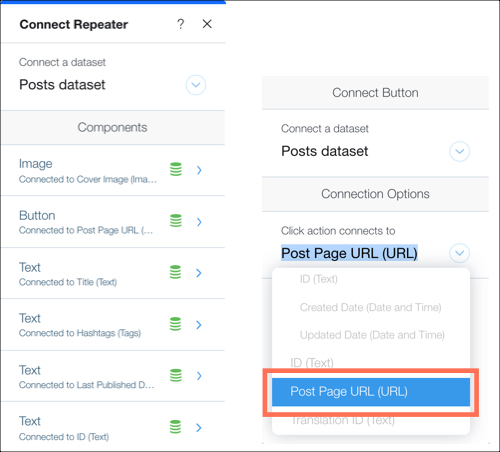
- Click your repeater or table in your Editor.
- Click the Connect to CMS icon
 .
. - From the Connect a dataset drop-down, select the Posts dataset.
- Link each of the components of your repeater or table to the appropriate fields in the collection.
Note: You can also link an image or button to Post Page URL (URL). This brings the visitor to that blog post when clicked.
- Click Preview.
What’s Next?
If you have multiple posts on one page, you can use the load more or pagination bar options to show more blog posts.
