

Countdown Widget Example (Alpha)
2 min
This easy-to-build widget counts down to a date the user enters in the widget settings panel.
Read on!
Read on!

What we built
This widget counts down from a date and time set by the user.
- It displays remaining days, hours, minutes, and seconds.
- The user sets the target date for the countdown in the widget's settings panel.
How we built it
Page Elements
- We added four text elements to display each of days, hours, minutes, and seconds, and changed their IDs to match their purpose.
- We also created text elements to label each of the displayed numbers.
Properties
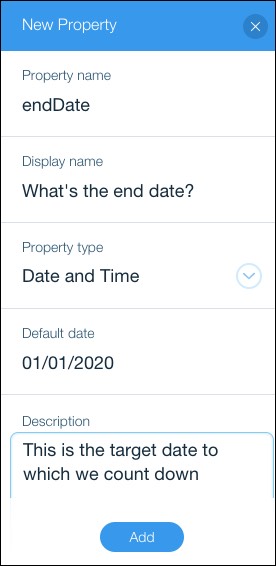
- To provide a user setting for the target date, we added the endDate property, which has the type Date and Time.
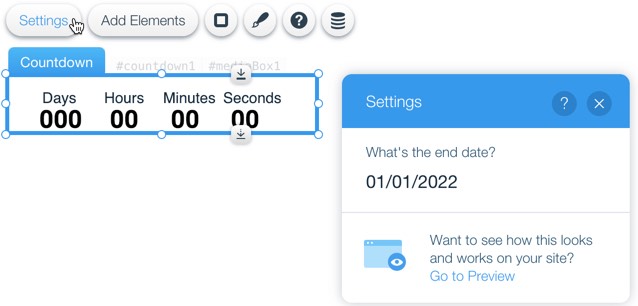
Here's what the setting looks like in the user's site:
Code
Here's what the code does. All of the functionality is in a function called getTimeRemaining().
- The function first gets the number of milliseconds between the date the user entered in the settings and now.
- Then, the function gets the number of whole days, hours, minutes, and seconds, by dividing the milliseconds by the appropriate factor and then rounding down to the nearest unit.
- The function converts the numbers to strings and puts those values in our labeled text elements.
Open the Countdown App in Blocks
Example Code
1$w.onReady(function () {
2
3function getTimeRemaining(){
4  //Gets the time in milliseconds between your selected date and this moment
5  const t = Date.parse($widget.props.endDate) - Date.parse(new Date());
6  //The following four lines extract the seconds, minues, hours, and days from the milliseconds returned by Date.parse
7  const seconds = Math.floor( (t/1000) % 60 );
8  const minutes = Math.floor( (t/1000/60) % 60 );
9  const hours = Math.floor( (t/(1000*60*60)) % 24 );
10  const days = Math.floor( t/(1000*60*60*24) );
11
12  //The following 4 lines convert the time values to strings and puts them in the text elements.
13  $w('#Days').text = days.toString();
14  $w('#Hours').text = hours.toString();
15  $w('#Minutes').text = minutes.toString();
16  $w('#Seconds').text = seconds.toString();
17}
18  //waits a second (1000 milliseconds) between each call to getTimeRemaining()
19  setInterval(getTimeRemaining, 1000)
20});
21
22
23$widget.onPropsChanged((oldProps, newProps)=>{
24 // If your widget has properties, onPropsChanged is where you should handle changes to their values.
25 // Property values can change at runtime by code written on the site, or when you preview your widget here in Blocks.
26
27});
28