

Velo Tutorial: Creating a Bookings Timetable
- Overview
- Step 1: Site Setup
- Step 2: Setting up the Schedule Page
- Step 3: Create the Imports and Global Variables
- Step 4: Create the onReady Function
- Step 5: Create the initializeSlots Function
- Step 6: Create the getAllClasses and the getAllStaff Functions
- Step 7: Create the setActiveDay Function
- Step 8: Create the populateServicesSlots Function
- Step 9: Create the getMultipleServicesAvailability Function
- Step 10: Create the setupDaysToolbar Function
- Step 11: Create the populateDaysToolbar Function
- Step 12: Create the daysToolbar_itemReady Function
- Step 13: Create the slotRepeater_itemReady Function
- Step 14: Create the Date and Time Helper Functions
- Step 15: Setting up the Booking Form Lightbox
- Step 16: Create the Imports and Global Variables
- Step 17: Create the onReady Function
- Step 18: Create the formRepeater_itemReady Function
- Step 19: Create the bookButton_click Function
- Step 20: Setting up the Thank You Page
- Step 21: Create an Import
- Step 22: Create the onReady Function
- Step 23: Create the Date and Time Helper Functions

Overview
- A Schedule page with two repeaters. The first repeater displays a list of days. The second repeater displays the classes scheduled on a given day. When a visitor selects a day in the first repeater, the Bookings API is used to retrieve the service slots available for that day and display them in the second repeater.
- A Booking Form lightbox. When the form on the lightbox is submitted, the Bookings API is used to book the service.
- A Thank You page that is shown with a confirmation of the booking details. The details are passed from the booking form lightbox to the thank you page using the Storage API.
Step 1: Site Setup
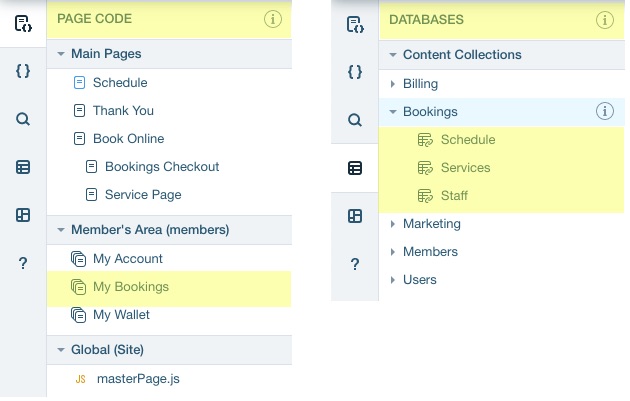
- In this example, we don't work with the Schedule collection.
- You may need to save or publish the site and refresh your browser to view the Bookings collections in the Database.
Step 2: Setting up the Schedule Page
The top section is used by site visitors to select a day. It consists of:
- A repeater shows a week's worth of days that a site visitor can select from. Each item in the repeater contains:
- A button that is used to make a day selection.
- On top of the button are two text elements for displaying the day of the week and the date.
- To the left and right of the repeater are buttons for showing the previous or next week's worth of days in the repeater.
- A loader image that is shown while repeater is loading its data.

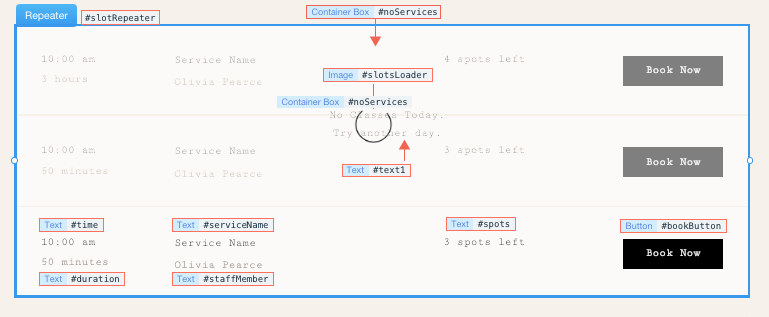
- A container box that shows when there are no classes for the selected day.
- The box contains a text elements with a message stating that there are no classes for the selected day.
- A repeater that shows the available classes. Each item in the repeater contains:
- Text elements to display the class's start time, duration, name, instructor name, and number of open spots remaining.
- A button to take site visitors to the booking form.
- A loader image that is shown while repeater is loading its data.
Step 3: Create the Imports and Global Variables
1import wixData from "wix-data";
2import wixBookings from "wix-bookings";
3import wixWindow from "wix-window";
4import { session } from "wix-storage";
5
6let activeDay;
7let staffMap = {};
8let servicesMap = {};
9let services = [];
10let isMobile;
Line 2: Import the wix-bookings module, which is used to get the available service slots.
Line 3: Import the wix-window module, which is used to determine the type of device the site is being viewed on.
Line 4: Import session storage from the wix-storage module, which is used to pass information between pages.
Line 6: Create a variable to store the selected day for which to show classes.
Line 7: Create a map to store the staff member information retrieved from the Staff collection.
Line 8: Create a map to store the services so they can be easily accessed by ID.
Line 9: Create an array to store the list of services retrieved from the services collection.
Line 10: Create a flag that indicates whether the site is being viewed on a mobile device.
Step 4: Create the onReady Function
When the page loads, the onReady function runs. So this is where we place code to set up the page.
1$w.onReady(function () {
2  isMobile = wixWindow.formFactor === "Mobile";
3  initializeSlots();
4});
Line 1: The code inside the onReady function runs when the page loads.
Line 2: Check whether the site is being viewed on a mobile device and set the isMobile variable accordingly.
Line 3: Call the initializeSlots function to set up the page in its initial state.
Step 5: Create the initializeSlots Function
The initializeSlots function is called from onReady. The function retrieves some information from the Bookings collections and stores it for later. It also sets an initial selected day and sets up the day selection toolbar.
1async function initializeSlots() {
2  services = await getAllClasses();
3  services.forEach(service => servicesMap[service._id] = service);
4
5  const staff = await getAllStaff();
6  staff.forEach(member => staffMap[member._id] = member);
7
8  setActiveDay(new Date());
9  setupDaysToolbar();
10}
Line 2: Get all the classes from the Services collection by calling the getAllClasses function. Store them in the services global variable.
Line 3: Put the services into a map, where the key is the service ID and the value is the service information, so that they can be retrieved easily.
Line 5: Get all the staff from the Staff collection by calling the getAllStaff function.
Line 6: Put the staff info into a map so that staff member's can be retrieved easily by ID.
Line 8: Set the current active day to today's date.
Line 9: Set up the days toolbar functionality by calling the setupDaysToolbar function.
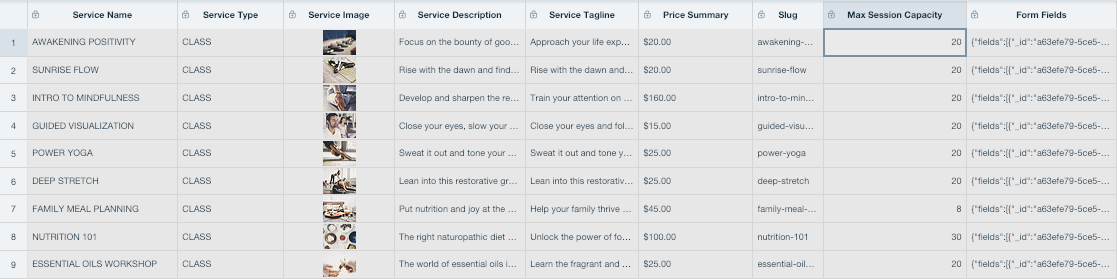
Step 6: Create the getAllClasses and the getAllStaff Functions
The getAllClasses and getAllStaff functions are called from intializeSlots. They query the site's Bookings collections and return the query results.
1async function getAllClasses() {
2  const data = await wixData.query("Bookings/Services").eq("serviceType", "CLASS").find();
3  return  data.items;
4}
Line 2: Get all services from the Services collection that have the type CLASS.
Line 3: Return the items that were found.
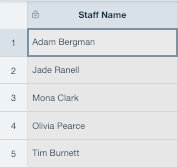
1async function getAllStaff() {
2  const data = await wixData.query("Bookings/Staff").find();
3  return data.items;
4}
Line 2: Get the staff member data from the Staff collection.
Line 3: Return the items that were found.
Step 7: Create the setActiveDay Function
The setActiveDay function is called from intializeSlots and setupDaysToolbar. It sets the given date in the days toolbar to the selected day and populates the services list with the slots available on the selected day.
1function setActiveDay(date) {
2  activeDay = date;
3  const dayRange = getDayRange(date);
4  populateServicesSlots(dayRange.startDateTime, dayRange.endDateTime);
5  $w("#daysToolbar").forEachItem( ($item, itemData, index) => {
6    if (!isMobile) {
7      if (isSameDay(itemData.date, activeDay)) {
8        $item("#dayPickerButton").disable();
9      }
10      else {
11        $item("#dayPickerButton").enable();
12      }
13    }
14  } );
15}
Line 2: Set the global activeDay to the date passed to the function.
Line 3: Get a date range that spans the given date by calling the getDayRange function. Meaning the range starts with the midnight at the beginning of the given date and ends with the midnight at the end of the given date.
Line 4: Populate the slots repeater by calling the populateServicesSlots function. The repeater is populated with the slots that are available for the services in the global services list during the given date range.
Line 5: For each day in the days toolbar set whether the day picker button is enabled.
Line 6: If the site is not being viewed on a mobile device set whether the day picker button is enabled. When the site is being viewed on a mobile device only one day is shown at a time.
Lines 7-12: If the day is already selected, then disable the day selection button so selecting it again doesn't reload the slots. If not, then enable the day selection button.
Step 8: Create the populateServicesSlots Function
The populateServicesSlots function is called from setActiveDay. It populates the service slots repeater with the slots that are available for the services in the global services list during the given date range.
1async function populateServicesSlots(startDateTime, endDateTime) {
2  let availableSlots = await getMultipleServicesAvailability(services, { startDateTime, endDateTime });
3  availableSlots = availableSlots.sort((a, b) => a.startDateTime - b.startDateTime);
4
5  $w("#slotRepeater").data = availableSlots;
6  $w("#slotsLoader").hide();
7
8  if (availableSlots.length > 0) {
9    $w("#noServices").hide();
10    $w("#slotRepeater").show();
11  }
12  else {
13    $w("#noServices").show();
14    $w("#slotRepeater").hide();
15  }
16}
Line 2: Get the available slots from multiple services for the date range passed to the function.
Line 3: Sort the available slots in ascending order by start time.
Line 5: Set the slot repeater's data to the sorted available slots. When a repeater's data is set, it triggers the itemReady event handler for the repeater's items. The slot repeater's itemReady event handler populates the item's text elements and sets the behavior of the item's button.
Line 6: Hide the slot loader image because the slot repeater has finished loading.
Lines 8-11: If there is at least one available slot found, hide the message that states no services have been found and show the slots repeater.
Lines 12-15: If there no available slots were found, show the message that states no services have been found and hide the slots repeater.
Step 9: Create the getMultipleServicesAvailability Function
The getMultipleServicesAvailability function is called from populateServicesSlots. It gets the available slots from multiple services for the given date range at once.
1async function getMultipleServicesAvailability(requestedServices, availabilityOptions){
2  let slotsPromises = [];
3  let slots = [];
4
5  requestedServices.forEach( requestedservice => {
6    const slotsPromise = wixBookings.getServiceAvailability(requestedservice._id, availabilityOptions).then(result => {
7      result.slots.forEach(slot => slots.push(slot));
8 } );
9    slotsPromises.push(slotsPromise);
10  } );
11
12  await Promise.all(slotsPromises);
13  return slots;
14}
Line 2: Create a variable to store the promises returned when getting the available slots for a given service. Here we want to wait for all the promises to resolve before moving on. Also, we don't want to wait for one promise to finish before starting the next promise, so we don't use async/await.
Line 3: Create a variable to store the retrieved available slots for all the given services.
Line 5: For each of the requested services passed to the function, get its available slots.
Line 6: Call the Bookings API getServiceAvailability function to get the current service's available slots and store the returned Promise.
Line 7: When the Promise has resolved, add all of the available slots to the slots list.
Line 9: Add the current Promise to the list of Promises.
Line 12: Wait for all the Promises to resolve.
Line 13: Return the retrieved available slots.
Step 10: Create the setupDaysToolbar Function
The setupDaysToolbar function is called from populateServicesSlots. It sets up the days toolbar functionality and shows the relevant dates.
1function setupDaysToolbar() {
2  let firstDay = activeDay;
3  populateDaysToolbar(firstDay);
4
5  if (isMobile) {
6    $w("#backButton").onClick(() => {
7      setActiveDay(getPreviousMidnight(activeDay));
8      firstDay = activeDay;
9      populateDaysToolbar(firstDay);
10    });
11    $w("#forwardButton").onClick(() => {
12      setActiveDay(getNextMidnight(activeDay));
13      firstDay = activeDay;
14      populateDaysToolbar(firstDay);
15    });
16  }
17  else {
18    $w("#backButton").onClick(() => {
19      firstDay = getDatePreviousWeek(firstDay);
20      populateDaysToolbar(firstDay);
21    });
22    $w("#forwardButton").onClick(() => {
23      firstDay = getDateNextWeek(firstDay);
24      populateDaysToolbar(firstDay);
25    });
26  }
27
28  $w("#toolbarLoader").hide();
29  $w("#daysToolbar").show();
30}
Line 2: Create a variable to store the first day that will be shown in the days toolbar.
Line 3: Populate the days in the days toolbar, starting from the stored first day by calling the populateDaysToolbar function.
Line 5: If the site is being viewed on a mobile device, where only one day is shown in the toolbar at a time.
Lines 6-10: Set the back button functionality to move back one day when clicked.
Lines 11-15: Set the forward button functionality to move forward one day when clicked.
Line 17: If the site is being viewed on a non-mobile device, where a week's worth of days are shown in the toolbar at a time.
Lines 18-21: Set the back button functionality to move back one week when clicked.
Lines 22-25: Set the forward button functionality to move forward one week when clicked.
Line 28: Hide the toolbar loader image because the toolbar has finished loading.
Line 29: Show the days toolbar.
Step 11: Create the populateDaysToolbar Function
The populateDaysToolbar function is called from setupDaysToolbar. It populate the days in the days toolbar, starting from a given date.
1function populateDaysToolbar(startDate) {
2  $w("#daysToolbar").data = [];
3  $w("#daysToolbar").data = isMobile ? [{ _id: "day", date: activeDay }] : getWeekDays(startDate);
4}
5
6
Line 2: Reset the days toolbar by setting the repeater's data to an empty array.
Line 3: If the site is being viewed on a mobile device, where only one day is shown at a time, set the repeater's data to the global active day. If the site is being viewed on a non-mobile device, where a week's worth of days are shown at a time, set the repeater's data to a week's worth of days starting with the given start date.
Step 12: Create the daysToolbar_itemReady Function
The daysToolbar_itemReady function is an event handler that is wired to the dayToolbar's onItemReady event. It runs when the dayToolbar's data property is set. The dayToolbar's data property is set in populateDaysToolbar. The function sets up each item's text values and the day selection button's functionality.
1export function daysToolbar_itemReady($item, itemData, index) {
2  $item("#day").text = daysOfTheWeek[itemData.date.getDay()];
3  $item("#date").text = getMonthDay(itemData.date);
4
5  if (!isMobile) {
6    if (isSameDay(itemData.date, activeDay)) {
7      $item("#dayPickerButton").disable();
8    }
9    else {
10      $item("#dayPickerButton").enable();
11    }
12
13    $item("#dayPickerButton").onClick( () => {
14      setActiveDay(itemData.date);
15    } );
16  }
17}
Line 2: Populate the day field's text with the repeater item's day of the week (e.g. WED).
Line 3: Populate the date field's text with the repeater item's date (e.g. 12/10).
Line 5: If the site is being viewed on a non-mobile device, set the day selection button's functionality. If the site is being viewed on a mobile device, where only one day is shown at a time, the day selection button is not needed.
Lines 6-8: If the current item's day is already the selected day, disable the day selection button to we don't reload the same slots if the already selected day is selected again.
Lines 9-11: If the current item's day is not the selected day, enable the day selection button.
Lines 13-15: Set the day selection button to change the selected day and the displayed services when clicked by calling the setActiveDay function.
Step 13: Create the slotRepeater_itemReady Function
The slotRepeater_itemReady function is an event handler that is wired to the slotRepeater's onItemReady event. It runs when the slotRepeater's data property is set. The slotRepeater's data property is set in populateServicesSlots. The function sets up each item's text values and the book button's functionality.
1export function slotRepeater_itemReady($item, itemData, index) {
2  const duration = getDuration(itemData.startDateTime, itemData.endDateTime);
3  const serviceName = servicesMap[itemData.serviceId].serviceName;
4  const staffMember = staffMap[itemData.staffMemberId].name;
5  const form = servicesMap[itemData.serviceId].form;
6
7  $item("#time").text = getTimeOfDay(itemData.startDateTime);
8  $item("#duration").text = duration;
9  $item("#spots").text = itemData.remainingSpots + " spots left";
10  $item("#serviceName").text = serviceName;
11  $item("#staffMember").text = staffMember;
12
13  if (itemData.startDateTime < Date.now()) {
14    $item("#bookButton").disable();
15    $item("#bookButton").label = "Passed";
16  }
17  else {
18    if (itemData.remainingSpots === 0) {
19      $item("#bookButton").disable();
20      $item("#bookButton").label = "Full";
21    }
22    else {
23      $item("#bookButton").enable();
24      $item("#bookButton").label = "Book Now";
25      $item("#bookButton").onClick( event => {
26        wixWindow.openLightbox("Booking Form", {
27          slot: itemData,
28          form: servicesMap[itemData.serviceId].form
29        } );
30      } );
31    }
32  }
33}
34
Line 2: Get the duration of the slot from the item's start and end dates (e.g. 1 hr 30 min) using the getDuration function.
Line 3: Get the slot's service name from the global service map using the item's service ID.
Line 4: Get the slot's staff member name from the global staff map using the item's staff member ID.
Line 5: Get the service's form fields from the global services map using the item's service ID. Form fields are fields that are needed for booking a service. For example, a service might need to know a site visitor's age.
Lines 7-11: Populate the item's text fields.
Lines 13-16: If the slot's start time has already passed, disable the book button and change its label to "Passed".
Line 17: If the slot's start time has not yet passed, check if there are any open spots in the class.
Lines 18-21: If there are no spots left in the class, disable the book button and change its label to "Full".
Lines 22-24: If there are spots left in the class, enable the book button and change its label to "Book Now".
Lines 25-30: Set the book button to open the booking form, passing relevant data to the form, when clicked.
Step 14: Create the Date and Time Helper Functions
Step 14a: Create the daysOfTheWeek Map
First, we create a daysOfTheWeek map which is used to map numbers to their correspoonding days of the week. Note, that the map is zero-based, so 0 maps to "SUN", 1 maps to "MON", etc. This maps is used in the daysToolbar_itemReady() function to translate numbers into the day of the week as shown in the days toolbar.
1const daysOfTheWeek = {
2 0: "SUN",
3 1: "MON",
4 2: "TUE",
5 3: "WED",
6 4: "THU",
7 5: "FRI",
8 6: "SAT"
9};Step 14b: Create the getWeekDays Function
The getWeekDays() function gets a list of the next 7 days of the week, starting from a given date. It is called by the populateDaysToolbar() function to create the list of days used as the daysToolbar's data.
1function getWeekDays(startDate) {
2  let weekDays = [];
3  let current = getMidnight(startDate);
4
5  for (let i = 0; i < 7; i++) {
6    weekDays.push( {
7      _id: "day" + i,
8      date: current
9    } );
10    current = getNextMidnight(current);
11  }
12
13  return weekDays;
14}
Line 2: Create a variable to store the list of days.
Line 3: Get the a date object for the midnight that starts the given date.
Line 5: For 7 days add a day object to the weekDays list.
Line 6-9: Add a day to the days list. The day has an _id property to be used by a repeater and a date property with the current day.
Line 10: Update the current day to the next day using the getNextMidnight() function.
Line 13: Return the list of days.
Step 14c: Create the dayRange Function
The dayRange() function gets a date range object where the start is the midnight at the beginning of the given date and the end is the midnight at the end of the given date. It is called by the setActiveDay() function to have a range for retrieving the available slots for your services.
1function getDayRange(date) {
2  const startDateTime = getMidnight(date);
3  const endDateTime = getNextMidnight(date);
4  return {
5    startDateTime,
6    endDateTime
7  }
8}
Line 2: Get the a date object for the midnight that starts the given date.
Line 3: Get the a date object for the midnight that ends the given date.
Lines 4-7: Package the day range in an object and return it.
Step 14d: Create the getMidnight, getNextMidnight, and getPreviousMidnight Functions
The getMidnight(), getNextMidnight(), and getPreviousMidnight() functions get the midnight that starts the given date's day, ends the given date's day, or the midnight that starts the day before the given date's day. These functions are used in various contexts.
1function getMidnight(date) {
2  let midnight = new Date(date);
3  midnight.setHours(0, 0, 0, 0);
4  return midnight;
5}1function getNextMidnight(date) {
2 let midnight = new Date(date);
3 midnight.setHours(24, 0, 0, 0);
4 return midnight;
5}1function getPreviousMidnight(date) {
2 let midnight = new Date(date);
3 midnight.setHours(-24, 0, 0, 0);
4 return midnight;
5}Line 2: Get a new date object set to the given day's date.
Line 3: Set the new date object's time to the midnight that starts the given date's day, ends the given date's day, or the midnight that starts the day before the given date's day.
Lines 4: Return the new date object.
Step 14e: Create the getDuration Function
The getDuration() function gets a duration text, such as "1 hr 30 min", from a given date range. It is called by the slotRepeater_itemReady() function to populate the duration text of each service slot displayed in the slot repeater.
1function getDuration(start, end) {
2  let diff = Math.abs(start - end);
3  const minute = 1000 * 60;
4  const total_minutes = Math.floor(diff / minute);
5  const hours = Math.floor(total_minutes / 60);
6  const minutes = total_minutes % 60;
7  const hoursOutput = hours === 0 ? `` : hours === 1 ? `1 hr` : `${hours} hrs`;
8  const minutesOutput = minutes === 0 ? `` : `${minutes} min`;
9  return `${hoursOutput} ${minutesOutput}`;
10}
Line 2: Get the duration in milliseconds.
Line 3: Calculate the number of milliseconds in a minute.
Line 4: Calculate the duration in minutes.
Line 5: Calculate how many hours are in the duration.
Line 6: Calculate how many minutes are left over.
Line 7: Create the hours text using the JavaScript conditional operator.
Line 8: Create the minutes text using the JavaScript conditional operator.
Line 9: Return the hours and minutes texts.
Step 14f: Create the isSameDay Function
The isSameDay() function checks if two dates are the same day. It is called in various contexts.
1function isSameDay(date1, date2) {
2  return getMidnight(date1).getTime() === getMidnight(date2).getTime();
3}
Line 2: Return true if the given dates are the same, or false otherwise.
Step 14g: Create the getTimeOfDay Function
The getTimeOfDay() function gets the time from a given date formatted using the browser's locale. It is called in the slotRepeater_itemReady() function to format the time displayed in the slots of the slot repeater.
1function getTimeOfDay(date) {
2  return date.toLocaleTimeString([], { hour: "2-digit", minute: "2-digit" }).toLowerCase();
3}
4
Line 2: Return the formatted time string.
Step 14h: Create the getMonthDay Function
The getMonthDay() function gets the month and day of a given date formatted as MM/DD. It is called in the daysToolbar_itemReady() function to format the date displayed in the days toolbar.
1function getMonthDay(date) {
2  return date.toLocaleDateString("en-GB", { day: "numeric", month: "numeric" });
3}
Line 2: Return the formatted time string.
Step 14i: Create the getDateNextWeek and getDatePreviousWeek Functions
First, we create a hoursInAWeek variable representing the number of hours in a week. This variable is used in the getDateNextWeek() and getDatePreviousWeek() functions.
1const hoursInAWeek = 24 * 7;The getDateNextWeek() and getDatePreviousWeek functions get the date one week after or one week before the given date. They are called in the setupDaysToolbar() function to set the functionality of the previous and next buttons in the days toolbar.
1function getDateNextWeek(date) {
2  let nextWeek = new Date(date);
3  nextWeek.setHours(hoursInAWeek);
4  return nextWeek;
5}1function getDatePreviousWeek(date) {
2 let prevWeek = new Date(date);
3 prevWeek.setHours(-hoursInAWeek);
4 return prevWeek;
5}Line 2: Get a new date object set to the given day's date.
Line 3: Set the new date object to one week after or one week before the given date using the JavaScript setHours function.
Lines 4: Return the new date object.
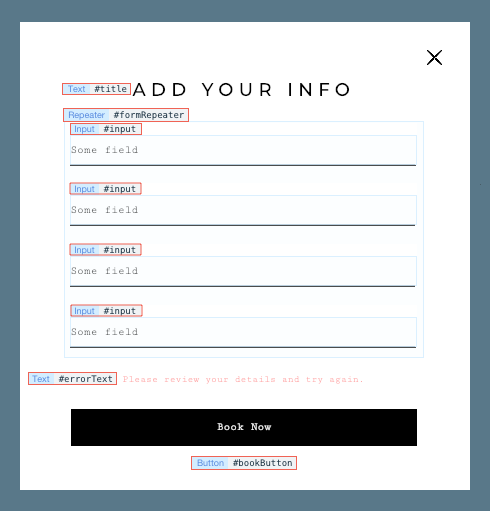
Step 15: Setting up the Booking Form Lightbox
The lightbox is set up with the following elements:
- A text element showing the lightbox title.
- A repeater for displaying form fields. Form fields are fields that are needed for booking a service. For example, a service might need to know a site visitor's age. Each item has one text input. The number of inputs shown to site visitors, depends on which service they are trying to book.
- A text element for showing an error message when the form is not filled out properly.
- A button used to book the service.
Step 16: Create the Imports and Global Variables
1import wixBookings from "wix-bookings";
2import wixWindow from "wix-window";
3import wixLocation from "wix-location";
4import { session } from "wix-storage";
5
6let slot;
Line 2: Import the wix-window module, which is used to retrieve information passed to the lightbox.
Line 3: Import the wix-location module, which is used to navigate to another page.
Line 4: Import session storage from the wix-storage module, which is used to pass information between pages.
Line 6: Create a variable to store the selected slot's data.
Step 17: Create the onReady Function
When the lightbox loads, the onReady function runs. So this is where we place code to set up the lightbox.
The form fields used in this function are fields that the service being booked requires. Since these fields can vary from service to service, the fields are presented in a repeater.
1$w.onReady( function () {
2  const context = wixWindow.lightbox.getContext();
3  slot = context.slot;
4  const fields = context.form.fields;
5  $w("#formRepeater").data = fields;
6} );
Line 1: The code inside the onReady function runs when the page loads.
Line 2: Get the data that was passed to the lightbox from the Schedule page and store it in the context variable.
Line 3: Get the slot data from the context variable.
Line 4: Get the form fields from the context variable.
Line 5: Set the form repeater's data using the form field data, thereby populating the repeater with a text input element for form field.
Step 18: Create the formRepeater_itemReady Function
The formRepeater_itemReady function is an event handler that is wired to the formRepeater's onItemReady event. It runs when the formRepeater's data property is set. The formRepeater's data property is set in onReady. The function sets up each item's text input element.
1export function formRepeater_itemReady($item, itemData, index) {
2  $item("#input").placeholder = itemData.label;
3  $item("#input").inputType = itemData.type;
4  $item("#input").required = itemData.constraints.required;
5  $item("#input").resetValidityIndication();
6}
Line 2: Set the input element's placeholder text from the form field label.
Line 3: Set the input element's type from the form field type.
Line 4: Set whether the input element is required from the form field's required property.
Line 5: Reset the input element's validity indicator.
Step 19: Create the bookButton_click Function
The bookButton function is an event handler that is wired to the bookButton's onClick event. It gathers all the booking information and performs the booking.
1export async function bookButton_click(event) {
2  $w("#bookButton").disable();
3  $w("#errorText").hide();
4  let isValid = true;
5  let formFields = [];
6
7  $w("#formRepeater").forEachItem( ($item, itemData, index) => {
8    if (!$item("#input").valid) {
9      isValid = false;
10    }
11    const value = $item("#input").value;
12    const _id = itemData._id;
13    formFields.push({ _id, value });
14  } );
15
16  const bookingInfo = {
17    slot,
18    formFields
19  };
20
21  const paymentOptions = {
22    paymentType: "wixPay_Online"
23  };
24
25  if (isValid) {
26    try {
27      const response = await wixBookings.checkoutBooking(bookingInfo, paymentOptions);
28      if (response.status === "Confirmed") {
29        session.setItem("bookedStart", new Date(slot.startDateTime));
30        session.setItem("bookedEnd", new Date(slot.endDateTime));
31
32        wixLocation.to("/thank-you");
33      }
34      else {
35        $w("#errorText").show();
36      }
37    }
38    catch(error) {
39      $w("#errorText").show();
40      $w("#bookButton").enable();
41    }
42  }
43  else {
44    $w("#errorText").show();
45    $w("#bookButton").enable();
46  }
47}
Line 2: Disable the book button.
Line 3: Hide the error text.
Line 4: Create a flag that indicates whether the form is valid.
Line 5: Create a variable to hold the form field values that are entered.
Lines 7-14: For each item in the repeater, check if the value entered is valid and add the items's ID and value to the formFields list.
Lines 16-19: Create a booking info object using the slot passed from the Schedule page and the form field data collected in this lightbox. The booking info object is used when booking a service slot using the Bookings API.
Lines 21-23: Create a payment options object and set it to indicate an online payment. The payment options object is used when booking a service slot using the Bookings API.
Line 25: If the values entered are valid, continue to book the service.
Line 27: Book the service using the Bookings API.
Lines 28-34: If the booking is confirmed, store information about the service in session storage and navigate to the Thank You page.
Lines 35-37: If the booking is not confirmed, show the error text.
Lines 39-42: If an error occurred in the booking process, show the error text and enable the book button so the site visitor can try again.
Lines 44-47: If there are any invalid values, show the error text and enable the book button so the site visitor can try again.
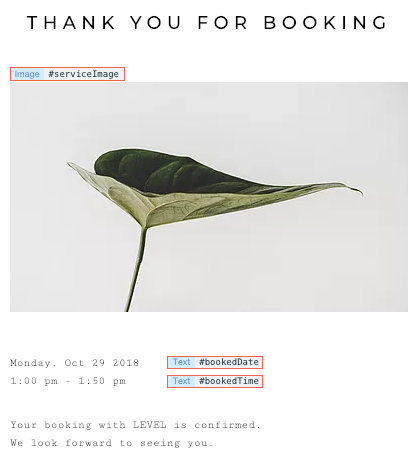
Step 20: Setting up the Thank You Page
The page is set up with the following elements:
- An image that can be used for displaying a image that represents the service that was booked.
- A text element for showing the date of the service that was booked.
- A text element for showing the time of the service that was booked.
Step 21: Create an Import
1import {session} from "wix-storage";Step 22: Create the onReady Function
When the lightbox loads, the onReady function runs. So this is where we place code to set up the page.
1$w.onReady( async function () {
2  const bookedStart = new Date(session.getItem("bookedStart"));
3  const bookedEnd = new Date(session.getItem("bookedEnd"));
4
5  session.removeItem("bookedStart");
6  session.removeItem("bookedEnd");
7
8  $w("#bookedDate").text = getFullDate(bookedStart);
9  $w("#bookedTime").text = `${getTimeOfDay(bookedStart)} - ${getTimeOfDay(bookedEnd)}`;
10} );
Line 1: The code inside the onReady function runs when the page loads.
Lines 2-3: Retrieve the data passed from the Booking Form lightbox.
Lines 5-6: Clear the data from session storage.
Lines 8-9: Populate the text elements with the data passed from the Booking Form.
Step 23: Create the Date and Time Helper Functions
Step 23a: Create the getFullDate Function
The getFullDate() function gets a formatted date string from the given date. It is called by the onReady() function to create a display text out of the slot's date.
1function getFullDate(date) {
2  return date.toLocaleDateString([], { weekday: "long", year: "numeric", month: "long", day: "numeric" });
3}Step 23b: Create the getTimeOfDay Function
The getTimeOfDay() function gets a formatted time string from the given date. It is called by the onReady() function to create a display time out of the slot's date.
1function getTimeOfDay(date) {
2  return date.toLocaleTimeString([], {hour: "2-digit", minute:"2-digit"});
3}