

CMS: Adding and Setting Up a Range Slider
4 min
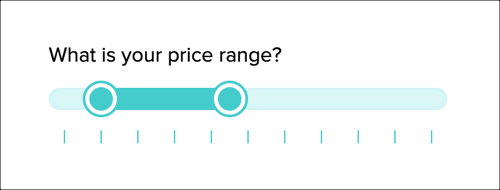
Give visitors a way to filter the items that appear on your site by dragging sliders to select a range of values. For example, if you run an online store, you can use a range slider to let customers filter products by price, making it easier for them to find items within their budget.
After adding a range slider, connect it to a dataset that connects to the repeater or gallery you want visitors to filter. Then choose a number field type to use for the filter and the condition. The condition determines whether to show items that have field values between the selected range or outside of the range. Lastly, customize the field title and the slider element's layout and design.
Any filters or sorts you apply to the dataset also apply to the connected elements. This means you can add filters to the dataset to exclude items from appearing and add sorts to control their order.
Important:
The range slider is not available in the Studio Editor.
Before you begin:
- Make sure to add the CMS to your site if you haven't already.
- Make sure you have a collection with suitable permissions for storing submissions from the slider input element.
To add and set up a range slider:
- Go to your editor.
- Add the range slider input element:
- Go to the page or section where you want visitors to filter content by a number value.
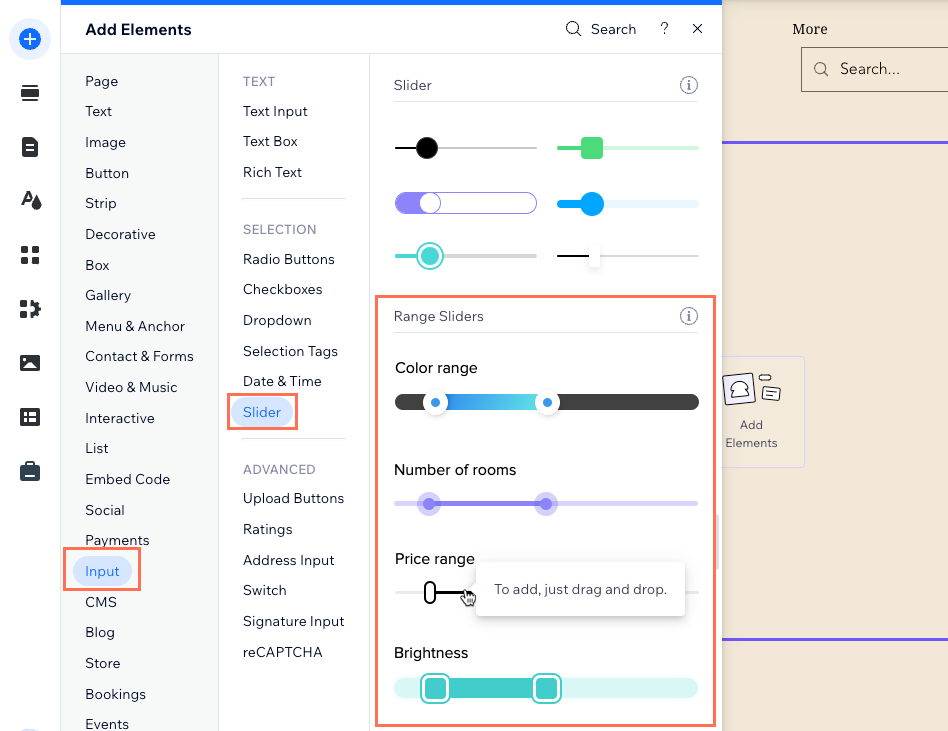
- Click Add Elements
 on the left side of the editor.
 - Click Input.
- Click Slider.
- Scroll down to Range Sliders, then click and drag the relevant range slider onto the page.
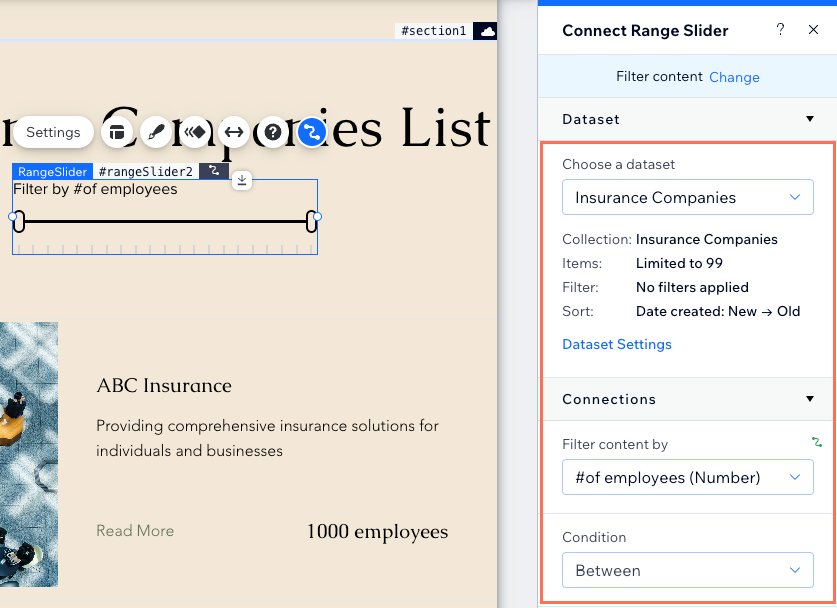
- Connect the range slider to the CMS:
- Click the Connect to CMS icon
 on the range slider.
 - Select Filter content in the Connect Range Slider panel on the right.
- Click the Choose a dataset drop-down and select the same dataset that connects to the elements (e.g. repeater, gallery, table) that you want visitors to filter.
- Click the Filter content by drop-down and choose the number field that visitors will use to filter the content.
Tip: To add a new field to your collection and use it for filtering content, select + Add, then enter the field name and click Add. You can add content to the field in your CMS collection later. - Click the Condition drop-down and select the relevant condition:
- Between: Show items that have a connected number field value that is between the range slider handles.
- Outside of: Show items that have a connected number field value that is outside of the range slider handles.
- Click the Connect to CMS icon
- Customize the range slider element:
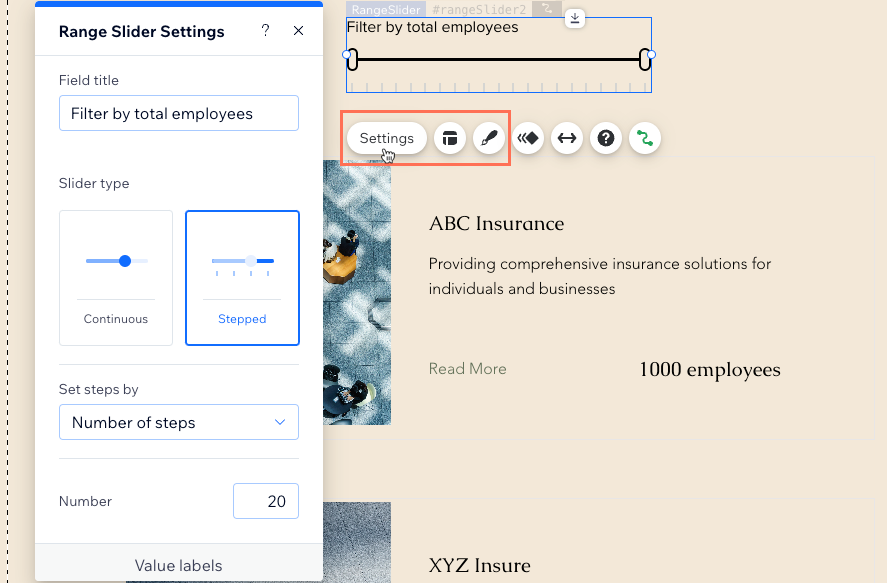
- Click Settings to customize the following:
- Field title: Edit the name that displays on the range slider and lets visitors know what it does.
- Slider type: Choose a continuous or stepped slider type:
- Continuous: Visitors can select any value within the set range.
- Stepped: Visitors can select specific, incremental values within the set range. Set up the following options:
- Set steps by: Click the drop-down and choose how you want to set the steps:
- Number of steps: You choose how many steps appear in the range slider. Enter the number of steps in the Steps field.
- Step value: You choose the value increments of each step, up to 100. Enter the value of the increments in the Value field.
- Value labels: (Optional) Enter a prefix in the Prefix field to have it appear before the value (e.g. $). You can also enter a suffix in the Suffix field to have it appear after the value.
- Set steps by: Click the drop-down and choose how you want to set the steps:
- Value range: Set the maximum and minimum values available in the slider. Then set the minimum and maximum selected value range.
- Accessible name: Make your slider accessible by entering a short description of what the slider is used for.
- Click the Layout icon
 to adjust the following:
- The size and shape of your range slider handles.
- The track height (thickness) of the track that the handles slide on.
- Choose a Left to right or Right to left range display direction.
- Adjust the alignment, offset, and spacing around the field title.
- (Steps only) Choose a layout: Lines or Dots.
- Click the Design icon
 to choose a preset design and customize it further.
- Click Settings to customize the following:
- Click Preview to test your range slider.
- Click Publish if you are ready to make the changes go live.
