

Velo: About Web Module Permissions
2 min
Visit the Velo by Wix website to onboard and continue learning.
Note:
You should have already learned about Web Modules before reading this article.
Web Module permissions allow you to control which users can work with functionality in your site that depends on your Web Module functions.
Setting Web Module permissions allows you to ensure that no one can access or use your backend code in ways that you didn't intend, either through your site's functionality or using a browser's developer tools.
Setting Web Module permissions allows you to ensure that no one can access or use your backend code in ways that you didn't intend, either through your site's functionality or using a browser's developer tools.
Web Module permissions example
The following example shows how backend functions with added permissions can only be called by certain types of site visitors.
This example was created using the following code:
1import { helloAnyone, helloMember, helloAdmin } from 'backend/helloModule';
2
3$w.onReady(function () {
4    $w('#anyoneButton').onClick(async () => {
5        try{
6            $w('#responseText').text = await helloAnyone();
7            setupGoodResponse();
8        }
9        catch {
10            $w('#errorText').text = 'Backend call failed. Are you sure you are an anyone?';
11            setupBadResponse();
12        }
13    });
14
15 $w('#memberButton').onClick(async () => {
16        try{
17            $w('#responseText').text = await helloMember();
18            setupGoodResponse();
19        }
20        catch {
21            $w('#errorText').text = 'Backend call failed. Are you logged in?';
22            setupBadResponse();
23        }
24    });
25
26 $w('#adminButton').onClick(async () => {
27        try{
28            $w('#responseText').text = await helloAdmin();
29            setupGoodResponse();
30        }
31        catch {
32            $w('#errorText').text = 'Backend call failed. Are you sure you\'re the admin?';
33            setupBadResponse();
34        }
35    });
36});
37
38function setupGoodResponse() {
39    $w('#errorText').hide();
40    $w('#responseText').show();
41}
42
43function setupBadResponse() {
44    $w('#errorText').show();
45    $w('#responseText').hide();
46}
You can experiment with this example for yourself on our Hello Web Modules example page.
To set Web Module permissions
- Hover over your Web Module, click the settings icon
 , and select Edit Web Module Permissions.
 - The Web Module Permissions panel opens, which displays each exported function in your Web Module. Functions that are not exported are not listed.
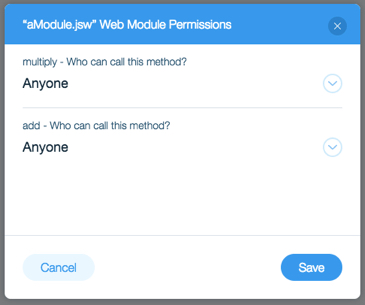
- Click the dropdown next to each function to define its permissions. The choices are:
- Admin. The administrator of the site.
- Site member. Anyone who has logged in to the site.
- Anyone. Anyone visiting the site.
Note:
By default, permissions are granted to Anyone for all the functions in your Web Module.
Hire a Velo Web DeveloperNeed a little extra help with your site? Hire a developer from the Wix Marketplace to build and deploy advanced web applications.
