

Wix Bookings: Setting Up the Service List Element
13 min
In this article
- Step 1 | Add the service list element
- Step 2 | Customize the layout of the service list element
- Step 3 | Customize your service list display settings
- Step 4 | Edit the text on the service list element
- Step 5 | Design the service list element
- FAQs
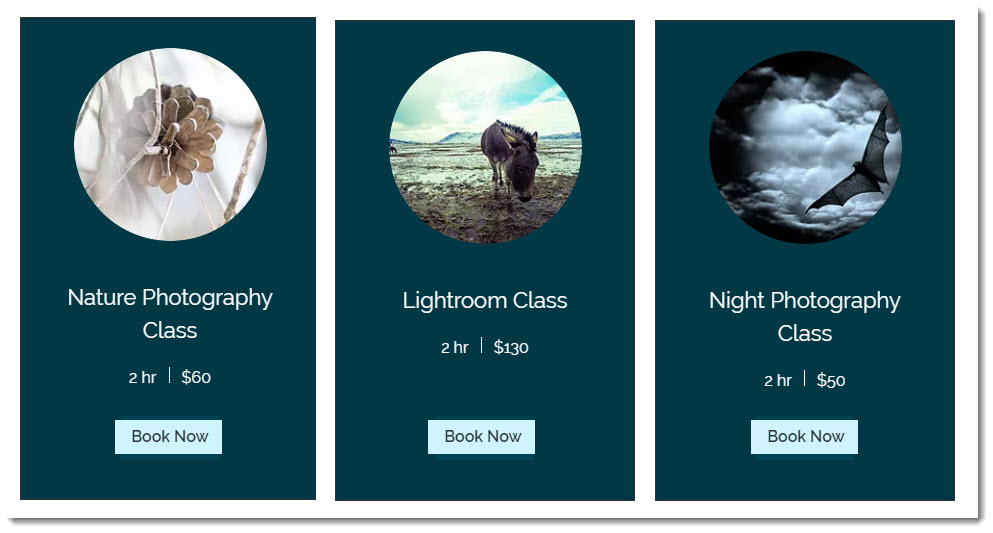
Your service list displays all the classes, courses and appointments you offer on your site. You can display everything on one page, or divide services by category on different pages. You can also customize the service list's design to suit your brand.
Step 1 | Add the service list element
Add a service list element to your page and display the services you want to promote. You can update the services displayed on this list as your business grows and you offer more services.
Wix Editor
Studio Editor
Wix Harmony Editor
- Go to your editor.
- Go to the page where you want to display your services.
- Click Add Elements
 on the left side of the editor.
 - Click Bookings.
- Click Service List.

- Drag the Service List element onto the page.
- Click the Service List widget.
- Click Settings.
- Click Services.
- Under How do you want to choose which services to display?, select the relevant option: Choose by service category, Choose by service location, or Choose services directly.
- Click the checkbox next to the relevant categories, locations or services you want to display. The options you see depend on your choice in the step above.
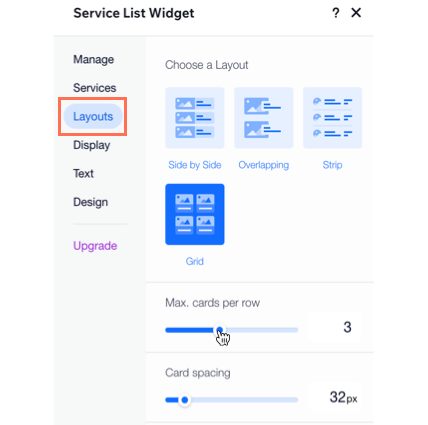
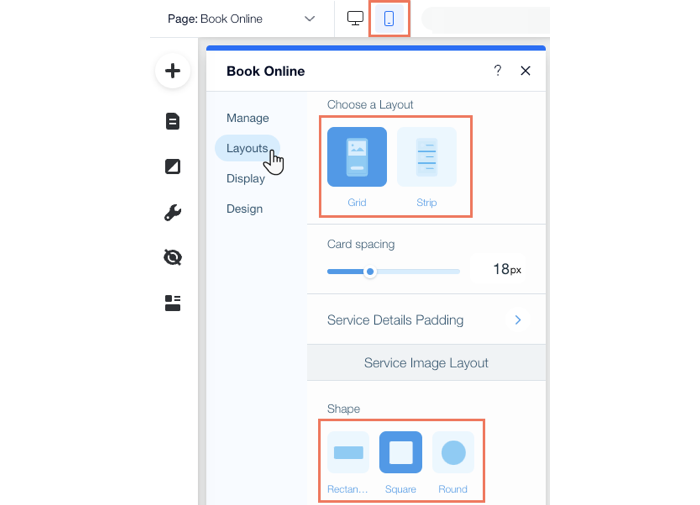
Step 2 | Customize the layout of the service list element
Customize the layout of your service list to showcase your services and get more bookings. As the number of services you offer grows, you can adjust the layout to keep things clear.
Wix Editor
Studio Editor
Wix Harmony Editor
- Go to your editor.
- Click the Service List element.
- Click Settings.
- Click the Layouts tab.
- Customize the layout of your Service List using the options:
- Choose a Layout: Select a layout for your Service List. Set the Max cards per row, if applicable to your chosen layout.
- Spacing: Set the spacing between your services in your list.
- Service Details Padding: Set the padding around the edges, and above and below your service details.
- Image Layout: Depending on the layout, choose the position, shape and cropping of the images in your Service List.
- Text Layout: Set the alignment for the list title and service text.
- Service List Tabs: Choose how you want to display and align your tabs.
Step 3 | Customize your service list display settings
Next, adjust the display settings on your service page to add more details about your services. This is a great way to sort your services and choose what you want to display. You can also show course availability and service actions, including a book now button or a button which takes clients to your membership plans.
Wix Editor
Studio Editor
Wix Harmony Editor
- Go to your editor.
- Click the Service List element.
- Click Settings.
- Click the Display tab.
- Customize the display of your Service List using the options:
- Show title on Service List: Enable the toggle to display the service list name. This is useful if you have several service lists on different pages.
- Show tabs on Service List: Enable the toggle to show different categories of services.Then set up the following:
- Use tabs to filter by: Choose how you want to filter the tabs:
- Categories: Choose this option if you offer a variety of different services.
- Locations: Choose this option if you offer the same services at several locations.
- Show tab with all services: Click the checkbox to allow your clients to view a complete, unfiltered list of your services.
- Use tabs to filter by: Choose how you want to filter the tabs:
- Service Details: Choose the displayed services and where clicking takes visitors:
- What would you like to show? Select checkboxes next to each detail you want to display.
- Clicking on the service name or image will take clients to the: Select whether your clients go to the Booking Calendar or the Service Page when they click the service name or image on the service list.
Note: By default, the service list is set up to send visitors to the Calendar page when they click a service name or image.
- Course Availability: Enable the toggle to show the current status of a course, for example, "6 spots left" or "fully booked". Then choose what you want to display:
- Number of spots left: Show the exact number of spots left on the course.
- Availability text: Show that there are still spots available, without showing the exact number.
- Service Actions: Select the relevant checkbox:
- Book Button: Display the Book Now and More Info buttons on your service list.
- Explore Plans Link: Display a link to your Plans & Pricing page where clients can buy a membership or package.
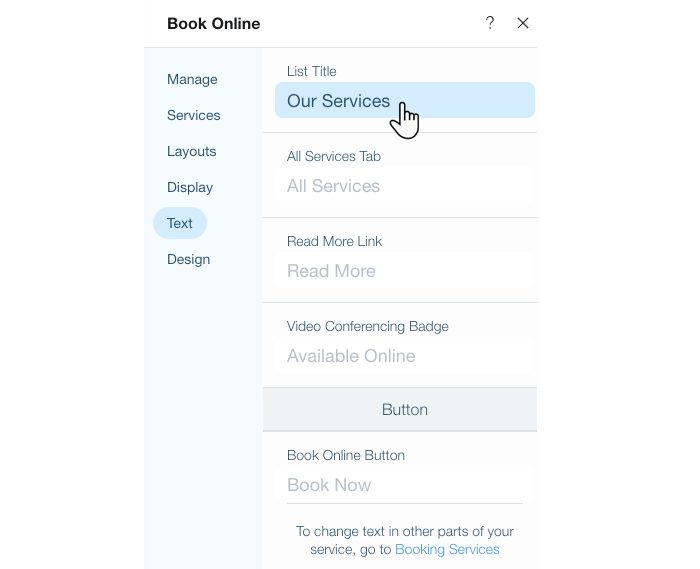
Step 4 | Edit the text on the service list element
Now that your display settings are clear, you can edit the text that guides your users through your service list. Customize the title and tab name, encourage clients to view details and book sessions.
Wix Editor
Studio Editor
Wix Harmony Editor
- Go to your editor.
- Click the Service List element.
- Click Settings.
- Click the Text tab.
- Customize the text on your service list:
- Text: Edit the List Title, All Services Tab, Read More Link and Video Conferencing Badge.
- Course Availability: Edit the Availability text and No availability text.
- Service Actions: Edit the Book Online Button, More Info Button, Request Booking Button, View Course Button, and Explore Plans Link.
Step 5 | Design the service list element
Once you're happy with your service list text, customize the design of your service page to fit your site and your brand. You can personalize the background and dividers, the text style and the button design.
Wix Editor
Studio Editor
Wix Harmony Editor
- Go to your editor.
- Click the Service List element.
- Click Settings.
- Click the Design tab.
- Design your Service List using the options below:
- Background & Dividers: Use the sliders to customize the opacity, color borders and more of your background and dividers.
- Text Style: Click the Text icon
 to edit the style, color and font of each piece of text on the service list.
Note: If the title is hidden, you can go to the Display tab to make the title visible. - Service Actions Design: Choose a style for Book Button and Explore Plans Link a font and color and adjust the button background and opacity.
- Tab Design: Choose the standard design for your tabs, including text font and color, and Divider Opacity & Color. Note: You only display tabs when you have more than one location or more than one category in your service list. Enable the Show tabs on Service List toggle in the Display tab to show different categories of services.
FAQs
Click below to learn more about setting up your Service List.
How do I adjust the layout on mobile?
Why can't I see tabs?
