Workflows: Automatically Moving Cards or Responding to Card Moves
4 min read
Automations allow you to focus on the bigger picture by taking care of smaller tasks for you. With Wix Workflows, you can set up automations that automatically move workflow cards or automatically respond to workflow card moves.
For example, you could move a card to the "Contacted" column when you send the contact a message, or automatically create a task for your team when a card is moved to the "Price Quote Sent" column.
In this article, learn more about:
Automatically moving workflow cards
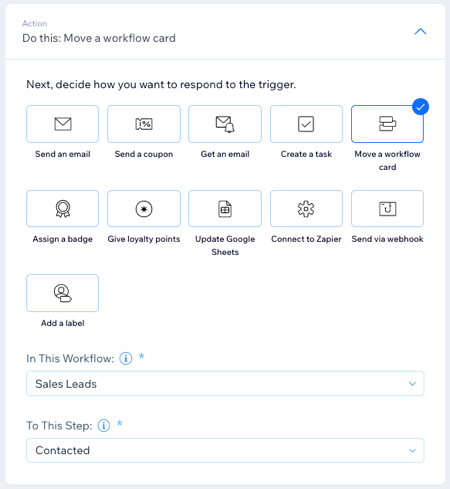
All automations consist of a trigger and an action. To automatically move workflow cards, you need to set a trigger that causes the action "Move a workflow card" to occur. For example, you can choose "Invoices" as the trigger if you want to move a contact's card to another workflow step once they pay.
To set up an automation with "Move a workflow card" as the action:
- Go to Automations in your site's dashboard.
- Click + New Automation in the top right corner.
- Click + Start from Scratch.
- Click the title to give your automation a name.
- Click the app you'd like to base your trigger on in the Trigger section.
- Select your chosen trigger from the available options.
- Click Move a workflow card in the Action section.
- Click the In This Workflow drop-down to choose the workflow you want to automatically update.
- Click the To This Step drop-down to choose the step you'd like to automatically move a card to.
- Click the Timing section to expand it.
- Click the Choose a time to send this action drop-down to select when the action should be carried out:
- Immediately: The action is performed as soon as the trigger occurs.
- Set custom time: The action is performed after the trigger, at a time set by you. Click the up and down arrows to set the number and click the drop-down to choose between days, hours and minutes.
- Click the Limit frequency to drop-down to set trigger frequency:
- Don't limit (trigger every time): Your action will take place every time it is triggered.
- Once per contact: Your action will take place only once per contact.
- Once per contact every 24hrs: Your action will take place only once per contact in any 24hr period.
- (Optional) Click + Add an Action at the bottom to set up a multi-action automation.
- Click Activate to save your new automation.
Important:
Cards cannot be moved back to previous steps using automations. Automations can typically only move cards forward in a workflow. The exception to this is cards in a "Completed" or "Archive" column - in this case, a new card will be generated for a contact when the automation is triggered.
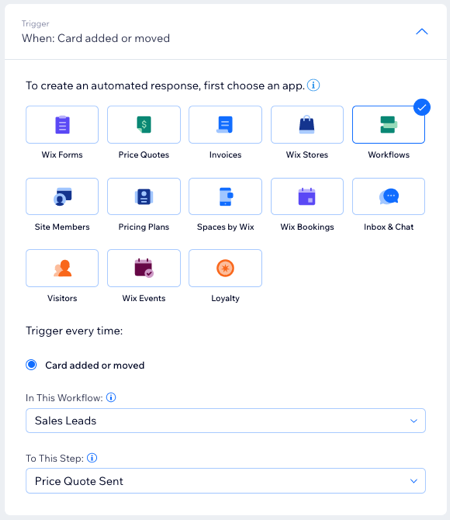
Automatically responding to workflow card moves
All automations consist of a trigger and an action. To automatically respond to workflow card moves, you need to set "Workflows" as the trigger and choose an action that will occur next. For example, you can choose the "Create a task" action to have a task created for a teammate when a contact's card moves to a specific workflow step.
To set up an automation with "Card added or moved" as the trigger:
- Go to Automations in your site's dashboard.
- Click + New Automation in the top right corner.
- Click + Start from Scratch.
- Click the title to give your automation a name.
- Click Workflows in the Trigger section.
- Click the In This Workflow drop-down to choose the workflow you want to act as a trigger.
- Click the To This Step drop-down to choose a step. This automation will be triggered when a card is added or moved to this step.
- Select your chosen action in the Action section and set up the action using the available options.
- Click the Timing section to expand it.
- Click the Choose a time to send this action drop-down to select when the action should be carried out:
- Immediately: The action is performed as soon as the trigger occurs.
- Set custom time: The action is performed after the trigger, at a time set by you. Click the up and down arrows to set the number and click the drop-down to choose between days, hours and minutes.
- Click the Limit frequency to drop-down to set trigger frequency:
- Don't limit (trigger every time): Your action will take place every time it is triggered.
- Once per contact: Your action will take place only once per contact.
- Once per contact every 24hrs: Your action will take place only once per contact in any 24hr period.
- (Optional) Click + Add an Action at the bottom to set up a multi-action automation.
- Click Activate to save your new automation.
Did this help?
|